Friday, May 30, 2008

FINE SILK YARNS AND HUMIDITY

LLILLIAN WHIPPLE AND WEAVECAST

I listened to Syne's  interview with Lillian Whipple on her WeaveCast episode devoted to fine threads -- Episode 11.  Though my threads are not quite as fine as Lillian's (she often weaves with 2/240, for example), still what Lillian Whipple had to say was of use to me. 

STATIC ELECTRICITY

Of particular interest was that Lillian reinforced my growing suspicions that many of my problems working with silk are due to static electricity.

BOMBYX SILK PROBLEMS

To be honest, I have had these same problems when weaving with Bombyx silk, but on a much smaller level. The silk organzine has, thus, really only magnified these issues. As a result, I have been forced to deal with them.  Now I should be able to handle them with bombyx silk as well.

HUMIDITY LEVELS

This whole notion of static electricity being a source of my problems with silk has taken me rather by surprise. I like to keep our house humidity between 40% and 50% because that is optimal for humans and that level of humidity also helps to keep pollen particles down on the floor instead of up in the air. But in the summer with air conditioning going, that is really really hard. In the summer, the only room I can successfully keep at those humidity levels is our bedroom. 

During the day, in the summer then, ambient humidity in the house tends to run around 30-35%.  I guess that is too dry for silk!

LINEN

Weaving with linen, by the way, poses similar problems................  Susan had reminded me of this in one of her comments, reminding me there as well of how I had soaked my plastic pirns wound with linen overnight before weaving with them.  And I had sprayed the warp with water as well when I was getting ready to weave.  Perhaps here are some more answers?

Related Post: 

Static Electricity
Skeins Dyed
Those Pesky Selvedge Loops Again

© 2008
Thursday, May 29, 2008

I THOUGHT I WAS DONE DYEING...

...until I noticed that the dark green I had dyed, the same day as I was dyeing the magentas, was not dark green. I had made another one of my arithmetical errors.

1% DOS VERSUS 4% DOS

My intention was to dye that particular green at 4% depth of shade. That is very dark. Most dyers would not go over 4% unless they were dyeing black. I looked at the numbers I was using. It turns out that I was actually dyeing at 1% depth of shade. That should, and indeed did, yield a fairly light green.

MAKING THE DYEING TIME WORTHWHILE

The idea of spending all that time to dye just a small bit of yarn got to me. So I decided that I would dye 200 yards instead of 50 yards. That is the amount I should have dyed in the first place because, if it works as I think it will, I will be using it as a major color, not as an accent.

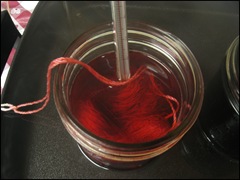
I also decided I really did need a full-fledged scarlet. So I went with the pure Sabraset Scarlet and dyed 200 yards of that as well. Here is a picture of said scarlet simmering in the dye. You can just see to the right of it the dark green. And it is dark....... Just what I wanted.

Scarlet

Related Post: I Really Ought Not To Be A Dyer

© 2008

Wednesday, May 28, 2008

DYEING MORE REDS

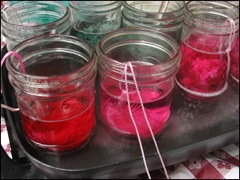
Here are some more reds (and greens not very visible at the back) that I am dyeing for the next piece(s).

some reds and greens

Another watery picture which I like, though not as effective as the the photo of the yellows.  I decided I wanted some strident magentas.  But something peculiar happened.

SCARLET VERSUS MAGENTA

The brilliant red on the left is the exact same color as its neighbor to the right--pure, unadulterated Washfast Acid Magenta.  The left one is dyed at 2% depth of shade.  Its neighbor is dyed at 1% depth of shade.  The one on the left, dyed at 2% DOS clearly verges on scarlet.  In real life, the magenta cast is obvious but it still leans very close to scarlet. But the neighbor to the right, dyed at 1% DOS, is clearly magenta.

THE IMPORTANCE OF SAMPLING

The next two red jars (the second one barely visible) are also dyed with Washfast Acid magenta at 2% and 1% depth of shade resepectively.  But to them I added a bit of blued green to take the edge off a bit.  What is interesting is that the 2% magenta with the blued green added looks much more magentish than the 2% pure magenta! 

When I added the bit of blued green to the two jars of magenta, I was flying by the seat of my pants, so to speak.  That is, I was using my eye to judge how much to add. I had not, in other words, done any sampling.

THE POWER OF MAGENTA

When I added the bits of blued green,  I "knew" intellectually that WF Acid Magenta is a very potent dye;  now I now experientially as well!  And i know also know that visual judging is not necessarily a particularly good idea.

© 2008

Tuesday, May 27, 2008

STATIC ELECTRICITY

In the process of dyeing the yellows I discovered that this silk carries a tremendous amount of static electricity.  When I went to put the dry skeins into the soaking solution those yarns danced the merriest of dances in their attempts both to avoid the water and to avoid each other.   Perhaps this static electricity plays into the problems I have been having with skeins in general and with the little bumps and loops in the fabric?

Related Posts:

Trouble in Paradise
That Badly Snarled Skein of Yarn

© 2008

Monday, May 26, 2008

DYEING YELLOWS

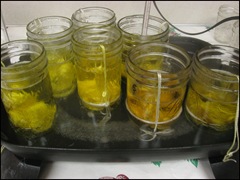
I am doing some more dyeing in preparations for weaving more pieces on this warp. Here is a pan of yellows in the process of "cooking."

some yellows

I'm rather fond of this picture. I like the wateriness of the colors. And I think this wateriness is intensified by the steam rising out of the jars and out of the pan itself. Click on the picture to enlarge it and you will see what I am talking about.

I am dyeing yellows because I have very little in the original dyed yarns. Here I am trying to get some variations, both in color and depth of shade. I am intrigued by what is happening to the jar on the far right. I added just a bit of violet to it to make the yellow just a little drab. It's hard to tell from the picture but it is probably the most potentially interesting of the colors.

Related Post:
Yellow + Violet
Neutral Dye Samples: Yellow plus Violet

© 2008

SMALL PIECES

I notice that that Nicki, aka The Weaving Diva, has taken up the American Tapestry Alliance's challenge to weave a small tapestry. The maximum size allowed is 100 square inches.  That is indeed small.

So I can understand Nicki's reluctance to enter.  Go here to read about her hesitancy and her beginnings.

In this first post she includes part of ATA's statement about the requirements.  Here is a brief excerpt: 

"...the goal is not merely to rescale large work, but to explore the boundaries of size"

And go here to read about her progress. And a statement of what she hopes to do I find of particular interest in that post:

"I am hoping for a piece that will draw you in from afar and keep you interested when up close. I know it would work on a big piece. This may, however, be difficult to achieve due to the small format involved but it should be fun to try."

WHAT THIS MEANS FOR ME

Both these statements speak to what I am trying to do, even though I am not creating tapestry. 

  1. I want to create pieces that are small, not simply shrunken versions of larger pieces.
  2. I want to create pieces that are exciting to look at both from a distance and close up.

HGA has a similar challenge for its Convergence exhibit called Small Expressions 2008. HGA's intention here is

"...to showcase fiber art of a small scale not to exceed 15 inches (38 cm) in any direction."

My work is clearly falling into that scale.  Perhaps at some point I may create a piece to submit.  But not to the 2008 Convergence!  Something to work towards, perhaps?

Friday, May 23, 2008

ART PIECE #1 DONE

Except for the hemstitching...........

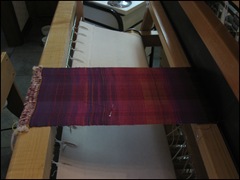
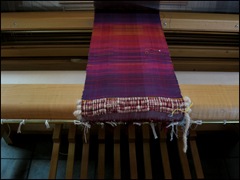
I have included two views to give some indication of the relative size. On the loom the piece measures 7.25" in width x 14" in

art piece 1 from side

art piece 1 from front

length. A comment has been made that it seems like a large piece. I must confess that even in these photos it appears to my eye to be much larger than it really is. I can only think that it must have something to do with the boldness of the colors.

Speaking of colors, the orange at the top is wrong. It is really yellow but for the life of me I could not get it to be yellow with my software. I am going to have to look at my PaintShopPro manuals, I guess!

Also, the piece as seen from the side looks a bit wavy near the bottom half. But that should block out nicely with washing and hard pressing.

It is difficult to see where the piece ends at the reed because the reed shades out the top of the piece. Also, the top of the piece includes the possibility of a hem through which to place a hanging rod. I'm thinking of a small dowel rod which I would paint or stain. I would gratefully receive ideas!

I am eager to get to the next piece. I have wound 15 small skeins for dyeing -- 50 yards each skein. I have the dye formulas made up....on paper that is. Next week dyeing begins.

FRIDAY LINKS TO POSTS FROM OTHER BLOGS

Tying the Warp to the Front Rod -- Willington Weaver
New Tricks and Resources --  Thrums 
Books..........  -- The Twisted Warp
Beaters --  Fun with Fiber
Inch by Inch ---t'katch - the language of weaving
warp, weft, and........      t'katch - the language of weaving (This is not your ordinary loom       weaving.........)

The following two posts from Weaverly are each relevant to the other:
The Deep Waters of Randomness   
Deliberate Randomness   

This Month's Work --   Homespun Work  (To translate this from Japanese, go to Google's Translate Tool found here.)  Yarn Calculations --  Dot's Fibre to Fabric (Note that this is for those readers who work with the metric system.   But even if you don't, read it anyway! )
A Weaver --  A Movable Feast
Welcome Home, Old Friend --     Sandra's Loom Blog 
Leno and me -- Tauret
Book Review: The Handweaver's Pattern Directory --  Cherri Hankins
I'm Getting Bored with This --Leigh's Fiber Journal

SOME BLOG POSTS FROM NON-WEAVERS

From a textile artist:
Subliminal Color Influences --  Studio 78 notes

From another textile artist.  Off topic maybe, but worth a read:
Downloading -- Albedo Design Journal

From a blogger, but good advice for weavers, especially weavers who do commissions, even on a casual level
What I Learned From Free-Lancing - Good Habits Rock -- Liz Strauss at Successful Blog

© 2008

Thursday, May 22, 2008

WEAVING AND SURFACE DESIGN

Constance Rose recently posted a picture of one of her water color paintings.  Go here to see it. In that post she explains that this is the kind of things she wants to use with her woven textiles.    She explains:  

" I am aiming to do similar work, soon, on fabric I have woven. I'm hoping to raise the bar on art cloth by weaving my own textiles to paint, dye, print on, bead and sew on, distress, whatever."

I have had similar thoughts on many past occasions.  The problem for me, I decided, is that I cannot figure out how to integrate the woven cloth into the painting, printing, distressing or whatever.  It is not that I regard my weaving as somehow too "precious."  It is that I cannot answer the question as to why use a handwoven fabric to apply these processes to. What does the handwoven fabric add to the final piece that could not be accomplished with purchased fabric?

WOVEN SHIBORI

Woven shibori* is a technique which does integrate the weaving with the dyeing and the painting.  But, limited as my imagination is, I cannot imagine any other way of integrating the usual surface technique processes with the weaving process.  What quality does a handwoven fabric possess that both enhances and is itself enhanced by any given surface design technique?  And what weaving structure would I use and why?

DIGITAL PRINTING AND WEAVING

Cally has come up with something interesting relative to all this, as I posted quite recently.  Go here to read her post, which is extremely clear and well done. 

The kind of weave structure that was used to create interesting effects with printing was a weave structure which went back and forth between warp-face and weft-face. Though what she saw in the exhibit was apparently digital printing, there is no reason non-digital printing and screen-printing techniques could not work just as well.
 

*For a good description of woven shibori, with lots of images, go here  And you can see some of Constance Rose's woven shibori work here and here and to see her process go here and here

Related Post: Loom Imposed Order

© 2008

Wednesday, May 21, 2008

PAINTING A MOCK-UP -- WITH PAINT OR COMPUTER SOFTWARE

Some of the dissatisfaction I expressed a recent post might be helped by painting my ideas first. I am not talking about any kind of detailed painting, the cartoons that tapestry weavers do, for example. I do think cartoon might not be a bad word. What i am talking about would be simply a painting that roughs in the colors with approximate proportions. What to do within the roughed-out colors would be determined at the loom.

"PAINTING" ON THE COMPUTER

I would probably "paint" on the computer simply because that would be easier. I think, too, it could be just as effective. But I would want to blow it up to the actual size of the weaving. Perhaps I can do this while I am dyeing the additional colors I am going to need.

A recent email helped to generate this line of thinking. In that email I learned that Sally Breckenridge, who created the weaving software called has now created a new weaving software program. This program is called GridN'WeaveIt

GRID'N'WEAVEIT

Grid'N'Weaveit is a graphics program is similar in some basic respects to other graphics programs such as Paint Shop Pro. But Sally's software enables you to create your graphic as a woven image. One thing of interest, for example, is that you can use your warp and weft lines as grids.

The intended audience is tapestry weavers and rug weavers. I wonder if it might be helpful to me? A thought. Unlike tapestry and rug weaving, however, my crackle weaving depends on the interaction of warp and weft. I could probably get just as good a overall idea of where I want to go in a piece by painting or with ordinary graphics software.

PAINT SHOP PRO AND PAINTER

Meanwhile, for my one of my next art pieces, I may work with Paint Shop Pro. In recent years, this software has become largely a tool for photographers in its most recent incarnations. For the serious computer artist Corel has has focused on developing Painter. Unfortunately its price tag puts it out of my league. Or maybe fortunately, for I suspect it would be mostly a distraction to the work I really want to do.

Paint Shop Pro still has the tools I need to do the kind of "painting" I might need to do.

Related Link: Designing Plaids and Corel Painter

© 2008

Tuesday, May 20, 2008

DIGITAL PRINTING ON WOVEN FABRIC

Cally has written a marvelous post about an exhibit she went to where she saw handwoven fabric which was also digitally printed.   She makes it very clear how she thinks it was done and conveys great enthusiasm over the possibilities this method of working hold.

I have always had some difficulty with the notion of surface design on handwovens.  But Cally has revealed possibilities for surface design where the weaving is integral to the surface design itself.

Go here to read the post.

© 2008

WHY A TEMPLE ON THIS WARP?

Have I mentioned that I am using a temple?  That I am using a temple despite a statement in a post made in July of 2007?  A statement in which I explained that I do not normally use temples with narrow warps or with closely sett silk warps?   Go here to read that post and see some pictures of temples.

So what am I doing using a temple on a warp that is 7+ inches wide, is made up of fine silk, and is very closely sett?

WITH AND WITHOUT THE TEMPLE

I started weaving with a temple but at one point I decided to try weaving without one.  The sides did begin drawing in more than they did with the temple.  I wanted the absolute minimum draw-in because I did not want the blocks at the ends to be narrower than the rest of the blocks. I had, however,  added more units in those blocks to help compensate.

Also, because the warp is so closely spaced, it is difficult to beat the weft yarns in.   The temple, by stretching those ends out, helps me to beat them in.

HOLES AT THE SELVEDGES

If you click on the picture from an earlier post, however, you will see one reason many weavers don't like to use temples: the many little holes the teeth of temple leave in the selvedges.  These little holes are happening here because of the extreme tightness of the weave structure.   By the next day, however, the woven cloth has clearly relaxed because the holes are gone.   

A WARNING ABOUT MY POSTS

So, as I wrote in another post on temples:

"A warning about my posts. I am always learning. What I say here today may well be different next year. I may have learned, for example, that my current skills (or lack of them) at winding on warps may have been leading me to use a temple as a crutch. I don't think so, but it's always possible." 

Go here to read the entire post.   

© 2008

Monday, May 19, 2008

PROGRESS ON CRACKLE ART PIECE ONE

art piece 1 partly woven

I am making progress.  Actually I am close to being done.  Two or three more inches of weaving should do it.

REPLACEMENT WARP END

The white headed pin on the right is temporarily holding a replacement warp.  There was a knot in the original warp end so I had to put in a new one.

CONFIDENCE GROWING A BIT

I am not unhappy with the piece.  Visible is the improvement in my selvedges, as I talked about in my previous post.  I am also beginning to understand how color works with this structure and treadling.  This means that next time I can play a bit more with threading variations.

YELLOW A PROBLEM

Right now what I am most unhappy with is the big patch of yellow I am currently weaving.  Instead of keeping the yellow in the same treadles for that inch or so, I think it might have been better to put it in different places and cut the blockiness of the effect.  Blockiness is what I was after right here.   But I don't think it works with the rest of the piece. Either the whole piece has to be blocky or not.  Or perhaps it is just the proportion of yellow that is off. Of course, the piece isn't quite done.......

© 2008

THOSE PESKY SELVEDGE LOOPS AGAIN

The loops at the selvedge were becoming less frequent.  But they were still there.   So I added a new trick.  Before I throw a shot (well, actually, before I  hand a pirn through the shed), I decided to pull that weft yarn a bit to make sure it was tight there.   Two things happened after that.  First, the loops have disappeared.   Second, when I pull on a weft yarn I sometimes see a loop that I am pulling out.

So I am now pretty much using three "tricks" to get the weft thread laid in correctly. 

  1. First, I clear the shed down at the fell.  I have to do this on only two of the six treadles. 
  2. Then I have to pull the weft yarn away from the selvedge before I hand that pirn through the shed from one hand to the other. 
  3. Then I have to loop the weft yarn coming through the shed over a finger of the receiving end with just a bit of tension, and then beat the shed while i let the weft slide over that finger.

None of this is habit right now, so weaving is taking intense concentration, simply from a technical point of view.   I have, I think, five yards of warp on.   Will all this have become a habit by the end?!!!!

© 2008

Saturday, May 17, 2008

COLOR-AND-WEAVE: THREE COLORS

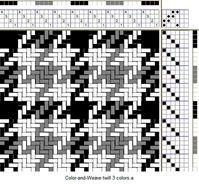
Color-and-weave twill 3 colors.a

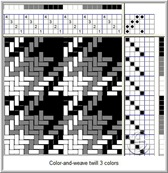
Color-and-weave twill 3 colors


Here are two examples of four-shaft straight draw twill, treadled straight.   This time, however, three colors are used. Each of the draft has a different color order.   And each of the drafts follows the color order of the threading in the treadling.

The left draft looks remarkably like the classic hounds tooth check.

LARGE DESIGNS

Notice how with color-and-weave that you can get larger designs than you might think possible, even with a four shaft loom.

TEXTURES

Instead of two or three colors, yarns with two or three different textures can be used.

Related Post:   Color-and-Weave

© 2008

Friday, May 16, 2008

DESIGNING

Anybody who has read my blog for a period of time knows that I design my own weaving. For any who would like to try but doesn't quite know how to go about it, or for any who have tried but has given up, there is a very good how-to piece for beginners available on the internet.  It is written by Syne Mitchell of WeaveCast fame and it appears in her latest edition of WeaveZine.  Go here to read the piece.

© 2008

ART PIECES, NOT MASTERPIECES

Cally brought me to my senses. She said about my fears of self-delusion:

"I think an artist is always to some extent dissatisfied with what they produce, because that is part of the motivation to keep working, and some things will necessarily be more pleasing to you than others and some things will probably turn out crummy. But if you waited until you were perfectly happy with your work before you called it 'art' then you would never get started at all...."  

What wonderful common sense!

The point is NOT me; the point is the work.  This piece is only the first.

And the pleasure is in the work.  And the joy is, not in the finishing, but in the doing, in the critiquing (yes, even in the critiquing), and in the imagining.  Maybe not in the threading.........(grin!) 

The weaving is NOT about me;  it is about the work.

Related Post: Weaving Masterpieces  

© 2008

Thursday, May 15, 2008

TROUBLE IN PARADISE

If you clicked on the picture in the previous post, you saw a lot of little loops of weft yarn at the selvedges, especially the left selvedge. But there is yet another problem. It is invisible in that picture. On the reverse side of the cloth there are occasional lumps of yarn. Theses lumps are actually little loops where the weft didn't stretch out fully.

So much for my "euphoric bliss."

All this makes me particularly unhappy because otherwise this piece is revealing itself nicely

SHEDS AND LOOPS OF YARN IN CLOTH

However, I see solutions beginning to shed not totally clear happen. One thing I started to notice was that the sheds were not always clear right down to the fell of the cloth. In this image you can see that. I suspect that one thing that was happening on these sheds was that the weft was occasionally getting caught up and pull out by the misaligned warps at the fell. So now I use my hand to clear any sheds that look like this. Doing that, I think, has taken care of the little loops on the underside. At least I don't seem to be feeling them anymore.

PIRN HANDLING

And I have settled down on an easy and effective technique of holding pirn and yarn after I have passed the pirn through. This probably accounts for the little loops at the selvedge beginning to clear up. I need more practice here in order to build up the necessary skill.

© 2008

Wednesday, May 14, 2008

CRACKLE SCARF MORPHS INTO...?

more woven

When I began weaving this crackle scarf, I kept looking at it. Looking at it with a question mark. I just didn't see a scarf. I didn't see the beginning of a scarf. I touched it. Frequently. It did not say "scarf." It kept saying---dare I say the words?--art piece.

There, I've said it. Saying it makes it more difficult for me to back away and change my mind. Saying it means commitment.

ART CLOTH VS ART PIECE

Constance Rose recently said it. Go here to read the post where she talks about her decision to commit to the creation of art cloth. Not art pieces; art cloth.

I Googled the phrase. Every site Google brings up links art cloth in some way with yardage and/or wearables. That is just how I viewed art cloth. I am not weaving art cloth.

I call what I am attempting to do an "art piece" because it will never have any connection with either yardage or wearables. (It won't even be a scarf). It will be closer to tapestry than to art cloth. But it will not be tapestry.

SELF-DELUSION IN SOLITUDE?

Am I simply deluding myself? Robert Genn sent out an email to his Painter's Keys subscribers. That email stopped me in my tracks. In it he talks about the dangers of working in solitude. Here is a passage that made my blood run cold::

"We all know of artists who are forever in a state of euphoric bliss about their essentially crummy art. These folks may rationalize that joy itself is enough, but it isn't. Pleasing yourself is loaded with potential self-deceit."

This is the danger of working in solitude. And since moving to South Carolina, I am definitely a solitary weaver.

TROUBLE IN PARADISE

However, while I may be finding myself in a "state of euphoric bliss," there is trouble in paradise. Trouble of a technical nature.

To read Genn's entire piece, called Kalopsia, as well as comments made by his readers, go here.

Related Links

Weaving and Art
Weaving as Fine Art
Fiber Art as Fine Art

© 2008

Tuesday, May 13, 2008

BEGINNING THE SCARF

beginning weaving


I have begun weaving the first four inches of the scarf.  Not bad progress despite the slowness of the weaving. 

WEAVING WITH PIRNS

I have learned that with these fine threads and the frequent changing of colors, it is difficult to use end-feed-shuttles.  Actually, the easiest way to weave seems to be simply using the pirn itself without the shuttle.   I can easily move the pirn through the shed from one hand to the other.

Using a bare pirn, moreover, certainly beats continually changing the pirns in the shuttles!

LETTING THE WEFT YARN SLIDE

I have also figured out how to hold the thread on the pirn after it emerges so that the yarn slides from the pirn into the just woven fabric as the beater closes.  The end feed shuttle does this automatically, assuming, of course, that I hold my shuttle near the shafts.   But using a bare pirn, I have to do this manually.

Related Posts:

Throwing the Shuttle   
Slow Weaving  

© 2008

Monday, May 12, 2008

COLOR-AND-WEAVE

In an early April post, I mentioned that I wanted to use color-and-weave effects for a handspun shawl I plan to design. 

I also plan to use color-and-weave effects for some towels for my daughter.  She has looked longingly on two different visits at some old cotton dish towels I wove and has virtually begged for some. How can I deny her?!  Weaving dish towels would give me a chance to pretty much just throw the shuttle without having to do too much thinking about it.  Maybe I could even listen to music!

WHAT IS COLOR-AND-WEAVE?

Color-and-weave is not a weave structure.  It is a particular way of using color no matter what the weave structure.

More specifically, color-and-weave means combining a particular color sequence in the warp yarns with the same or a different particular color sequence in the weft yarns. The result is a fabric where color creates designs, not stripes. Two colors are most frequently used, but one can design color and-weave-effects with three or more colors.

SOME SAMPLE DRAFTS

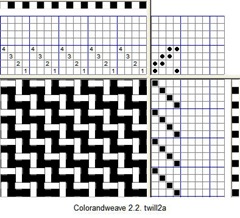
2.2.Twill2a

This first draft is a straight draw twill on four shafts.  It is threaded in two colors, alternating one by one. The treadling is a straight treadling.  And it too is treadled with two colors, alternating throw by throw.

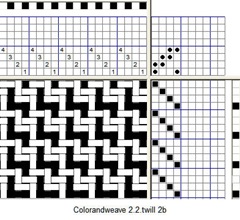
 2.2.Twill2b

Here is the same straight draw twill twith two colors alternating in the threading.  the treadling is also straight.  But now three shots of light weft alternate with one shot of dark weft.

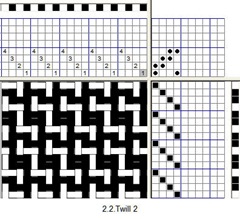
 2.2.Twill 2


Here is yet another treadling variant.  Now one shot of white weft alternates with two shots of dark weft. 

TREADLED FOR PLAIN WEAVE

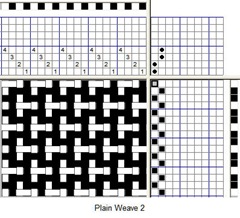
Plain Weave 2

And of course this threading could be treadled as plain weave. The result is still another color-and-weave effect.

BIBLIOGRAPHY

Here are three good books that I have which are devoted specifically to color-and-weave.

Ann Sutton, Color-and-Weave Design.   Go here for some interesting information on Ann Sutton.
Margaret B. Windeknecht, Color-and-Weave II
Margaret B. Windeknecht, The Pinwheel: An Exploration in Color-and-Weave Design

WEAVING PROJECT WITH PAPER

Also, Handwoven has a weaving project available on the internet about how to weave paper coasters using color-and-weave.  Go here to download it as a pdf file.

Saturday, May 10, 2008

LINKS TO POSTS FROM OTHER BLOGS

Here are some recent posts that I have especially enjoyed reading.

Dornik Twill and a Pink Cake -- t-katch - the language of weaving
Interstices -- Constance Rose Textile Designs
Reading My Life -- Constance Rose Textile Designs
Busy Weekend -- Woven Thoughts
Fine tuning --  Woven Flame
Trapeze -- Tien's Blog
Beginners -- Curiousweaver
The Great Comeback! -- Thrums
More MTW Samples -- Leigh's Fiber Journal
Geringsing from Tenganan -- A Movable Feast
Just One of Those Daze -- Funny Farm

© 2008

Thursday, May 8, 2008

VIEWING WEAVING DRAFTS

SAVE AS JPEG'S

I learned a while ago that I can save the weaving drafts I create with my weaving software as JPEG'S.  That is useful information with this blog.  It means I can easily save and upload weaving drafts to the blog.

"MY PICTURES" FOLDER

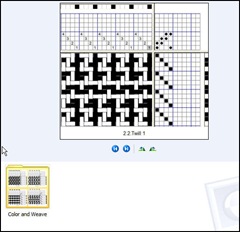
But I figured out something equally  screemsjpt of color and weave folder important.   I can save them to a folder in "My Pictures". My operating system is  Windows XP. When I click on the folder, it shows a normal view of one of the JPEG's in that folder.  And at the bottom of the screen are thumbnails of the rest of the JPEG's in that folder.  If I want to see any one of the thumbnails full size, I simply click on it.  Or else I click on one of the arrows beneath the normal view. This is an absolutely wonderful system.

CLIPPING SOFTWARE

In the weaving program I use, PixeLoom, I can save my drafts as JPEG's.  However, I prefer using a piece of software called Snag-It.  It is available here. With this program I can choose just how much of the draft I want to save as a JPEG.   I can create titles for the JPEG.  All sorts of things.   And I use it for capturing web site information as well.

In any case, if I am hunting for a draft, or if I want to see a group of them together, it is much easier to save the drafts as JPEG's into a folder in My Pictures and view them there, than it is to look at them individually in my weaving program.

© 2008

Wednesday, May 7, 2008

HEMSTITCHING ADDENDUM

This post is for anyone who might be wondering about all that strange weaving that precedes the hemstitching.

LIGHT BLUE WEFT AT BEGINNING

The first bit of weaving in light blue is done with 20/2 pearl cotton.  This is the weaving I did to make sure everything was right with the threading and the sleying. As you learned here and here, things were not right.

HEAVY WHITE WEFT

The shots of white weft consist of heavy rug yarn.  These are functioning simply as spacer yarns.  They will be easy to remove form the final cloth and leave me a fringe.

BRIGHT YELLOW WEFT

The little bit of bright yellow weft are shots of 20/2 cotton that I wove to get the warp ends back together.  I only wove a few because they will be hard to remove.  I used bright yellow so that I could see clearly where the needle was going when I did hemstitching.

© 2008

HEMSTITCHING

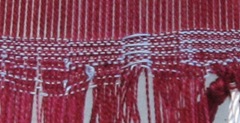
I have chosen to finish the edges of this scarf with hemstitching and to cut the fringes fairly short.  I could make long fringes and finish those with some kind of braiding.  I enjoy doing that.   But with silk this fine, and with the interest being focused on the scarf itself, I think short fringes with the edges hemstitched is best. 

Because I planned to hemstitch, I left extra warp on the right when I threw my first shot of weft.   The amount I left was approximately 4-5 times the width of the fabric.  This is the end I put in the needle to do the hemstitching.

HEMSTITCHING DIRECTIONS

For hemstitching I use the directions in Virginia M. West's, Finishing Touches for the Handweaver, revised edition. On page 16, she has a clear diagram on how to do it at the beginning of the weaving and a second clear diagram for the end of the weaving.   Until I found this, I felt like I was trying to twist my head around 180 degrees to figure out how to mirror the hemstitching at the other end!

hemstitching step 1

STEP ONE

Here in the first picture you step step one of the hemstitching.  The needle goes down into the chosen space at the bottom edge of the fabric. Then the needle comes up to the left, still on the bottom edge of the fabric.


STEP TWO

Here is step two. The needle goes back to the first space it went in at the right.  But hemstitching step 2 when it emerges at the left, it comes up about six weft yarns into the fabric.  In this case, that means to the top of the woven section.  I had thrown six weft shots because that was how deep I wanted the hemstitching to be.

You continue by returning to step one, inserting the needle into the bottom edge of the fabric where it had emerged in the first part of step one.

The Weaver's Companion also has good directions and diagrams.  Here, however, the hemstitching is done from left to right instead of right to left. It doesn't matter which direction you go, just as long as you are consistent.

SIZE OF HEMSTITCHED GROUPS

I am grouping 12 ends in a unit.   This is three dents worth of threads.  It is easy to run my needle between the groups up at the reed and then use my finger to run the division down to where I am hemstitching.  This is easier than counting out 12 individual warp ends.

TAMING SILK ORGANZINE WITH "THREAD HEAVEN"

I quickly learned that this silk organzine did not want to behave as a sewing/embroidery thread.  So I have lubricated it heavily with "Thread Heaven," now available at most chain fabric stores such as Hancock's or JoAnn's.   It is what sewers now use instead of beeswax.  It does a good job and doesn't have those little bits and pieces tof wax that would come off beeswaxed threads.  This organzine has become very sleek and docile.

Tuesday, May 6, 2008

DELETE YESTERDAY'S TO-DO LIST

Now I know why I waited until today to proceed with my to-do list.  I was apparently waiting for Cally to give me an absolutely brilliant solution.  And here it is:

"Would it be possible to tie up shaft 5 to work in parallel with shaft 4, or is it busy doing something else?"

Wow!

It worked!  Thank you, Cally.

© 2008

Monday, May 5, 2008

THREADING DIFFICULTIES

threading error Having fixed the crossed warp ends I proceeded to throw initial shots with 20/2 pearl cotton. I had not gone far when I saw that warp ends were not catching in one block.  That is happening where you see those long weft overshots in the middle of the picture.  Looking underneath will reveal that warps are totally not being caught.

CHECK THE THREADING

I checked the threading.  It was correct.   I tried treadling again.  One of the treadles still created long overshots in that block.

CHECK THE TIE-UP

Perhaps that treadle was not tied up correctly? I checked.   It was. I checked the threading again.   It was fine. 

And then I saw it.

WATCH THOSE SHAFTS!

I had placed the warp ends for shaft four (NB, this is a FOUR-shaft threading) onto heddles placed on shaft.......................FIVE! Of course any warp ends on shaft five would never be caught......

REPLACEMENT HEDDLES

I tried to go the replacement heddle route.  But when I tried to put one on shaft four, the heddle just got caught totally up into all the warp threads.  Using replacement heddles just wasn't going to work.

TO-DO LIST

So now what I get to do is:

  1. Tie together the warp ends that need to be threaded to keep them separated from the rest.
  2. Cut all the warp ends
  3. Slip knot groups of warp ends in front of the reed that do not need to be re-threaded.
  4. Pull the marked warp ends to be threaded through the reed.
  5. Pull those warp ends...........sob.......through the heddles.
  6. Rethread those warp ends.  113 warp ends.
  7. Resley those warp ends.
  8. Group warp ends into slip knots for lashing on
  9. Lash on the warp ends
  10. Adjust the warp tension
  11. Throw the shuttle to even out the warp ends and to check for crossed ends and threading errors.

Any volunteers?

Related Posts:
Who Spotted the Threading Errors?
Threading Error Revisited

© 2008

CROSSED WARP ENDS

Having lashed on the warp and gotten it evenly tension, I proceeded to throw the shots necessary to align the warp ends evenly. 

More problems.

Two sets of crossed warped ends.  These were easy to correct.  I was able to cut the ends off close to the knots.  Then I resleyed the ends in the correct dents so that they no longer crossed. 

Next I tied on an extra length of warp to the two ends and, in each case, tied it onto the lashing cord.

The next problem was more serious.

© 2008

LASHING ON TO THE FRONT ROD

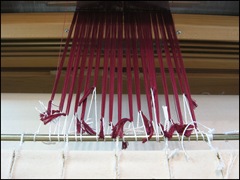
warp lashed on front rod Before I lashed on I cut off the excess ends beyond the knots.  This makes the process go a little more easily.

However, things did not proceed smoothly.

As I was lashing on, I discovered that some of the groups still had a loose end or two.  In fine silk it is impossible for me to untie the overhand knot.  I simply retied the knot and then cut off the excess length.

I had to do this several times.  That is why, in the picture, some of the ends are much shorter than the others.

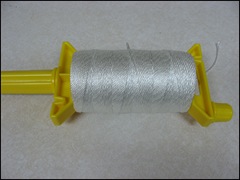
lashing cord Here is a photo of the cord I use for lashing on.  It is available at Home Depot or Lowe's. 

© 2008

PREPARING FOR LASHING ON

INITIAL PREPARATION

I put the front beam back on. I removed the lease sticks that were sitting at the back of the heddles. 

SLIP KNOTS TO OVERHAND KNOTS

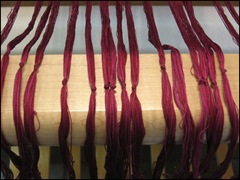
Then I took each individual slip-knotted group of warp and worked them through so that there were no loose ends in the group.  They were not all the same length, but that is never to be expected.  Once assured that there were no loose ends, I then tied the group securely with an overhand knot.

Knotted warp ends

FLOATING SELVEDGES

Note that on each side, the floating selvedge warp end is tied in with the regular warp, even though the floating selvedge warp is wound on its own bobbin and will hang, weighted, at the back of the loom on its own.

PLACEMENT OF KNOTS

tried to make the overhand knot on each warp group so that all would occur on the same place, so that they would form a straight line across the warp.  Of course I never succeed in this.  But the closer I get the easier it makes the lashing on.

Related Post: Ready to Weave

© 2008

Saturday, May 3, 2008

LINKS TO RECENT POSTS FROM OTHER BLOGS

Here are some recent blog posts I particularly enjoyed.

Perceived Value -- Constance Rose Textile Designs
Lace Shawl -- Fun with Fiber
How to Avoid Carpal Tunnel -- A Movable Feast
Silk Yarn - What Every Weaver Should Know-- Dot's Fibre to Fabric
Rethreading, Take Two -- Centerweave
The Readiness is All -- Weaverly
Failure at its Finest -- Deep End of the Loom
The Pleasures of Threading -- T'katch: The Language of Weaving
A Tale of Two Scarves -- Thrums
This Book Makes me Thirsty -- Unravelling 
Saori Weaving Founder Turns 95 -- Weaving a Life
Association of Latvian Textile Artists -- Textile Arts Resource Guide
     The works shown here are a mix of tapestries, batiks, and fabric painting. All are interesting to look at, even for a weaver.  There is one particularly interesting weaver, however:  Dzintra Vilks.  Don't miss her stuff.

 Don't Fact Check the Soul --  Measure for Measure
   This is a blog which appeared in The New York Times.   It is a post by Rosanne Cash on song-writing.  Much of what she says applies to artists in general, including weavers.

Ten Life Lessons for Reinventing Yourself      http://www.successful-blog.com/1/10-life-lessons-for-reinventing-yourself/  -- Liz Strauss at Successful Blog
   This post is a from a blog for bloggers.  The post has much to say to weavers as well.

© 2008

Friday, May 2, 2008

MORE ON SLEYING THE REED

COUNT HEDDLES AND ENDS

As I said earlier, I am sleying four warp ends per dent. I count out these four ends two ways. First, I count the number of heddles. I do that always but in the case of very fine yarns it is really much easier to count heddles than warp ends. Second, I do count the warp ends themselves.

DOUBLE CHECKING

After I have sleyed eight dents I first look at the dents to make sure that I have not skipped any. Then I pick up each group of four ends and count them, separating them with my fingers if I have to. Separating fine yarns is easier with longish fingernails. When I am satisfied, I tie these groups of eight in a slip knot.

HALF-INCH OR LESS GROUPS

Why eight dents? Eight dents with four threads each adds up to 32 ends. I am warping at 72 ends per inch. To get a group of ends that would equal one-half inch, I would have to tie nine dents of four threads in a group. It is easier in the next step, however, if I have an even number of dents. With this fine warp i absolutely do not want groups of more than one-half inch. So I have opted for eight dents with 32 ends.

KEEP FRONT BEAM OFF

I still have not put the front beam back on. Keep it off makes it easier for me to do the sleying. I will put it back on when I am done.

Related Post: Sleying the Reed

© 2008

Thursday, May 1, 2008

TAPESTRY

Recently I listened to another Weavecast podcast.  The session on tapestry with Sara Swett.  Listening to it got me interested in tapestry again.

To see some of Sara Swett's beautiful work, go to her website.

WOOL WARPS

One of the ideas that really intrigued me was the notion of a wool warp instead of a cotton or linen warp. According to Sara, if  both warp and weft are wool, they can bind and meld together in the finishing/washing process.

TAPESTRY RUG

Tapestry Rug

Wool wefts can slip and slide along a cotton or linen warp.  I know this for a fact because I wove a tapestry wool rug --  on a linen warp.  I have to be very careful in vacuuming it for the wool yarns can slide along the warp and leave gaps.  I had assumed this was due to my inadequate beating.   That may be true.  But now I now it also has to do with the fibers.

TAPESTRY ON A FINER SCALE?

So I thought a bit about taking up tapestry again. Using finer yarns than rug yarns.  Using wool warps. No weft interlocks, as I had done with the rug. Start slow.  Start with squares.  

I did try this a few years ago. But I insisted  on many different colors and all different size squares.  The result was that I could not focus on technique.  And that is what I needed to focus on.  I was running ahead of myself.

NEW TAPESTRY BOOK

With these thoughts in my head I ordered a revised edition of a tapestry book i own:  Carol K. Russell's Tapestry Handbook: The Next Generation.   I really wanted to try tapestry again,  though I have no time in the world.  I could give up blogging.

The book arrived. It is a beautiful book, much more beautiful than the first edition.  But I came to my senses.  I am not going to give up blogging..........

Related Posts:
Getting Sidetracked
Making Choices

© 2008