Tuesday, March 31, 2009

WINDING THE DYED SILK ONTO CONES

Posted by Peg in South Carolina

I didn’t think it was going to go well, despite what I had thought earlier

SHRUNKEN SKEIN

First of all, the dyeing process had caused the yarn to shrink enough so that the skein became too small to fit my Goko—my unwinder of choice for fine silk.

But the skein fit fine on the LeClerc skein winder. However, unlike the Goko, when I unskein from the LeClerc, I have to turn it with the handle at the same time I turn the handle on the cone winder.  The LeClerc is just too heavy for the cone winder to pull it around.  The Goko, on the other hand, is very light.

THREADS DON’T ALIGN

Despite the flatness of the skein and the softness of the yarn, the threads did not align the way they do with my hand-made skeins.  And it was clear that there was absolutely nothing I could do about it.

I tightened the LeClerc as tight as I could get it.  But part of the skein was still a bit looser than the rest. Not a good sign.

FINDING THE OUTSIDE END

Then I looked for the place that the ends were tied together.  I cut them apart and attached a length of 20/2 pearl cotton to each.  I do this primarily so that the end I am not using to wind from does not get lost in the event that the yarn I am winding breaks and I cannot find the end. Then I can always begin with the end of the skein.

I checked to see where the ends came from.  Both ends appeared to be on the inside of the skein.  That is how I put the skein on the winder.  But I know that each end has to come from the opposite side of the skein.  Sure enough, I found that end and worked my way with it to the front of the skein.   I pulled at it for a few rounds and it very nicely came off across the top of the skein.

This is something I had never bothered doing.  In fact, I had never even thought about it until Laura mentioned that it was important to use the end that ran across the top of the skein.  But I’ve decided that this is pretty significant.

UNWINDING BEGINS

I undid the figure-of-eight ties and gently started to unwind the yarn.  It did just fine.  I put in through the yardage counter and attached it to the cone in the cone winder and got to work.  Loose Loops in Skein Whoppee!   The thing winds!
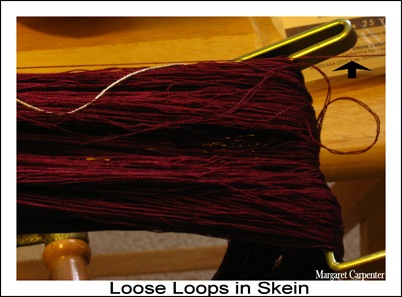
Well, maybe not perfectly.  Because the skein is not perfectly taut throughout, loose ends crop up.  In the photo you can see a couple of loops that had just come up and caught onto the unwinding yarn (the black arrow points to the unwinding yarn).  But all I had to do was grab that end and jerk it gently away from the skein and all was well again.

This happens from time to time, but not enough to be annoying or cause a significant slow-down. 

If you take a look at the skein, it really looks like a mess.  But apparently it is not.  When I watch the yarn unwinding, I see it go back and forth across the width of the skein.   Clearly these skeins are made in a manner different from my process.

THE OTHER END

Also, the white thread visible at the top of the skein is the piece of 20/2 pearl cotton which is tied on to the other end of the skein.  Clearly that will be easy to find if I need it.

Related Posts: 
   Silk Skein Dyed and Dry
   Winding Weft Yarn for Dyeing Continues


Winding the Dyed Silk Onto Cones” was written by Margaret Carpenter for Talking about Weaving and was originally posted on March 31, 2009. ©2009 Margaret Carpenter aka Peg in South Carolina
Monday, March 30, 2009

TWISTING THE FRINGE

Posted by Peg in South Carolina

Now I am twisting the fringe.  I am using the directions Susan gave in her blog.  Go to her post, “A Good Twist to the Yarn,” to read about and see the process in detail.  I was so impressed by her post, and I had so much trouble with the fringe twister that I have been using, that I ordered the fringe twister she uses.  It is made by Forsyth (where it is called a cord twister).  More information is available here.

Susan hemstitched her scarves.  I did not hemstitch this shawl.  I had found in some of my earlier things where I braided rather than twisted the fringe, that hemstitching was not needed.

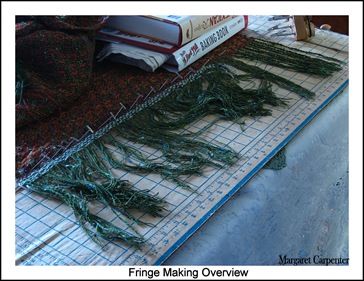
Fringe Making Overview I set up my work station similar to Susan’s.  But for my board I used a sewing board that is used for cutting out fabric.  It is already marked in inches and is generally available in stores like Hancock’s and JoAnn’s.

Susan used long pins for blocking knitted lace.  Having none of those, I used the ordinary pins knitters use to pin seams before they sew them. 

Because the woven fabric is so loose and fluid at this stage, I also added the weight of two books.  This helps keep the woven weft from pulling forward, but does not prevent it. 

Also, because I did not hemstitch, I keep the woven warp protector (the white weft shots at the bottom of the shawl) in for as long as I can.  I remove it only from the area where I am actually working.

Fringe Making Detail Here is a detail of the working area with the fringe twister on view at the right side of the photo.

I am twisting two ends in each clip, resulting in a twisted braid of four ends.  I am twisting the groups of two ends 20 times to the right.  Then, when I join them to make the group of four, I twist the 40-end group to the left 20 times.

To place the overhand knot I tried using a very thin crochet hook, inserting it into the untightened knot, placing it where I wanted it to be, and then tightening it, as Susan instructed.  Then I stopped using it because it didn’t seem to guarantee all that much accuracy.  That, however, is not the fault of Susan’s instructions.  It is because I had not yet figured out how to deal with the flimsiness of the fabric.

Related Post:  Hemstitching


Twisting the Fringe” was written by Margaret Carpenter for Talking about Weaving and was originally posted on March 30, 2009. ©2009 Margaret Carpenter aka Peg in South Carolina
Friday, March 27, 2009

HANDSPUN SHAWL OFF THE LOOM


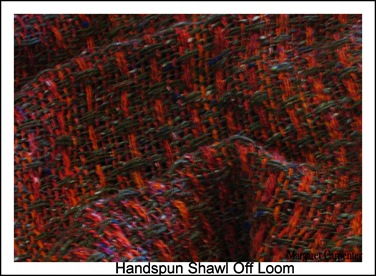
The shawl is off the loom.  Because of the open sett, the shawl is very fragile.  Handspun shawl off loom Hopefully wet-finishing will change that.

Here are the measurements:

Width:    at reed—27.5”;   on loom—25.5”;   off loom—24.5”
Length:  on loom—97.5”;   off loom—83.5”
Picks per inch:  on loom—6-7;  off loom—8

The dramatic shrinkage in length off the loom occurred because I wove and measured the fabric under tension.  Because this is handspun, it is extremely flexible.  It can be stretched out but when when released will immediately snap back into shape.

It is also strong.  No warp breakage.  Not even any shredding at the selvedges.


Handspun Shawl off the Loom” was written by Margaret Carpenter for Talking about Weaving and was originally posted on March 27, 2009. ©2009 Margaret Carpenter aka Peg in South Carolina
Wednesday, March 25, 2009

BLOGS TO VISIT

Posted by Peg in South Carolina

My New Cone Winder – Woven’N’Spun

An ingenious way of using a bobbin winder and a foam cone to wind yarn onto a cone.  The only thing she forgets to say is that the yarn must be wound moving rapidly up and down, crisscrossing the cone. This way, layers of yarn don’t dig into earlier layers of yarn and the whole thing will unwind smoothly. 

If you spindle spin, you will recognize this as the way you wind the spun yarn onto the spindle. 

If  you spin on a wheel with a WooLee Winder, it winds the spun yarn on in the same way which is why those bobbins are wound much tighter and firmer that on wheels without WooLee Winders.

Woven Ratios an essay by Barbara Walker on WeaveZine.

This piece really appealed to me because it is about a weaving technique I have been playing with (in my head) and thinking about as a good way to use my hand spun yarn.  The weaving technique is called color-and-weave, but what is different about Walker’s piece is that she analyzes how to use color in terms of intensity or strength and proportion when developing a color and weave drawdown. 

Her discussion of color is applicable to weaving structures in general. 

When she discusses intensity, she is not so interested in the varying intensities a single color can have, but a comparison of the intensities of the different hues.  This is because she is interested in teaching how one can successfully use two different hues which seem quite strident by getting the proportions right in terms of the amount of each hue that is used.

Temples…love ‘em or hate ‘em – Dust Bunnies Under My Loom

I have not been using temples lately.  Lynnette has reminded me how useful they can be.  For those who don’t really know how to use this tool, do check out her post.

Imaging Weaves – Curiousweaver

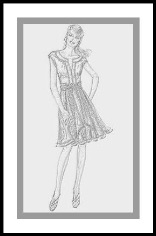
A very interesting post on fashion drawing.  In her discussion she gives a link to a fascinating download of fashion templates.  I intend on downloading it. 

mannequin Meanwhile, I have tried my own experiment by copying and pasting a Vogue pattern image into Paint Shop Pro and playing with it.   It would be hard to draw a scarf on it with a mouse and I don’t have a Wacom tablet


Blogs to Visit” was written by Margaret Carpenter for Talking about Weaving and was originally posted on March 25, 2009. ©2009 Margaret Carpenter aka Peg in South Carolina
Tuesday, March 24, 2009

SILK SKEIN DYED AND DRY

Posted by Peg in South Carolina

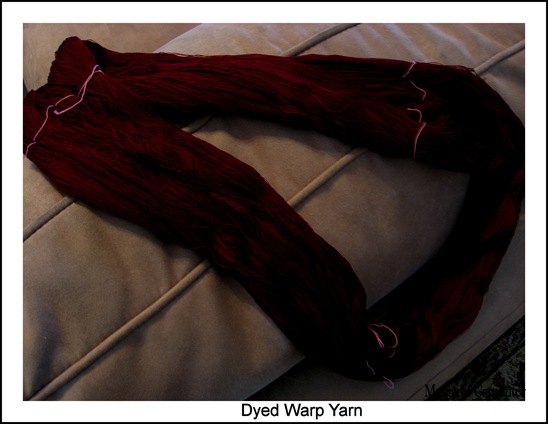
Dyed Silk Warp She is a beautiful thing to behold. I hate to hide her in the crackle warp. I once saw some beautiful silk scarves woven in huck lace. I think this yarn would be beautiful treated just that way.

But I’m not going to. It will be the crackle warp for the upcoming sample/scarf.

It is not just the color that is beautiful. What is just as beautiful is what has happened to the yarn as a result of all my snapping and slapping of it. It is flat and soft. The divisions that the pink figure-of-eight ties make in the skein are clear. I have high hopes for the unskeining to cones process.

Still, I can see her woven as huck lace…………

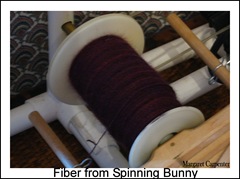
By the way, take a look at what I’ve been spinning from The Spinning Bunny. This is wool but doesn’t the color look familiar? I must really like this color!Fiber from Spinning Bunny

Related Post: Dyeing the Skein


Silk Skein Dyed and Dry” was written by Margaret Carpenter for Talking about Weaving and was originally posted on March 24, 2009. ©2009 Margaret Carpenter aka Peg in South Carolina
Monday, March 23, 2009

WINDING WEFT YARN FOR DYEING CONTINUES

Posted by Peg in South Carolina

As I continued winding skeins of this 60/2 silk, winding it from my Goko skein-winder to my LeClerc skein winder got a bit easier. I still couldn’t, most of the time anyway, simply wind the LeClerc skein winder and have the yarn freely come off the Goko. Instead I pulled the yarn off the Goko by hand, piling it up on the floor and over my legs. Then I wound the loose yarn onto the LeClerc. That would give me about 5-7 yards of silk.

HICCUPS

Sometimes when I came to the end I would find the yarn feeding smoothly off the Goko for a little bit, or with only slight hiccups that I could deal with easily with my left hand. The really tough hiccups that forced me to stop happening just a little less frequently. So things were easing up.

What causes these hiccups? I don’t know. The yarn gets caught by the yarns further inside the skein. And I don’t know what causes that either. In any case, this was going much more smoothly than some of my earlier frantic unwinding some of my dyed skeins of silk organzine. So I was grateful for that.

SKEIN TO CONE

When I finally finished winding off six separate skeins for dyeing—three for blues and three for reds—I decided to wind off the rest of the original skein onto a cone.

Now things got progressively easier until, when I hit about the 900-yard mark, the unwinding started going very smoothly. All I had to do from that point on was to turn the LeClerc skein winder and let the yarn coming from the Goko run over my left hand. Though I could feel tiny catches happening with some frequency, rarely did I have to use my left hand to undo a bad catch.

A BROKEN YARN

And then I ran out of yarn. But there was still a lot of yarn left on the Goko. I knew there was a broken yarn somewhere. I had seen the two individual ends periodically as I wound. So I knew this was going to happen. I couldn’t find the broken end in the skein. Fortunately, however, I had tied a contrast yarn to the other end of the skein itself before I started winding so that I found easily.

What worried me was………….am I back to slow winding off again?

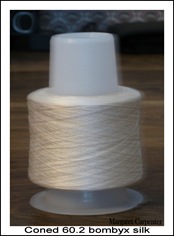
60.2 silk coned from skein Well I was, but only for a little while, maybe for 3 yards. Then everything went smoothly again until I had a total of 2,166 yards wound on the cone.

NEXT SKEIN?

I am now thinking that the next time I go through this I may just begin by winding the entire skein onto a cone and then making the small dyeing skeins from that. Just an idea for now. Part of this will depend on how unwinding the dyed skein goes. Stay tuned!

Related Posts:
That Badly Snarled Skein of Yarn
Disappointment


Winding Weft for Dyeing Continues” was written by Margaret Carpenter for Talking about Weaving and was originally posted on March 23, 2009. ©2009 Margaret Carpenter aka Peg in South Carolina
Friday, March 20, 2009

DYEING CALCULATIONS RUN AMUCK

Posted by Peg in South Carolina

I let the dye pot sit overnight with the yarn in it. That way all the possible dye that could attach to the yarn would. I need not have worried.

RINSING

When I looked at the dye pot the next morning, the water was nowhere near clear. With these kinds of dyes, unlike with the MX dyes, the dye pot is supposed to exhaust, if not completely, almost completely. The result is very little rinsing needs to be done.

Not so here. I pulled the yarn out of the pot, squeezing out as much of the dye liquor as I could, and dropped it into the waiting rinse water. Within seconds the rinse water was so darkly stained I could not see the yarn in the water! I was in trouble.

I rinsed and i rinsed and I rinsed, making very little progress. I was getting tired. So I started letting it soak in hot, hot water for 30 minutes at a time. About five hours later I had made some progress………

WASHFAST ACID MAGENTA

I started contemplating the fact that part of the dye was a bit of washfast acid magenta. I had recalled that that was a dye that tended to bleed. I went to Paula Burch’s site called All About Hand Dyeing. I was right. So I did one more hot soak. I observed that the red had changed in hue. Indeed, it did look like the washfast acid magenta. Then I rinsed in cold water. Hardly any dye. Then I rinsed in cold water with a bit of vinegar which I was sure the yarn deserved after all its travails in rinse water.

Did I mention that I made a mess on the countertop? I did not put down my usual oil cloth, as I had anticipated an easy rinsing with little or no dye left in the water. All I put down were newspapers. The remaining dye was so intense it bled through the papers to the counter. I will have a lot of cleaning up to do. I will tell DH to think of them as blueberry stains………

I removed the yarn from the vinegar rinse water, squeezed all the water I could out and placed it inside a terry bath towel which I promptly stomped on with full body weight to get rid of more water. I took it to the bathroom. I slapped it against the tub a few times, then snapped it vigorously a few times. i repeated this process a couple of times and then hung it to dry. Wet, the yarn looks positively black, though I know it isn’t.

So the question of the day is:

WHERE DID I GO WRONG?

The answer in general is obvious. Way too much dye powder. Way way too much dye powder. But the specific answer as to how this happened is more nebulous. Somehow in my calculations I got very very confused.

So I went back to my trusty Ashford Book of Dyeing and re-read its instructions and then re-read my dyeing instructions for this piece. And here is what I discovered: I was using calculations based on 1 kilo (i.e., 1,000 grams) of fiber! 30 grams of dye will dye 1 kilo of fiber at 3% depth of shade. I was dyeing 100 grams of fiber. If my arithmetic is correct, I had used 10 times as much dye powder as I needed to use.

My face is so red. This was not even an arithmetic error. It was a failure to read the top of the chart in the book.

Related Posts:
I Really Ought Not to be a Dyer
Dyeing Miscalculations
I Ought Not to be a Weaver


Dyeing the Skein” was written by Margaret Carpenter for Talking about Weaving and was originally posted on March 20, 2009. ©2009 Margaret Carpenter aka Peg in South Carolina
Thursday, March 19, 2009

DYEING THE SKEIN

Posted by Peg in South Carolina

I deemed the skein sufficiently tamed to endure the dyebath.

MY SETUP

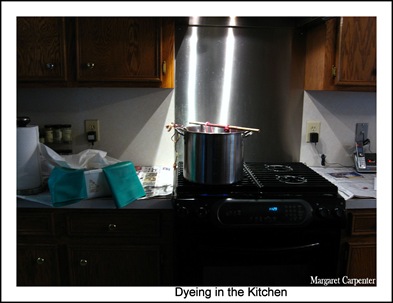
Because I use Lanaset (also known as Sabraset) dyes for my silk, I need a source of heat. SoDyeing in the kitchen I use my kitchen to dye. A general view of my setup is in the photo at the left.  The range is gas, which means that it is very easy to control the heat.  I have a professional hood.  It pulls the fumes (which are barely noticeable) into the garage, but I open the garage door when I use it.  And it has really neat LED lights.

But I do not mix dye powders in the kitchen.  That happens in the garage.  I am a careful and fairly neat dyer.  And I am always alert to the need for cleaning up.  One time I did have a disaster happen.  I knocked a liter of yellow dye with my elbow.  It went over and onto the floor.  A white floor.  It cleaned up perfectly, though I was sweating it out for awhile!  I know keep dye containers well away from the edge of the counter.

Karren Brito

My dyeing process follows fairly closely the process Karren Brito describes in her book called Shibori: Creating Color & Texture on Silk. Despite the book’s title, Brito has much to say to anyone who dyes silk.  I found her book invaluable for helping me to refine the process I had been building up over time from reading other books.

THE ADDITIVES

I begin the dyeing process by heating up water with sodium acetate, citric acid, and Albagel SET.  Brito, in email conversations on the dyers email list, has insisted that sodium acetate is not appropriate for using with citric acid, only with acetic acid or vinegar.  She is a chemist.  She is a skilled dyer.  I believe her.  Still, this combination works for me. These additives will help the yarn both to take up the dye and to take it up evenly. I could also add salt to slow down the dye take-up still more and so further enhance the possibilities of level dyeing.   With silk fabric, I probably would.  But with weaving yarn, I actually like a tiny bit of inconsistency.

THE FIRST HOUR AND TWENTY MINUTES

When the water reaches 120 degrees I put in the skein of yarn and move it around pretty much constantly for 10 minutes.  I then remove the skein, pour in the dye solution, return the skein to the 120-degree water and move it around for 10 more minutes.   Then I set the timer for 60 minutes and manage the temperature so that it raises to 180-190 degrees in that time period.  That means that I try to raise the water 10 degrees for each 10 minutes.  But I don’t move it around very much during this period.  I am more concerned about watching the temperature because it is the slow raising that helps the dye continue to take up but take up evenly.

To keep me sane I do odd little 2-3 minutes tasks like reading an email, knitting a round on a sock, and then I come back and look at the temperature. The first few times I did this, I had widely fluctuating temperature climbs (and drops……..). I’ve done this often enough that I have a pretty good idea of how to control the temperature.

Dyepot

EQUIPMENT

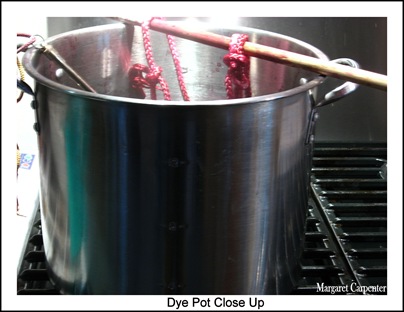
Here is a close-up photo of the dye pot.  It is stainless steel, though very cheap so the walls are thin.  That means I have to be careful that the yarn does not rest for any length of time at the bottom, for it can burn.  Yes, I learned that from experience!

Cheapness also means than I cannot have the water above the level of the rivets near the top.  Water will rust them out and when that begins to happen, the pot will start leaking at that point.  Yes, that happened to me as well….

At the top of the pot is a wooden dowel.  To this I attach the skein by two polyester cords that I insert through the center of the skein, keeping them apart.  I like to use rather thick cord because it is easier to move the skein a bit along  a slippery cord.  I try to do this a few times during the process so the skein gets re-arranged in the pot instead of just pulling it up and down or moving it back and forth.

Note that the polyester cord takes up the dye as well as the silk.

In the pot on the left side is a thermometer.  The thermometer is inside a metal armor guard to prevent it from breaking in the jostling of dyeing.  There is a loop at the top of it through which I put some thin polyester cord and tie it to a pot handle.  This way it is not going to slip down into the dye pot.

THE SECOND HOUR

But the dye process is not yet done. At the end of the hour, I set the timer again for 60 minutes.  This time I manage the burner so that it keeps that dye pot water at 180-190 degrees.  This is not very difficult.  I check the thermometer only every 15 to 20 minutes.

At the end of this second hour, I just let the yarn sit in the dye liquor until morning.

To learn more about Lanaset dyes, go here.

Related Posts: 
Dyeing in the Kitchen
Dyeing Silk
Immersion Dyeing Issues


Dyeing the Skein” was written by Margaret Carpenter for Talking about Weaving and was originally posted on March 19, 2009. ©2009 Margaret Carpenter aka Peg in South Carolina
Wednesday, March 18, 2009

PREPARING SKEIN FOR DYEING

Posted by Peg in South Carolina

At last I am getting to the dyeing for my next crackle project! It’s been a long time since I blogged about it, so go here and then here if you need a bit of a reminder of what the project is about.

Laura recently posted a piece called Skeins that is relevant to my ongoing struggles with 60/2 silk. Her post encourages me to continue in my current methods of skein handling but a great deal more vigorously.

When I got the 50-gram skein of 60/2 silk out to soak overnight, I first snapped the skein all around, as Laura explained and as I usually do when I am getting ready to unwind a skein. I was not getting ready to unwind this skein; I was getting ready to dye it. I did the snapping this time because I thought that doing so would help the yarn come through the dyeing process a little bit better.

I went at it, however, much more vigorously than usual. After I had snapped the skein around, I slapped it hard against my leg several times in different places, and then did the snapping business again. I did this several times and I saw the skein gradually getting wider, getting flatter. I had never seen it spread out like this before. I’m thinking I may be on to something.

I soaked the besieged skein overnight in very hot water with a bit of synthrapol. Go here to find out lots about synthrpol. When I removed it in the morning, I squeezed out the water. Then I did the snapping and the slapping once again. Again, punished within an inch of its life, the skein spread itself out very nicely widthwise.

I plan to repeat the process after the yarn is dyed and rinsed but still damp, and then again after the yarn has dried. If I get to it, I will do it once or twice during the drying process. And then, when I am ready to put it on the skein winder which I use for unwinding, I will first attack it once more with great ferocity! Perhaps doing all of this will help the yarn come off more smoothly.

Related Post: Dyeing Books: Some Favorites


Preparing Skeins for Dyeing” was written by Margaret Carpenter for Talking about Weaving and was originally posted on March 18, 2009. ©2009 Margaret Carpenter aka Peg in South Carolina

Tuesday, March 17, 2009

ANOTHER PAUSE

Posted by Peg in South Carolina

image

Annie  has done me the honor of nominating me for the Kreativ Blogger award. 

Accepting this award means following some rules:

  1. copy the Kreativ Blogger award to your blog
  2. put a link to the person from whom you received the award
  3. nominate 8 other blogs and
  4. link to them
  5. then leave a message on the blogs you nominated

Here are the eight bloggers I  have selected (and with great difficulty!)

Weaving Spirit

CyberFiberScriber

Curious Weaver

Tangled Threads

Scarfaday

Sunrise Lodge Fiber Studio

Handweaving Today

Thrums


Another Pause” was written by Margaret Carpenter for Talking about Weaving and was originally posted on March 17, 2009. ©2009 Margaret Carpenter aka Peg in South Carolina

Monday, March 16, 2009

PAUSING

Posted by Peg in South Carolina

Susan of Centerweave has graciously selected me for this award:

image

Accepting this honor means that I must do the following things:

1. I must list my five addictions
2. I must pass this award on to five other fabulous blogs

First, my five (only five?!?) addictions:

  1. Blog writing (you never would have guessed……….grin!)
  2. Ice cream (that doesn’t mean I actually eat it; it simply means I frequently engage in self-torment, except, for those occasional times when I simply must eat some……)
  3. Googling (lost in time, lost in space……………)
  4. Spinning (ahh, finally something fibery……….)
  5. Mystery cozies (they help me get to sleep)

Only one fibery addiction? What, not weaving? Not dyeing? Nope. Both activities are so complex and enriching that it would be demeaning to put them under the category of addiction. Next: five more fabulous blogs:

The Hawthorne Works
Nigel’s Weaving Blog
Works in Progress
Ask the Bellwether
Tien’s Blog

Thank you, Susan!


Pausing” was written by Margaret Carpenter for Talking about Weaving and was originally posted on March 16, 2009. ©2009 Margaret Carpenter aka Peg in South Carolina
Friday, March 13, 2009

END NEARING FOR HANDSPUN WARP

Posted by Peg in South Carolina

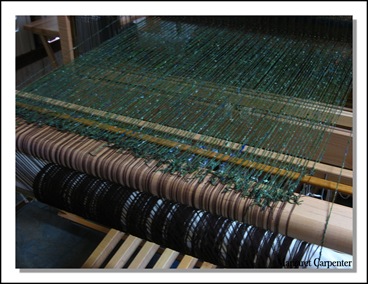
Knots over back beam The knots have come up over the back beam.  But they have not gone through the lease sticks.

Yes, I kept the lease sticks in while weaving. No, there were no broken warps.  But at this point I am going to remove those sticks.  This way I don’t have to worry about the knots catching on them when I move the warp forward.

I have woven close to two yards.  If I continue to weave until the knots come up to the heddles but not through them, I will have about 20 more inches woven. 

We are leaving for Charlotte for a long weekend.  It will be nice to have 20 inches of weaving on this warp to return to.

Related Post:  Weaving Has Begun


End Nearing for Handspun Warp” was written by Margaret Carpenter for Talking about Weaving and was originally posted on March 13, 2009. ©2009 Margaret Carpenter aka Peg in South Carolina
Thursday, March 12, 2009

MULTI-POCKET FOLDERS

Posted by Peg in South Carolina

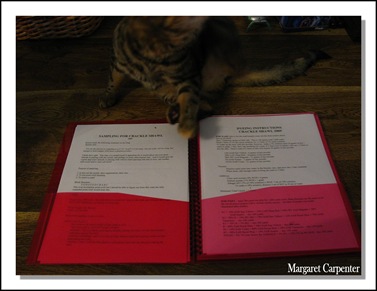
weaving binder for notes Recently at Office Depot I saw these lovely multi-pocket folders. They looked neat. Better than manila envelopes for keeping records together of a complex project. So I purchased two—one red and one green.

I am now using the red one for the crackle shawl/scarf/sample. The folder has a total of eight pockets. There is one each on the inside of each cover. There there are three pages, each with a pocket on either side.

This is how I have set up the red folder. The first pocket (on the left in the photo) has the details for what I originally called “Sampling for Crackle Shawl.” That sampling has morphed into the Sample Scarf, and this pocket includes the history of that morphing. The pocket on the right contains dyeing instructions.

The remaining pockets, which are not visible in the photo, contain details for the crackle shawl itself in the third pocket, the details of the sampling I did on the leftover warp from the red crackle art pieces which is where this current project had its beginnings, in the fourth pocket miscellaneous mostly handwritten notes, in the fifth pocket technical information on the weave structure, and in the sixth pocket information on finishing techniques, including fringe twisting.

I have a lot of information in this pocket folder, all neatly organized. I should be able to find information easily and well as add more information and ideas easily.

In the green pocket folder I have put the materials on the handspun shawl I am currently weaving. That is a bit of overkill because there is really very little material: the sampling that I did, the drawdown, and information on the materials. One normal manila folder would work just fine.

Related Posts:
Organizing Projects: Part One
Organizing Projects: Part Two


Multi-Pocket Folders” was written by Margaret Carpenter for Talking about Weaving and was originally posted on March 12, 2009. ©2009 Margaret Carpenter aka Peg in South Carolina
Wednesday, March 11, 2009

WEAVING ART PIECES

Posted by Peg in South Carolina

ART CLOTH

A recent issue of Surface Design, a publication of the Surface Design Association, has a piece called “One Cloth, One Quilt: Whole Cloth Composition.”  (Winter 2009,  pp. 14ff.)  Creators have been designing art quilts for awhile now.  To this end many have created their own fabrics to cut up for the quilts.  They dye their fabric, using various techniques.  They bleach it.  The paint it.  They print on it.  They silk screen the fabric.  And there are probably endless more things they do to it.  Often they have admired the fabric they created so much that they could not bear to cut it up.  This had to have been one of the things that led to the concept of whole cloth quilts.

But it has moved even beyond that insofar as many of these whole cloth artists do not even quilt the fabric any more, though many do.  For an excellent description of art cloth, go to the Art Cloth Network.  The following sentence from their web site struck me:

Art cloth is unique because it can also be transformed - into home furnishings, and into individual special garments - without being compromised.

To this end, I have seen beautiful shawls hung on walls, displayed as art pieces. It is the memory of these pieces that has stirred me into creating this next shawl/art piece.

SHAWLS AS ART

The shawls I have seen were hung flat against the wall.  But to see a strikingly different display of a gorgeous shawl, go here. None other than a Randall Darwall shawl.  Actually I am not sure this is a Darwall shawl as the only indication is given in the link address.  But all that really shows is that Darwall uploaded the photos of this exhibit.  Well, it is gorgeous, no matter who the weaver is.

Looking at Darwall’s site, I find the following statement:

Yardage for clothing is produced on the 24” wide shawl warps.

So a 24” wide warp can produce yardage, shawls, art pieces.  Also, having had the privilege of a day workshop with Darwall many years ago, I learned that he regarded his scarves as much art pieces as scarves, meant to be draped over tables and other pieces of furniture to be shown off.

Kris Abshire does both painted and otherwise decorated cloth for clothing and art pieces.  But she does weaving as well.  She classifies her woven rugs and throws in the decorative category.  But also in the decorative category is a magnificent table runner.  Go to this link, scroll down to the bottom of the page and click on the runner to see it in glorious full screen. 

Another weaver who does woven art, frequently ikat, is Polly Barton.  I found her website interesting and inspirational.  Here you can get glimpses of her studio and learn about private studies you can do with her.

SUMMER WORKSHOPS

Today I received the Arrowmont catalog for its summer offerings.  One of its weaving offerings is definitely art oriented.  It is called Dimensional Weaving and is being taught by Lesli Robertson.  The course is about learning how to create sculptural pieces on the loom using unusual materials and techniques.  Not something I am interested in trying, but am interested in seeing.

More interesting to me is a workshop called “The Woven Image.”  I almost didn’t look at the description for I thought it was probably about jacquard weaving.  Not.  It is about using weft brocade, supplemental warp, and pick-up double weave to create imagery on woven cloth.  Now that is tempting.  It does seem a lot to cover in a week’s time.  It is being taught by David Brackett.  He is offering this same workshop at this summer’s Surface Design Conference.

QUESTION

Are my art pieces going to be just that, art pieces, or are they going to be art cloth?

Related Posts:  
2009 International Surface Design Association Conference
More on Fiberart International 2007


Weaving Art Pieces” was written by Margaret Carpenter for Talking about Weaving and was originally posted on March 11, 2009. ©2009 Margaret Carpenter aka Peg in South Carolina
Tuesday, March 10, 2009

BLOG POSTS TO VISIT

Posted by Peg in South Carolina

The first post, called Feeling Blue by Robert Genn is on color, specifically the colors blue and red. Robert Genn of Painters Keys has found himself using a lot of blue lately in his paintings and here he talks about the significance of his focus on that color. But he also talks a bit about red, which makes me happy, since red seems to be my focus right now. But I’m not particularly happy with what he says: “with red you are more inclined to be vigilant and careful.” His piece is tempting me to begin to work with blues. Which works best for you, blue or red?

With this next post, I return to weaving: Finding Your Way in the Dark – The Hawthorne Works. I loved this piece on the limitations of weaving software because I find this software infuriatingly unhelpful in my own weaving. I also appreciated his discussion on overcoming the difficulties of being able to see only parts of the piece one is weaving during the weaving process. The more one weaves on a piece, the more of the piece one cannot see. This is an important problem for a rug weaver who weaves on a regular horizontal loom. But it is also an issue I faced, for example, when I wove my recent art pieces. And I will face it again when I start weaving the next crackle shawl/sample. He has given me a camera trick I will want to try.

Meg, in her post called Mine or Someone Else's? has written an interesting post on what can be a difficult decision: should I stay in my comfort zone or should I leave it to try something that I cannot be sure will work out? I can’t imagine just totally leaving my comfort zone without at least some testing, but perhaps I am too wary. What ways do you have to help you leave your particular comfort zone?

Tien’s post, Heading into the Wilderness, is about leaving the comfort zone and entering the wilderness of the unknown. Why, she asks herself, does she insist on “…striking out on my own rather than following the path that is already laid out.” Her answer resonates with mine.

Related Posts:
Creative Intelligence and Weaving
Aiming for Excellence
Leaving the Comfort Zone


Blog Posts to Visit” was written by Margaret Carpenter for Talking about Weaving and was originally posted on March 10, 2009. ©2009 Margaret Carpenter aka Peg in South Carolina
Monday, March 9, 2009

DISAPPOINTMENT

Posted by Peg in South Carolina

On Friday, I got things ready to dye the warp for the silk crackle scarf/sample. To read some about this project go to this post, Crackle Shawl: Initial Thoughts on Design. Also this post: Words of Wisdom. I planned to use one of the 100-gram skeins of yarn I purchased from Treenway for the warp. Because this is a lot of yarn to dye, I had decided not to use dye stock solutions to mix for the color I wanted. Instead I chose to weigh and mix the dye powders directly into the water.

I had worked out the weight of powder I would need for each color. Now I had to get ready to do the mixing. This happens in the garage.

I covered the counter in the garage with newspaper. I gathered the equipment and supplies i needed, put them on a tray and brought the tray out to the garage. I got my box of Lanaset dye powders and brought them to the garage. Then I got out the colors I needed. No violet. I took every jar of powder of the box. No violet. I came inside and checked the storage area to see if I had put the jar away on the shelf without putting it in the box. No. No violet.

This was so unexpected. I try very hard to order a new jar of dye powder when I see a color running low. I still think I have misplaced it. Nevertheless, I ordered more from ProChem Now I have to wait till I receive it.

But I did put the dyeing time on Friday to good use. I worked out the formulas for the weft colors I plan to use. But I could work out only the percentages. I had to make and then weigh the skeins first before I could flesh out the percentages with actual amounts of dye stock solutions.

So today, ready to start working with weft yarns, I went to get my cone of 60/2 silk. I simply cannot find it. I know there wasn’t much left on it, but it is so much easier to use cones to make small skeins from. So I ordered a cone from Webs.

Eager, however, to get to work on this, I decided to try to unwind one of the Treenway 100-gram skeins. It is tied with figure-of-eight ties in four places, each tie covering four groups. My assumption was that, after I had the skein on the skein winder correctly, I could slip my fingers through the spaces between groups, working my way around the skein until all the groups were nicely aligned. I had not tried this before. But I do this with my own skeins, so why not Treenway’s? I couldn’t get it to happen. I struggled and struggled and struggled. I just couldn’t.

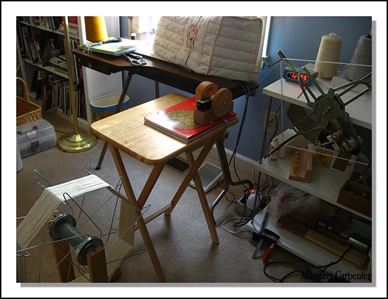
Winding skein to skein So I went to work unwinding. The photo on the left shows a corner of my very messy sewing and yarn-handling room. It also shows my skein winding setup. In the lower left corner is my Goko skein winder with the Treenway silk skein on it. The yarn goes from their through the yardage counter attached to my little table in the center. I need that so that I unwind only the amount I need for each skein. And from there the yarn goes onto my LeClerc skein winder which has just a bit of yarn wound on it from the Goko.

Getting the yarn off the skein for the first time around was really difficult. It was very tangled and twisted with neighboring and not-so-neighboring threads. It was awful. The second round was a little easier. Now it seems to be working the way it should, though it still sticks too badly to be able to simply unwind it. I have to pull it off the skein winder as I turn it for a couple of turns. Then I wind the loosened yarn onto the skein winder I am using to make the small skein. I am hoping this changes so that the silk feeds off the skein winder easily. But I’m not counting on it.

One of the things I am watching is where in the skein the yarn feeds from. The first time through, it came from both the first and second group of yarns on the skein. But now it is coming only from the first group. I can tell because, though I have removed the ties, I can still see the separations at the places where the ties were. If this continues, I will know that I was on the right track with my earlier struggles and will persevere at it with the next skein.

Related Post:
Skeins to Cones
Skeining Photos
Tying Skeins
Skein Making


Disappointment” was written by Margaret Carpenter for Talking about Weaving and was originally posted on March 9, 2009. ©2009 Margaret Carpenter aka Peg in South Carolina

Friday, March 6, 2009

WEAVING HAS BEGUN

Posted by Peg in South Carolina
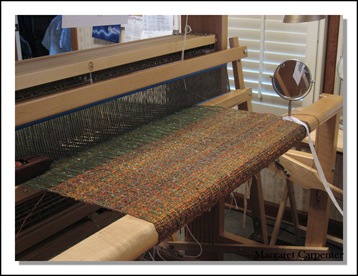
weaving begun 2WATCH THE SHAFTS

Here is a photo after I have woven the first 20 inches. The placement of the treadles has not been a problem. In fact, it has become a good thing. I am always looking at the shafts to make sure that the correct shafts have risen. One of my first weaving teacher’s mantra was “watch the shafts.” When I watch the shafts, there is far less risk of a treadling error than if I watch the treadles.

SELVEDGES

I am having to do something, however, that I normally avoid. I am touching the selvedges…… If I had included either a plain weave or basket weave at the selvedges, I would have been OK. Isn’t hindsight wonderful?! But the way the warps group together, it is difficult to weave without touching them. And in the case of the double shots on the pattern treadles, the floating selvedge, on the second shot, pulls the floating selvedge way into the warp that I have to literally grab it and pull it out to where it should be.

PLACING THE WEFT

I am having great fun weaving this because of the continually shifting colors. But it is still slow weaving (though not the slow weaving of fine silk!). I have found that the easiest way to place the weft shots is to do the following:

  1. Open the shed
  2. Throw the shuttle
  3. With the shed still open, pull the beater part way to the fell.
  4. Change the shed
  5. Pull the beat to the exact point where I want the weft to lie.

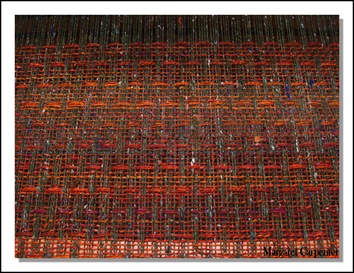
weaving begun Following this procedure I am getting 8 shots per inch, which exactly balances the 8 warps per inch. The way I check this visually as I weave is to look at the empty squares formed by the crossing of warp and weft. At the fell, where I have just beat, they are just ever so slightly taller than they are wide, or so I try to keep them. Farther down, as a result of the impact of more beating, they square up. These little squares are visible in the second photo to the left, but blowing up the photo will make it even more prominent.


POSTSCRIPT ONE: SHUTTLES

I started weaving with the boat shuttle, since the yarn on the shuttle, after the unweaving, was attached to the weaving. I was surprised to find two things:

  1. How light the boat shuttle was.
  1. How much easier it was to get the Bluster Bay end feed shuttle through the entire web when throwing it.

image Had I continued to weave with the boat shuttle, I would have learned how much more energy I would have to expend to get the shuttle all the way across. But I could see how the issue of lightness would be important for people with shoulder issues. But using the boat shuttle would mean continually changing bobbins because it holds a great deal less yarn than the Bluster Bay end feed shuttle. And so far, at least, it does not both my shoulders.

This photo shows three of my shuttles. The first one one the left is a Schacht end-feed shuttle. The middle one is my Bluster Bay. And the one on the right is a LeClerc boat shuttle. The Bluster Bay is clearly the largest!

POSTSCRIPT TWO: COLOR

The colors in the two photos seem different. The difference comes from perspective. Looked at from a greater distance, the colors soften and blur. Looked at from the loom bench, they are quite vivid. So the colors in each of the photos are accurate from the perspective each photo was shot.

Weaving Has Begun” was written by Margaret Carpenter for Talking about Weaving and was originally posted on March 6, 2009. ©2009 Margaret Carpenter aka Peg in South Carolina
Related Posts:
Window Screening
Window Screening Continued
Never Touch the Selvedges
Slow Weaving

Thursday, March 5, 2009

WEAVING BEGINS…AND SO DOES UNWEAVING

Posted by Peg in South Carolina
After throwing four shots with the handspun weft in pseudo plain weave, I went on to weave in the pattern. I treadled everything exactly as I was supposed to. The fabric looked like window screening. That is to be expected. After I had woven about 5 inches I realized something just was not right.

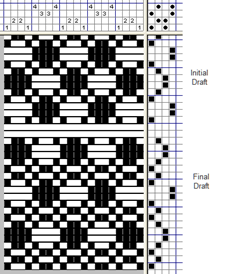
Canvas Weave draft The nature of the yarn and the window-screening effect combined to make it difficult to see what was going on. But when I looked carefully I saw that the pattern that was supposed to happen simply was not happening. Yet I was treadling everything correctly.

Then I compared the written tie-up with the treadle tie-up. Whoops. Not the same. Though the treadles with correct tie up were there, they were not in the order that written draft specified.

My first thought was to change the treadle tie-ups so that they matched the tie-ups as I had them in PixeLoom

My second thought was to open PixeLoom and move the treadles to where they were supposed to be. I went with the second thought. PixeLoom’s move tool makes this ridiculously easy to do.

The first draft on the left shows the original drawdown. The top draft, called the initial draft, is the basis for the draft I created, which is the bottom draft. That original draft created a heavier fabric than I wanted. In the bottom draft, called the final draft, I have repeated the treadlings were only single shots were thrown in order to give a little space and air to the fabric.

The problem came when I treadled those treadles!

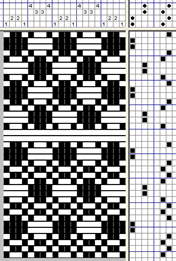
Canvasweavedrafttreadlesreordered Here is how I re-ordered the tie-up and treadles. The second draft shows the re-ordered tie-up and treadling. The top draft is still the original draft; the bottom is the draft I am actually using for the shawl.

My only concern is that I might get confused when I actually start weaving. The spaces between treadles represent treadles which are tied up, but not for this particular weave. So I will be skipping treadles when I weave. Time will tell.

Having taken care of the tie-up and treadling, it was time to settle down to the actual unweaving. I carefully unwove about 40 shots of weft yarn, down to the initial pseudo plain weave beginning. To do this, I cut the weft yarn and wound it onto a spool that fits into my LeClerc boat shuttle. After removing 4 shots worth of weft, I started winding, then put the spool back into the shuttle and unwove 4 more shots. Removed it, and wound what I had just unwoven. And so I continued.

I could not use my Bluster Bay pirn and shuttle because there was no way I could wind that pirn correctly by hand.

So now I am ready to begin. Again………….

Related Posts:
Unweaving
Into Every Life…
Unweaving and Weaving
Pirn Winding


Weaving Begins…and So Does Unweaving” was written by Margaret Carpenter for Talking about Weaving and was originally posted on March 5, 2009. ©2009 Margaret Carpenter aka Peg in South Carolina
Wednesday, March 4, 2009

LASHING ON TO THE FRONT OF THE LOOM: PART TWO

Posted by Peg in South Carolina
lashed on

MASON TWINE

This time the lashing on went without incident.  Also, this time I measured out a generous 8 yards of the mason’s twine instead of 10 yards.  I still had plenty extra.  By the way, I forgot to mention in the last post that my use of pickup sticks to keep the rod from moving around while I lashed on was from a tip I got from Leigh.  Leigh used rulers.  I didn’t have rulers, so I turned to pickup sticks.

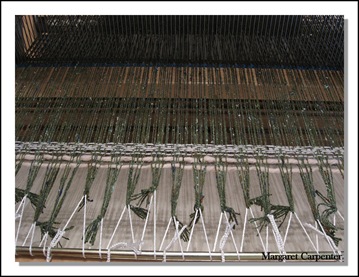
When I lash on I go through about one quarter of the warp bouts.  Then I go back to the first bout and begin to retighten the bouts I have just lashed on.  Then I lash on to the half-way mark and go back to the beginning to retighten, continuing the retightening process to where I have stopped.  I do the same thing after I reach the 3/4 point and then again at the end.  I then tie the cord to the rod on the ending side.  Then I go to the front and check the evenness.  This time it seemed quite even without any further fiddling with the lashing cord.

The first photo shows the warp lashed on.  The warp ends were different lengths, but this will not affect the next step.

First shots thrown

SPREADING THE WARP

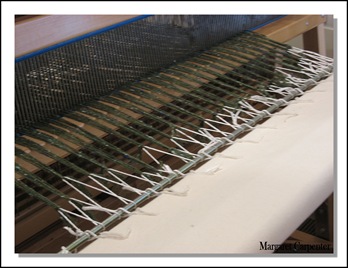
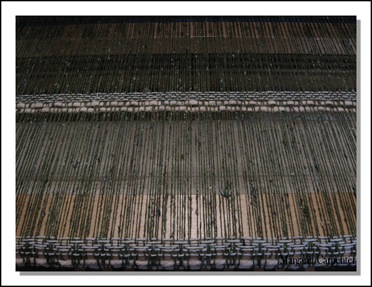
The next step is to throw the initial shots that will spread the warp.  Normally I use fine weft yarn to do this, but this time, because of the few threads per inch, I spread the warp in two stages.  First, I threw two shots in pseudo plain weave (canvas weave has no genuine plain weave possibilities) with a heavy wool rug yarn.  Then I threw four shots in pseudo plain weave with the wool yarn I had used for the sampling.  The second photo on the left shows these initial shots.

These shots have another purpose.  They show me if I have any incorrect threadings.  And they show me if I have any warp threads crossed behind the reed.  The threading is correct.  And there are no crossed threads.  When I am warping with very fine yarns at high epi’s, it is not at all unusual for me to have one or two crossed threads.  This yarn is much easier to work with.

ALLOWING FOR FRINGE

I’m still not ready to start weaving because I want a fringe.  A 10” fringe. This is kind of long but intend either to braid or to twist the ends.  Either process will shorten the fringe some.

Allowing for fringe To allow for the fringe I repeat the shots I just did, only farther back on the warp. The third picture on the left shows these shots thrown.  Now I am ready to start weaving.

POSTSCRIPT

For an excellent post on lashing on with lots of detail photos, go to this post from Leigh’s Fiber Journal.


Related Post:  Lashing on to the Front of the Loom:  Part One


Lashing on to the Front of the Loom: Part Two” was written by Margaret Carpenter for Talking about Weaving and was originally posted on March 4, 2009. ©2009 Margaret Carpenter aka Peg in South Carolina
Tuesday, March 3, 2009

LASHING ON: I AM ONCE AGAIN A BEGINNER

Posted by Peg in South Carolina
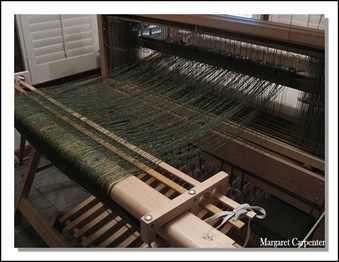
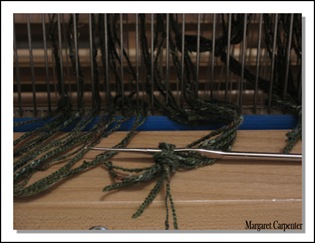
I got the warp lashed on. I went to the back of the loom to check the tension. And I saw them. Them. Two warp yarns. Two warp yarns hanging loose. Oh my ………… I followed them to the front of the loom. They were in the heddles. They were not in the reed. Nor was there a reed space from which they had fallen out.

I did not take a photo. I was too upset. I just wanted to find out what went wrong and correct it.

This has not happened to me since my first year of weaving. It first occurred when, after a marathon weekend learn-to-weave class at my weaving guild, I put my first warp on my own loom at home. I was aghast but got it fixed.

During my first year of weaving, “losing” warp ends was not an unusual occurrence. The most likely place this happened was in sleying the reed, though it also happened in threading. I learned quickly to keep my eyes open for possible dropped warp ends. Apparently I have gotten a bit lax recently in my watchfulness. By at least the ends dropped while sleying the reed rather than while threading the heddles.

Undoing overhand knot What I had to do was to remove the lashing cord and then undo the knots in the bouts from the problem area over to the closest selvedge. Fortunately not many. Undoing the knots is a bit finicky, but with the help of a small crochet hook, it’s not too bad.

What makes me angry with myself is not so much my lack of watchfulness. It is that there was a clue that this had happened. A very big clue. And, except for a slight question mark in my mind, I paid absolutely no attention to it.

The clue came when I was tying the overhand knots in preparation for the lashing on. I started at the right and moved to the left. When I got to the left, the warp ends going through the reed did not end up in the same way as they had on the right. On the right, there were six warp ends in three reed openings. On the left there were four warp ends in two openings. They should have been identical since I started in the middle and worked first right and then left as I sleyed.

My excuse is that in my weaving, they rarely come out the same on each side. But there is a reason. The center of my warp is rarely at the center of my reed. This happens at the threading. When I count the number of heddles I need on the right side on each shaft, it never comes out right when I actually do the threading. And this despite the fact that my weaving program, PixeLoom, very nicely does the counting for me. Sob…… But on this warp, it came out right in the threading. The center of the warp was right where it should be. So the sleying should have been identical on each side. I should have stopped to think all of this out and then looked for the reason. But I didn’t.

It is in the nature of my being somehow to be careless in the details of things. It is always my inclination, for example, just to let mistakes stay. Weaving is a great corrective to this tendency. But it is a bit painful!

Related Post: Wool Crackle for Crackle Exchange


Lashing On: I Am Once Again a Beginner” was written by Margaret Carpenter for Talking about Weaving and was originally posted on March 3, 2009. ©2009 Margaret Carpenter aka Peg in South Carolina
Monday, March 2, 2009

LASHING ON TO THE FRONT OF THE LOOM: PART ONE

Posted by Peg in South Carolina

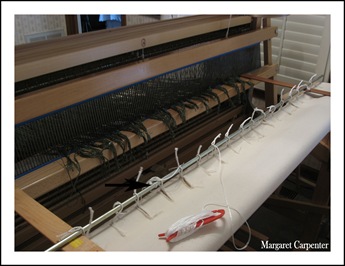
Raddle removed lease sticks in angel wings To prepare for tying on I removed the raddle from the back beam.  I attached the Angel Wings to the back beam.  The one on the right side of the back beam is visible in the first photo.  In it are two holes through which I slip the lease sticks. After I moved the lease sticks in, I retied them with shoe laces.

The next thing I did was to tie the warp ends together in groups of 8.  Since there were so few ends, I had been going to group 12-16 ends together.  But then I read – I think in Chandler – that you should never ever lash on or tie on groups larger than one inch; and preferably the groups should be less than one inch. Doing this helps insure that all the warp ends will be tensioned equally. 

Since there are 8 ends in an inch here, I grouped the warp ends in groups of 8.  Each of these I tied together using an overhand knot pulled tightly.

Ready to lash As I was doing the knotting, I noticed that the ends on the left were noticeably shorter than those on the right.  So, in order to get the lengths relatively the same, I ended up making a second knot in each of the shorter groups and cutting off the first knots.

In retrospect, it would have been more efficient to check the lengths before tying the knots, then trimming those that were too long. In the second picture, they can be seen hanging from the reed over the shuttle race.

I pulled the apron rod up and over the front beam. I also put on two pick-up sticks, one on each side of the warp, to keep the apron rod from flopping around.

I got out my mason twine which is what I use for lashing on.  It is good for this because it is slippery.  I measured ten times the width of the warp. Most directions say seven or eight times but I worry…….  I wound the twine onto the red knitting bobbin visible sitting on top of the apron.  I knotted it onto the left side of the rod. The black arrow in the second photo shows the point where I knotted it on.  I am ready to lash on.

Related Posts:  
Questions on Preparing Warp Bouts
Preparing for Lashing One
Lashing On To The Front Rod
Lashing on to the Front Rod


Lashing on to the Front of the Loom: Part One” was written by Margaret Carpenter for Talking about Weaving and was originally posted on March 2, 2009. ©2009 Margaret Carpenter aka Peg in South Carolina