Tuesday, June 30, 2009

SLOWING DOWN THE WEAVING STILL MORE

Posted by Peg in South Carolina

In addition to the complexity of the treadling, there are other issues that slow down my weaving.

Another thing that happens is that throwing a shuttle will pull the loop from the other shuttle into the shot.  So I have to check to see if this has happened.  Sometimes the extra weft pulled in is visible, but mostly not.

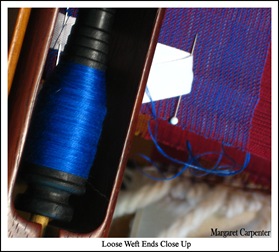
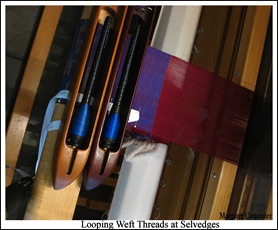
The first image shows the loose hanging weft yarns. The second image shows the detail.  

Looping Weft Threads at Selvedges

Just a bit of a mess there.  No wonder weft gets caught  up where it doesn’t belong.

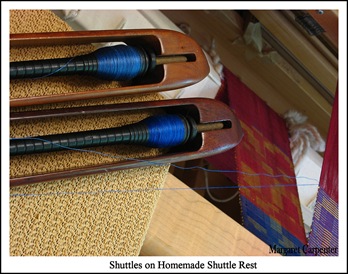
The weft ends hang that way because I rest the shuttles on the fabric.  There is no place for the weft emerging from the shuttle to go except to droop there at the edge of the fabric.


But if I were to place the shuttles on the bench by my side, there would be too much of the weft pulled out of the loose weft ends close upshuttle and it would be difficult to throw it correctly. And that would soon create its own mess.
What I need to do is to get out the boards I made for shuttle rests and position them on the loom.  That is exactly what I did.  It definitely helped. 

I still tug at the ends, but the ends are easier to get hold of.  And I still need to tug at them, because one still does occasionally get caught up, but usually only barely.

This setup has made my weaving more relaxing and quicker……..well, relatively quicker!  But the more relaxing did surprise me.

Shuttles on homemade shuttle rest

You can see how little of a mess there is any more.

The board I got from the waste pile at Lowe’s or Home Depot.  Then I covered it with rug liner so that the shuttles would not slip.  I attach it with a C-clamp.  There is one on the right side of the loom as well.

Related Posts:
Weaving with Multiple Shuttles
Managing Multiple Shuttles


Slowing Down the Weaving Still More” was written by Margaret Carpenter for Talking about Weaving and was originally posted on June 30, 2009. ©2009 Margaret Carpenter aka Peg in South Carolina
Monday, June 29, 2009

SLOW WEAVING

Posted by Peg in South Carolina

It takes me a long time to weave my crackle pieces. There are several reasons for this:

1. I am generally working with fine silk at fine setts.
2. I am usually working with multiple shuttles.
3. Sometimes the pattern of choosing shuttles as I weave changes as I weave.

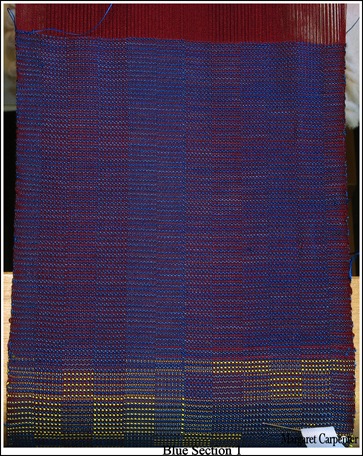
The following photo shows the fabric that just resulted from using two shuttles in a varying pattern:

Blue section 1

This is the first blue section of the second half of the crackle scarf/sample I am currently weaving. Looking carefully at the fabric shows a constantly shifting muted pattern. The pattern varying the way I treadle. The easiest way to show how this slows down my weaving is to reproduce my treadling notes.

Before presenting these, I need to remind you that I have six treadles tied up and I am treadling them one after the other. One sequence, then, consists of six treadles in a row. Here they are:

1. 1 shot bright blue, 1 shot dark blue….repeat through the 6 treadles. Repeat this sequence a total of 3 times.
2. 2 shots dark blue, 2 shots light blue, 2 shots dark blue. Repeat this one more time.
3. 1 shot bright blue, 1 shot dark blue…repeat through the 6 treadles
4. 2 shots dark blue, 2 shots light blue, 2 shots dark blue.
5. 1 shot bright blue, 1 shot dark blue…repeat through the 6 treadles
6. 2 shots dark blue, 2 shots bright blue, 2 shots dark blue
7. 2 shots bight blue, 2 shots dark blue, 2 shots bright blue
8. 2 shots dark blue, 2 shots bright blue, 2 shots dark blue
9. 1 shot bright blue, 1 shot dark blue…..repeat through the 6 treadles.

This is one fully treadled section. It represents a binary system I designed and consists of 64 shots. It measures not quite 1” in length. I weave this four more times for a total of five repeats.

This is the same way I wove the red sections in the first half. Go here to read more about that.

Slow weaving? yes indeed!

Related Posts:
Binary Sequences and Designing
Managing 3 Shuttles
Slow Weaving (written in 2007)


Slow Weaving” was written by Margaret Carpenter for Talking about Weaving and was originally posted on June 29, 2009. ©2009 Margaret Carpenter aka Peg in South Carolina
Friday, June 26, 2009

TO READ

Posted by Peg in South Carolina

KEEPING A PROJECT SKETCHBOOK

Sketchbooks -- Laritza has come up with a good idea for a project sketchbook.  She has set up the things it must be able to do and come up with a solution which I am considering for my own projects.

WHY DO LESS MORE SLOWLY?

The Seven Essential Rules for Slowing Down and Enjoying Life More – this little essay from Zen Habits really got to me, especially the suggestions to do less and eat more slowly.  How in the world can I do less?  Well, I could forget about the bra…………  My choice……..sigh.

If that isn’t enough, I found the introductory page for Zen Habits:  The Beginner’s Guide To Zen Habits  This page consists of links to all  sorts of amazing reading.  So I guess I’m not going to do less after all………

ANALYZING PATTERNS IN ART

Robert Genn has given me much to think about in his essay called Patterns. Though he has written this for artists, I believe there is much there that I can start thinking about in terms of my weaving, especially if I start using my weaving software in ways that better allow me to visualize the pattern of a whole piece.  I have printed this out for a ready reference to questions to ask myself.  And I have copied it into my E-sketchbook as well.

SOCIAL NETWORKING

Social networking is the rage these days, among weavers as well as all sorts of other people.  Keep in mind that both Ravelry and Weavolution are social networking sites.   With this in mind I found a recent post by DoshDosh, Social Media Networking and ROI: How to Maximize Value and Minimize Cost.  For me the title was a turn-off.  But it turned out to be a most interesting read.  If you keep in mind that value and cost do not have to refer to money necessarily, I would definitely recommend this piece.

TRACK BROWSING TIME

If you have Firefox, here is a very cruel extension that seems to work very easily to keep precise track of your browsing time.  Go here if you are interested in downloading it.  No, I have NOT downloaded it……..yet……….  I don’t think I want to…… 

A QUILTER’S CREATIVE PROCESS

I love to read how artists work out their creative ideas in the thinking and planning stages.  Weavers, fiber artists, visual artists, composers.  In this case the artist is quilt artist Carol Taylor.  An interview with her appears on Terry Jarrard-Dimond’s blog and can be read here.

PHOTOGRAPHING WOVEN GARMENTS

I found a rare treat on Daryl’s blog:  a wonderful essay called Photographs with images of Daryl photographing her garments.


To Read” was written by Margaret Carpenter for Talking about Weaving and was originally posted on June 26, 2009. ©2009 Margaret Carpenter aka Peg in South Carolina
Thursday, June 25, 2009

TYING UP TREADLES

Posted by Peg in South Carolina


On my current warp I have six treadles tied up.  But I have a total of ten treadles on the loom.  I could have tied up the first six treadles on the left side.  Or I could have tied up the center six treadles.  I decided to tie up the center six.

There is a definite ergonomic advantage to tying up the center six treadles.  Doing this keeps my legs closer to my body as I weave.  That translates into the fact that it is physically easier on my legs (and one arthritic ankle) to weave with the center treadles tied up.

But, as with most everything, there is a price to be paid.  Some times I don’t start far enough to the left at the beginning of the treadling sequence. When that happens, I begin the treadling sequence with treadle four instead of treadle three.  Since I am treadling straight and because for some reason I see more easily what is going on to the right of my body, by the time I get to what is supposed to be treadle five in the sequence I realize that I have not enough treadles left on the right.  So I unweave a bit and start again.  This has happened only a few times, so it’s really not a significant price.

The other problem is what to call these treadles when I am writing this blog or talking to others.  Sometimes I call them 1,2,3…….;   sometimes 3,4,5….  They exist in my computer drawdown as 1,2,3……..  I think it is probably least confusing to refer to them as 1,2,3…….  The actual physical tie-up is only a matter of ergonomics.

For myself, however, in my head I think 3,4,5…….as I am weaving.  If I did not talk to myself like this, I might really have treadling problems!  And so in my written notes I refer to them as 3,4,5………..

Related Post:  Ergonomics at the Loom


Tying up Treadles” was written by Margaret Carpenter for Talking about Weaving and was originally posted on June 25, 2009. ©2009 Margaret Carpenter aka Peg in South Carolina

Wednesday, June 24, 2009

WEAVING SOFTWARE LUST

Posted by Peg in South Carolina

Someone on the WeaveTech list talked about a piece of weaving software she had purchased recently.  It is called Pointcarre and you can learn about it here.  Also check this site, PointcarreUSA. To read an interesting and illustrated piece published by MCADVision Magazine, go here.

I had heard of Pointcarre before but thought it was really for jacquard weavers or multi-(more than 8) shaft weavers. For  professional weavers whether they worked on their own or in industry. Not for someone like me.  But when I learned how it could be used both to design and show what the fabric would look like when woven, I developed severe software lust.

I quickly learned from the post on WeaveTech that you had to spend two to three days in New York City to learn how to use the program.  Then I knew, not only that the program was horribly expensive, but way beyond anything I needed or even wanted.  Still, seeing the phrase “photorealistic simulations” on their web site did not help this knowledge….  Did I mention that this photorealistic simulation includes the kind of yarn? Sigh.

But they do sell a CDRom of almost 4,000 weaves.  Reading the description suggests it might be useful even to a lowly 8-shaft weaver.  But when the website tells you to contact them to order it, I know it is way to expensive.  It is like expensive clothing, cars, and the like.  If I have to ask the price, I can’t afford it.

Besides, I know this program won’t get the color interactions right either.  I have to actually weave for that……….


Weaving Software Lust” was written by Margaret Carpenter for Talking about Weaving and was originally posted on June 24, 2009. ©2009 Margaret Carpenter aka Peg in South Carolina

Tuesday, June 23, 2009

WILL THIS WORK?

Posted by Peg in South Carolina

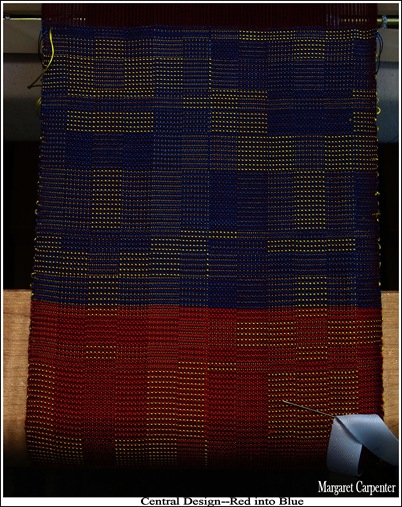
Center Design

At the center of the warp I changed the background colors from reds to blues. Not a subtle shift.  Just one color smack against the other. 

The second half will be woven in blues;

Will this work?


Will This Work?” was written by Margaret Carpenter for Talking about Weaving and was originally posted on June 23, 2009. ©2009 Margaret Carpenter aka Peg in South Carolina

Monday, June 22, 2009

FABRIC SIMULATION/APPEARANCE

Posted by Peg in South Carolina

Fabric Simulation for blog

I have not liked the way my weaving software represents the design of the fabric as it will look when woven. It is not just a matter of color interaction. The pattern wefts are never close enough together and so the image on the screen always looks a bit strange to me. So I went through a rather elaborate convolution with my weaving software to simulate what it would look like.

I have called this a simulation because I have made changes in the treadling that make the draft unweavable. Its only function is to create the right appearance.

What you see above is what I came up with. I was pleased.

But then I did this.

Fabric appearance in software blpog

Here is how I did it:

1. I copied the draft
2. I pasted it into Paint Shop Pro
3. I saved it as a jpeg and edited it.
4. I opened Windows Live Writer and brought it into the page for this post.
5. In WLW, I enlarged it.

It so happens that I used a draft with a different order of treadling from the one I used in the first image. But even so, it is clear that producing an image of crackle more in keeping with what the woven fabric is going to look like is far easier than I had thought at first.

And so the title I have given to the image is deceiving. This is not really how the fabric appears in the software. It is how the fabric appears after copying the draft from the software into another program (in this case, Windows Live Writer), and then enlarging that image.

If I am not interested in editing the image in graphics software, I can simply copy the image into a Word document, perhaps the document I am keeping my records in for that particular project, and enlarge it there. Very simple.

I am thinking that doing doing this will be especially useful in drafts where there are few or no repeats in the threading design, and even more useful when the treadling of the blocks varies a great deal. This piece is only six inches wide and with only one repeat. My next piece may be 18” or more wide, probably with few repeats in the threading, if any. I am getting eager to move on to this piece, but there is still much to do.

Related Post:
Playing with Color
PixeLoom, Paint Shop Pro and Gradated Warps
Viewing Weaving Drafts


Fabric Simulation/Appearance” was written by Margaret Carpenter for Talking about Weaving and was originally posted on June 22, 2009. ©2009 Margaret Carpenter aka Peg in South Carolina
Friday, June 19, 2009

CRACKLE WITH FLOATS OF FOUR (OR MORE)

Posted by Peg in South Carolina

Anyone who has ever woven crackle knows that one of the givens is floats of 3 in the weft pattern. No fewer. No more.

Zielinski addresses this in Volume 8 of the Master Weaver Library. The section is called “Crackle with Floats of Four.” I read this and immediately wondered if I couldn’t do this with 8-block crackle woven on 4 shafts. I set to work and here is what I came up with.

Clarifying the blocks by color

To help keep things straight and facilitate my ability to understand what was going on, I did some color coding.

EXPLAINING THE DRAFT

There are 8 separate threading blocks. Each threading block has its own color warp thread. There are two units in each block. The blocks are threaded in straight twill order.

Looking closely at the draft shows an occasional black warp end. These are incidentals needed to adjust the joins between blocks. I wanted these incidental warp yarns to be black so that I would easily recognize them as such.

The blocks on either end are identical; I did that so I could check out block transitions in repeating the threading.

Each treadling represents a separate threading block. In each of those threadling blocks there is a at least one threading block which shows the 4-thread weft float. So I assigned a light version of the warp color in the block in which it first appears across the row to that threading.

ANALYSIS

The first two treadles show the floats in two different threading blocks. In the case of the first shot, floats appear both in the red block (hence the pink weft) and the brown block. In the case of the second shot, floats appear both in the navy block (hence the light blue weft) and in the orange block.

With the third shot, the violet weft, there are the 4-shot floats in the purple threading block. Then that violet seems to come close with a 4-float and a 3-float warp in the green threading block. But when I went back to the original drawdown and checked more carefully, I saw a threading error I had made in the design. I corrected it (it is NOT corrected in the above image).

The green shot has its 4-thread float in the green threading block. It also has one 4-thread float falling between the green and the red-violet threading blocks. That placement suggests that I have made a mistake with the black incidental warp end there. I checked and it turned out that if I removed the end and the end to the right of it, all was well. (Again, this correction is NOT shown in the above image).

The fifth and sixth shots have 4-float wefts occurring only in their respective threading blocks.

QUESTION

So, 3 treadles result in 4-float wefts showing in two different threading blocks. The other 3 treadles result in 4-float wefts showing in only one threading block. Is this true in Zielinski’s structure with 3 floats? I will color code them.

USEFULNESS OF COLOR CODING

This color coding has been enormously helpful in revealing problems. And it is giving me more understanding of crackle. Not only am I going to color code Zielinski’s crackle, I am going to color code regular 4-shaft crackle. I know that with regular 4-shaft crackle two blocks always appear with each treadling. But I have never understood how to figure that out. I think color coding will help.

CONCLUSION

Color coding looks to be a promising tool! And weaving 8-block-on-4-shaft crackle with weft floats of more than 3 seems it might be viable.

Related Post:
Crackle Threading Review
Crackle: The Incidental Threads


Crackle with Floats of Four (or More)” was written by Margaret Carpenter for Talking about Weaving and was originally posted on June 19, 2009. ©2009 Margaret Carpenter aka Peg in South Carolina

Thursday, June 18, 2009

DYEING RECORDS

Posted by Peg in South Carolina

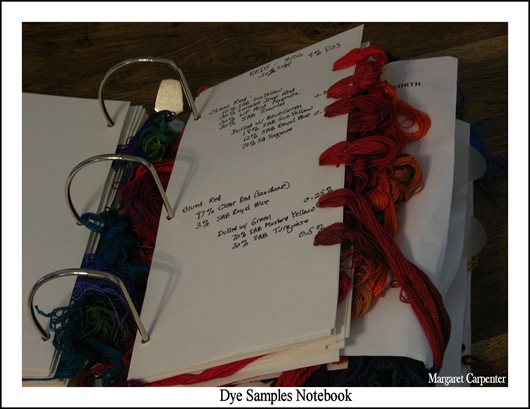
Dye Samples Notebook

This is one of two ways I keep dyeing records.  This one consists of a 3-ring binder.  I make cardboard pages about 4” wide by 11” tall.  I punch 3 holes in the left side to fit into the binder.  Then I punch multiple holes on the right side in which to tie samples.

I write in the dye formulas for each of the samples and include at the top information about the fiber.

Each page is devoted to a different color.  The page open here is a group of reds.

The front half of the binder consists of samples of silk yarns.  The second half consists of samples of wool yarn.  Doubtless there will come a point when I will need to separate these into two ring binders.

This binder is devoted to those fibers dyed with acid dyes.  I use primarily Lanaset dyes but I do occasionally use Washfast Acid dyes.

I have a second binder which is devoted to fibers dyed with Procion MX dyes.  These past few years, that binder has seen little use as my work has primarily been with silk.

I keep the binders in a plastic box in a closed cabinets.  I do not want to expose the dyed yarns to light because I do not want the colors to be affected by light over time.

Related Posts: 
   First Dye Samples: Take Two
   Keeping Records

image


Dyeing Records” was written by Margaret Carpenter for Talking about Weaving and was originally posted on June 18, 2009. ©2009 Margaret Carpenter aka Peg in South Carolina
Tuesday, June 16, 2009

TEMPTATION

Posted by Peg in South Carolina

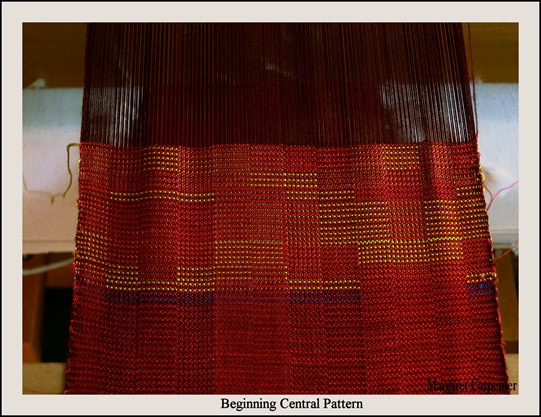
Beginning Central Pattern

Two weaving temptations have recently assailed me.

1. I was tempted not to unweave something that was just plain wrong.

2. I was tempted to let the second blue dyeing of the silk stand even though it still had more of a yellow cast than I was happy with.

TEMPTATION NOT TO UNWEAVE

The first temptation centered on a treadling error.  First I treadled 2x with pattern weft on treadle 4.  Those are the first two lines of gold weft visible in the photo above.  Now, for a moment, forget about the rest of the golds.

I was then to treadle 3x with pattern weft on treadle 8.  When I had finished what I supposed was the second treadling group, which was to be treadled 3x,  I discovered I had treadled it only 2x.  So I treadled one more group.  It did not look right. 

It did not look right because it was not right. After I treadled the first group 2x, I treadled 1x the next/correct pattern treadle.  But for the next 2 pattern treadles I went to a new treadle.

Hmm.  It wasn’t right but it did look kind of interesting. Could l I turn this “mistake” into a pattern?  Between every group of blocks I could treadle one group with the pattern weft thrown on a treadle different from what I had just treadled and what was to follow.  I would determine, at the moment of change which treadle to use for that pattern treadle on the single group of 8 treadles.

So, with this thought in mind, I continued.  It was not very long before reality set in. This was an interesting idea.  For another piece.

The problem was that it destroyed the clarity of the pattern, a clarity which characterized the patterns of the first two pattern stripes.  Looking at the photo above, which is correctly woven, shows that pattern clarity very well.

So I unwove.  Not fun, but not difficult and, since I had woven only about 1 inch (probably had thrown 60 shots), it did not take all that long.

Should I just have unwoven when I first saw the problem?  Doing this would have saved some time.  Oh the other hand, by weaving this new idea I learned, not just that it wouldn’t work for this piece, but also that it was nonetheless an interesting idea. And it working on this led me to understanding a bit more about the qualities of this piece I am weaving.  So, no, I should not have just unwoven without giving the new idea a chance.  

The selvedge ends looked a little frayed, but I didn’t worry.  I could always replace them if they broke (they didn’t break.).

TEMPTATION NOT TO DYE A THIRD BLUE

Unlike the first temptation, the second temptation haunted me for days.  I had dyed the second dulled blue, but when I compared its to the first dulled blue and to the bright blue against which it would be woven, I just wasn’t really happy.

Back and forth I went.  The color will do. No, it won’t do; it has too much of a yellow color cast.  Yes, it will do; it is clearly better than the first dye lot.  No, it won’t do; I can’t live with that yellow cast.  And so on.

At the loom, I wasn’t ready for the dulled blue yet; I still had some more weaving with the reds to go.  So I continued to go back and forth in my head, resisting what I knew I was going to have to do.

I finally broke down.  I wound the white silk weft.  I redid the formula. I dyed.  And now it sits in the dye pot, soaking the very last bits of dye molecules that it can, waiting for the morning when I can rinse and dry.

Related Posts: 
   Resisting Doing the Work
   Improvising at the Loom
   Weaving as Exploration

image


Temptation” was written by Margaret Carpenter for Talking about Weaving and was originally posted on June 16, 2009. ©2009 Margaret Carpenter aka Peg in South Carolina

Monday, June 15, 2009

BLOG ANNIVERSARY!

Posted by Peg in South Carolina

Today begins my second year of blogging.  Well, actually, it was Saturday, but I don’t normally write blogs on Saturday. Anyone curious about my first blog post (besides me!) can go here to check it out.

Writing this blog has turned out to be playing a vital role in my development as a weaver. I am grateful to those of you who encouraged me to start a blog.

I am grateful to all of you who take the time to read it, whether or not you comment. I know that commenting takes up precious time, something few of us have enough of.

And I am grateful to all you weaving bloggers. The community you have created also plays an important role in my weaving. I only regret that, like you, have precious little time to comment.

Related Post:  Weaving and Blogging 

Blog Anniversary!” was written by Margaret Carpenter for Talking about Weaving and was originally posted on June 15, 2009. ©2009 Margaret Carpenter aka Peg in South Carolina
Friday, June 12, 2009

PIRN PROBLEMS

Posted by Peg in South Carolina

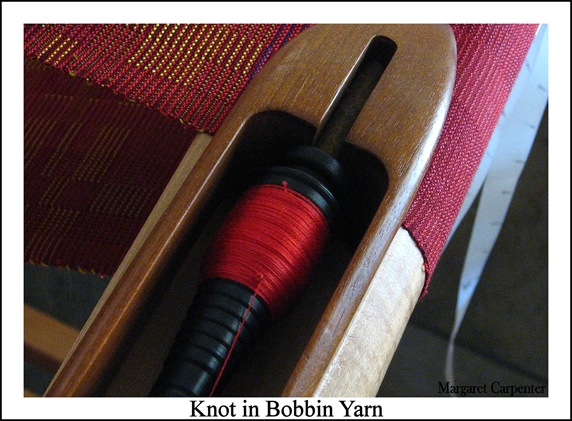
Knot in bobbin yarn

Here is one of my pirns sitting in a Bluster Bay shuttle. Look closely at the yarn on the pirn.  Can you see the problem?  Towards the front there is a visible knot.  And the thread that is coming from the pirn—the thread that is going to be woven into the warp—is caught around it. 

Every time the yarn goes around that pirn as I pull the thread out, it catches on that knot.  And stops in its tracks. So I have to stop and pull it off the knot.  As soon as the part of the yarn with the knot comes off, the problem is gone. 

On the other pirn there are multiple knots….

Not a fun way to weave, but the warp is narrow and the weaving is time consuming anyway. But were I weaving something like a straight twill with only one shuttle, this issue would prove maddening.  Indeed, when winding the pirns I would stop when I came to a knot and either throw out what I had wound and stop again if there were not very much.  Or, if there was quite a bit on, I would start a new pirn.

Related Post:  
Pirns and Bobbins Wound
Pirn Winding


Pirn Problems” was written by Margaret Carpenter for Talking about Weaving and was originally posted on June 12, 2009. ©2009 Margaret Carpenter aka Peg in South Carolina
Thursday, June 11, 2009

DESIGNING THE MIDDLE SECTION

Posted by Peg in South Carolina

I am getting close to the middle section of this sample/scarf that is on my loom.  But I have not yet designed it.  All I know is that I want to use treadlings from both of the previous two design groups, combining them in some way.

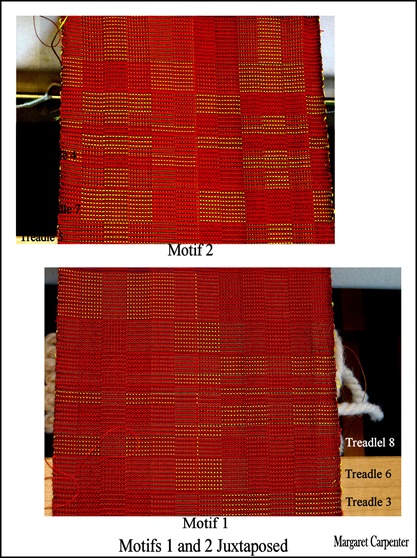
To help me design this section, I needed to see together those two motif sections I had woven.  With the scarf still on the loom, that was pretty much impossible.

So I went into Paint Shop Pro and created the following image:

Motifs 1 and 2 juxtaposed

I even managed to label the treadles to make it easier to work with.  I have printed this out.  In black and white since all I have is a laser black-and-white printer.  But the contrasts are clear and that is what matters.

I am so pleased with the results of my efforts that I find myself staring at the photo with cat-like pleasure. I cannot even bring myself to work on the designing---the very reason for going through this work!

I am definitely no longer “distracted and out of sorts.”

Related Posts:  
   Motif Stripe 2
   Figure and Ground

image


Designing the Middle Section” was written by Margaret Carpenter for Talking about Weaving and was originally posted on June 11, 2009. ©2009 Margaret Carpenter aka Peg in South Carolina

Wednesday, June 10, 2009

DISTRACTED AND OUT OF SORTS

Posted by Peg in South Carolina

And maybe even a bit grouchy…………

It all started innocently enough: I decided to make a bra. Yes, in case you didn’t hear me correctly, a brassiere.

I do sew. As a matter of fact, I sew pretty well. I don’t sew a lot anymore. Mostly just occasionally on weekends. Weekends are when I do non-weaving things I enjoy. Sewing is one of those things.

Because I like to sew, I follow a few sewing blogs. Not many. Just a few blogs that really interest me. I don’t comment. I just haunt them. Until one blogger suggested a bra sew-along.

This blogger sews beautiful bras.

I love beautiful things.

The mountain was in front of me.

I joined the bra sew-along.

To say the least, things have not gone well, and I haven’t even started sewing a bra. It took me at least a week to decide on a pattern, and then I finally bought two patterns because I just didn’t know what to look for.

And I also decided I would start with a camisole and panties. Sort of work my way up to the bra. The camisole was a disaster and I hated the panties. I sulked. I posted on the sew-along. I sulked some more.

I knew what was wrong. The basic thing was that I hated the fabric. So I ordered the right fabric and figured out what to do right with it.

And then I ordered the fabric and supplies for the bra. How many hours did I spend in front of the computer trying to figure out who to order from and exactly what to order? Hours down a seemingly endless hole.

For the past ten days it seems I have spending much of my life on the internet trying to get all of this sorted out. Weaving has suffered. I have been so anxious that I’ve neglected my aerobic exercising, though not my yoga. Even my bum ankle squawks at me when I sit for too long in front of the computer.

But at last I feel like I am coming out of that dark hole that sits in the computer screen and finally returning. It feels good to be leaving behind all that anxiety. Sewing can return to being a fun weekend activity, a change of pace from weaving activities.

Related Post:
Maddened by Ideas
Focus: A Postscript


Distracted and Out of Sorts” was written by Margaret Carpenter for Talking about Weaving and was originally posted on June 9, 2009. ©2009 Margaret Carpenter aka Peg in South Carolina

Tuesday, June 9, 2009

WEAVOLUTION

Posted by Peg in South Carolina

This is the official press release for the weaver’s answer to Ravelry. I have signed up—look for me as Peg in South Carolina. I encourage everyone to take a look. You don’t have to sign up to look around. You sign up only if you want to participate.

JOIN THE WEAVOLUTION

The new online gathering place for hand weavers

Weavolution.com, an online social network designed to meet the unique needs of handweavers, launches its beta test on June 8, 2009. Designed to bring handweavers together from around the world, Weavolution.com is a one-stop resource for every type of handweaver.

From hobby to production, from peg to dobby, Weavolution provides a place for weavers to meet, discuss and participate in moderated user groups and forums.

Members may post projects, looms, yarns, books, and accessories to share with others and solicit feedback from other members.

But you don’t have to be a member or even a weaver to explore the site and learn about weaving free of charge.

Weavolution aims to become an inclusive, global community that encourages weavers by enabling them to discover andclip_image002 follow trends in weaving; find local, national and international resources; and find businesses catering to their needs. Weavolution members can search the site’s databases to view items, group postings and research information catalogued by others.

Weavolution’s goal is to provide a website for handweavers that is useful, fun and helpful, and to be a resource for shops, products and ideas from around the corner and around the world.

The project began in 2008 when three weavers from across the United States, Claudia Segal, Tien Chiu, and Alison Giachetti, met online and formed Weavolution. Working together with a host of dedicated volunteers, the team forged Weavolution.com into a website with the potential to become a community.

Come, take a look. Weavolution.com is available for anyone to explore. You don’t have to sign up to see our site. But if you do, we hope you’ll decide to

JOIN THE WEAVOLUTION


Weavolution” was written by Margaret Carpenter for Talking about Weaving and was originally posted on June 9, 2009. ©2009 Margaret Carpenter aka Peg in South Carolina
Monday, June 8, 2009

DULLED BLUE

Posted by Peg in South Carolina

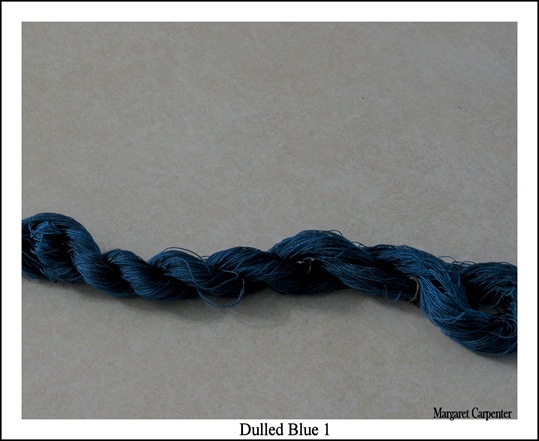
Dulled Blue 1

I am not happy with the way the dulled blue turned out.  Not that the color isn’t perfectly beautiful.  I actually adore it.  But for what I am currently weaving, there are two problems:

1. The blue is not nearly dull enough
2. The blue has morphed into a blue-green

So I have changed the formulas.

YELLOW AND RED FOR ORANGE

First, I have drastically revised the orange, which, being the complement of blue, is the toner color.  Instead of having it consist of 85% SAB Sun Yellow and 15% SAB Scarlet, I used the following proportions: 60% SAB Sun Yellow and 40% SAB Scarlet.  I made this quite radical change because I realized that SAB Scarlet tends to lean towards yellow anyway.

ORANGE AND BLUE PROPORTIONS

Second, I revised the proportion of toner to the blue.  Because I wanted more dulling, instead of 90% SAB Royal Blue plus 10% of the toning orange, I am using 85% SAB Royal Blue plus 15% of the toning orange.

This last change makes me a little nervous.  Because there is more red in the orange this time, that alone will have a greater dulling effect, since red is a much stronger color than yellow.  Should I therefore have kept the proportions of blue to orange the same?  I will find out!

KEEPING RECORDS

When I do intentional dye sampling I keep pretty good records.  When I do some kind of gradated dye run, I wind the samples on a piece of card with limited notations and keep the complete records in a Word document.

When I am just sampling colors to see what they look like, I put swatches on large pieces of card with holes punched in to hold the sample swatches.  I keep similar colors on the same card and keep the cards in a 3-ring binder.

I also have good written records of the dyeing I do for my weaving projects.  But what I have consistently failed to do is to keep the swatches of those yarns I dyed. 

I plan to change that beginning now.  I am haunted by the possibility that somewhere I have made the right dulled blue for this project but for which I have no record; and so I am re-creating the wheel, so to speak.  Probably not true, but……

Related Post:  
Keeping Records
Changing My Mind Midstream

image

Dulled Blue” was written by Margaret Carpenter for Talking about Weaving and was originally posted on June 8, 2009. ©2009 Margaret Carpenter aka Peg in South Carolina

Thursday, June 4, 2009

3:00 IN THE MORNING

Posted by Peg in South Carolina

image

My E-sketchbook is both a blessing and a curse. It allows me to wake up in the middle of the night and open it up. So much for sleep. But it allows me to get my ideas down in a format that is much more useful to me than simply taking linear notes, especially in my pretty much illegible handwriting.

The two pages above are the result of a recent middle-of-the-night awakening.

One thing I was easily able to do, because this is a computer and not a physical notebook, is to pull out from another page an idea that I thought might be useful to the current thinking these pages applies to. Copying and pasting is the greatest!

The images and notes in the upper left hand corner of the second page were pulled from an earlier page I noticed as I was skimming through this sketchbook. And I didn’t have to bring those in by copying each item one by one. I simply held down the shift key, clicked on each of the items and so created a group which I could move as a group. I can ungroup them any time I want. This is one of the nice gimmicks of Microsoft Publisher.

The items on the bottom half of the second page are also grouped, at least temporarily. They belong together. But should I want to move any one of them, I can easily ungroup them.

Another thing I have started to do is use two different type faces. I use plain Times New Roman for stuff that is pretty much purely technical or for things that I need/want to do. But I use a script type (Viner Hand ITC) for the idea notes. I had begun by doing all the notations in script simply because it looked attractive. But I thought the visual separation of the notes through typography might be more useful.

I do not make a point of making entries on a daily basis, though I had planned to do this. But keeping this sketchbook, even erratically, is proving to be enormously useful.

image Another thing I have done in the hopes of making this e-sketchbook more useful is to create a kind of table of contents at the beginning of the book. I thought that I would just list some of the things in the sketchbook. I assume that someday I will have multiple sketchbooks and I want to try to make things a bit easier to find. Of course, a lot of the value of the sketchbook is simply browsing through it randomly.

But now I have started to add page numbers to some of the items to make it easier to find things. I am up to 19 pages and will probably have a fair number more before I decide to start a second sketchbook.

By the way, the faint gray lines that surround all the entries do not print. They are simply the guidelines for what is being entered into them.

Related Posts:
Latest Entries in Sketchbook
Software for E-Sketchbooks

image

3:00 in the Morning” was written by Margaret Carpenter for Talking about Weaving and was originally posted on June 4, 2009. ©2009 Margaret Carpenter aka Peg in South Carolina

Wednesday, June 3, 2009

CHANGING MY MIND MIDSTREAM

Posted by Peg in South Carolina

I was not sure that I had enough of the dulled red silk for the other half of the scarf. I could dye some more. Yes. But I am dyeing in very small batches, 6 grams or less of fiber in each dye bath. Accurate reproduction at this scale is very very difficult. Would it matter? Maybe not.

But I started thinking of alternatives. And I decided that the other half was going to be different. The background color, instead of reds, was going to be blues.

I began thinking of using the large center design as the transition from the red to the blue.

I have some blue silk already dyed from another project that will work beautifully. What I do not have and need is a dulled blue. So I have worked out a formula, basically a bright blue dulled by a bit of orange. I have skeined 6 grams of yarn (200 yards), soaked it, mixed the dye and am now dyeing.

I dislike going to all the work of dyeing such a small amount. I thought about using this to start dye testing some greens for the Textile Museum project. But that would require a lot of work right now, translate, a lot of time. And I want to get on with the current project. And we are leaving town tomorrow for a few days. So one small skein it is.

Blue after 10 minutes

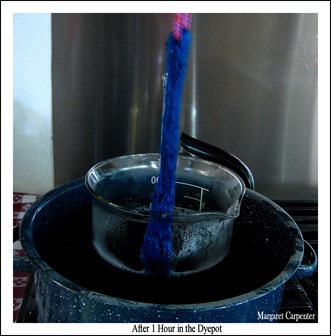
Blue after 1 hour in the dyepot


Here are photos of the same yarn taken at two different times in the dyepot. The one on the left had been in for about 10 minutes (after having soaked for 10 minutes in the additive solution alone). The one on the right has been in the dyepot for 1 hour, at which time it has reached a little over 180 degrees.

The yarn will stay in the dyepot for one more hour at the same temperature. The yarn should then be even slightly darker. Note, however, that wet yarn appears darker than dry yarn.

I dyed on the stove instead of using an electric frying pan. I still used a water bath in order to protect the yarn from scorching at the bottom. In addition, it is easier to control the heat with a water bath. And it was much easier to control the heat with this set up, using a gas range, than it is using an electric frying frying pan setup.


Related Posts:
Changing My Mind at the Warping Board
Designing the Christmas Towels Yet Again
Art Piece 4: I’ve Changed My Mind (Again)
Back to the Dyepots

image

Changing My Mind Midstream” was written by Margaret Carpenter for Talking about Weaving and was originally posted on June 3, 2009. ©2009 Margaret Carpenter aka Peg in South Carolina

Tuesday, June 2, 2009

DETAILS

Posted by Peg in South Carolina
Pattern Wefts DEtail

I have hard cropped part of the original photo to show in more detail just how the pattern weft operates. The blocks with the brightest yellows are the pattern blocks, the blocks where the yellow pattern weft shows the most.

SECONDARY PATTERN APPEARNCES

Then there are blocks where the yellow shows in spaced dots. The second block from the left in the first row on the bottom is an example. Next to it on the left is yet a different way in which the yellow can show, as lines of dots. These secondary appearances of the yellow do not at all obscure or detract from the pattern blocks. They simply add a bit of visual complexity.

JOINING OF BLOCKS

Looking again at the pattern blocks, when two pattern blocks abut each other along the width of the warp, the joins are sometimes different. In the second row from the bottom there are three pattern blocks next to each other. The join between the two on the left have yellow floats just slightly longer than the other floats. And the joint between the two on the right have joining floats slightly shorter.

These differences reflect how I joined the two blocks in the threading. I had not really thought much about moving from block to block as I was designing the threading. I do know that sometimes there are accidentals and sometimes not. Whether or not there are accidentals, and how many there are, depends on the particular blocks being joined. But I had never paid any attention to what would happen at the joins when weaving.

In an earlier post, I discussed a bit the creating and joining of blocks. But that was very early in my working with the concept of 8 crackle blocks on 4 shafts. Now I finally begin to understand the importance of paying attention to which blocks can follow which and the accidental(s) that may be needed. When I do my next piece I shall have to look into that as I design the threading.

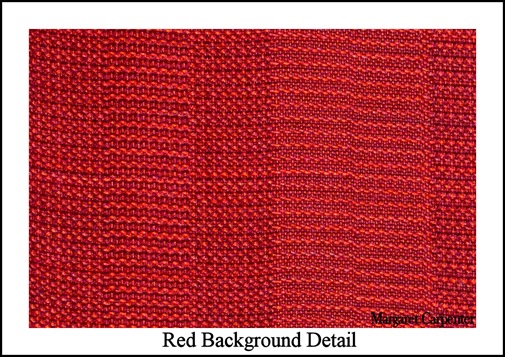
Red Background Detail

And here I have hard cropped a part of the background area.

In the design areas, I wove with two different reds in addition to the yellow. But the reds were both bright, saturated reds. I did not want to detract from the pattern, but I still wanted a subtle (subliminal!!!) difference.

Here I also wove with two different reds. In this case one bright, one dull. Nothing subliminal here! It all looks a bit uneven. In reality, the unevenness is even clearer.

This unevenness results from treadling which sometimes alternates the two reds, sometimes treadles each red twice, sometimes with the bright red leading, sometimes with the dark red leading.

BINARY SEQUENCES

Not wanting it to be a mess, however, I did tame it with some order. But I did not want the order to be immediately obvious. To do this I created three binary sequences:

1 0 0 0
1 0 1 0
0 1 1 1

1 stands for alternating 1 bright red and 1 dull red for the six treadles.

0 stands for alternating 2 dull reds and 2 bright reds for the six treadles.

There were a couple of sub-rules as well. In a given row, for example, when three 0’s follow each other, I continue the alternation and do not begin again with two shots of dull red. But when the 0 ends one row and then begins another row, I begin both with the two shots of dull red.

image

Related Posts:
Binary Sequences and Designing
Weaving Begun Again
8 Crackle Blocks on 4 Shafts
Polychrome 8-Shaft Crackle

AN ASIDE: In looking for related posts that I thought might be helpful, I was stunned to learn than I had started working with this variation of crackle at the end of 2007. In a way, I had no idea that I had been studying this for so long. But in another way, it feels like I have never not been studying this. And possibilities keep opening up. Kind of like being married!


Details” was written by Margaret Carpenter for Talking about Weaving and was originally posted on June 2, 2009. ©2009 Margaret Carpenter aka Peg in South Carolina

Monday, June 1, 2009

MOTIF STRIPE 2

Posted by Peg in South Carolina

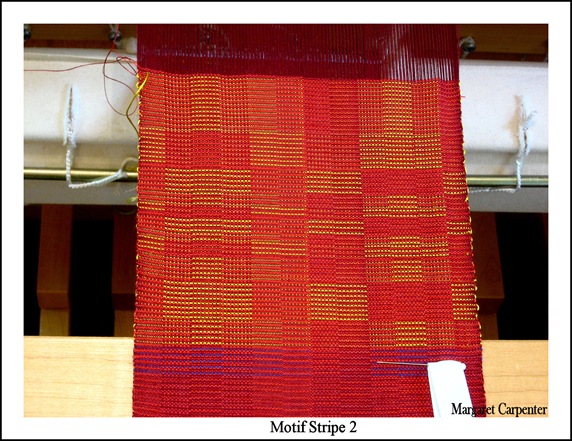
Motiif Stripe 2

ASYMMETRY

Here is the second stripe motif group, beginning with the blue shadows at the bottom.  Like the first motif stripe group,  the treadling is asymmetrical.  I have used the same treadle to begin and end the group, to give some sense of unity. But to add complexity I treadled the end group 18 times, instead of the 5 times as I did at the beginning.  I had done this with the first stripe motif group as well.

FIBONACCI

The number of pattern treadles in each group follows the *Fibonacci sequence, as you can see if you count the yellow pattern yarns in each block.  The same is true of the first group as well, though the sequencing is a bit different.

One of the things I like about this treadling technique is the shadow patterns that show—places where the yellow shows, but not nearly as strongly as in the pattern areas.

“SHADOW” PATTERNS

Looking at the first treadled pattern block, for example, reveals two well-defined squares which show the yellow pattern very clearly.  But on either side of these are two blocks which also show yellow, just not at distinctly.  And on the left side, there are two blocks on either side of those that show yellow even less distinctly. The result is that even in those shadow areas, there are differences as to how much the yellow shows.

PLANS FOR SECOND HALF

This completes the two motif group stripes on the first half of the scarf.  I plan, at this point anyway, to repeat them on the other half, but reverse the treadling so that they are a mirror image of this group.

Now to weave the next red background group and plan what on earth I’m going to do with the large central pattern.  Right now I haven’t a clue!

*To find out (lots) more about the Fibonacci series,  check out this web page:  Fibonacci Numbers and the Golden Section.

image

Related Posts: 
Improvising at the Loom
Designing and Mathematics


Motif Stripe 2” was written by Margaret Carpenter for Talking about Weaving and was originally posted on June 1, 2009. ©2009 Margaret Carpenter aka Peg in South Carolina