Wednesday, June 30, 2010

SLEYING THE REED HALF DONE

Posted by Peg in South Carolina

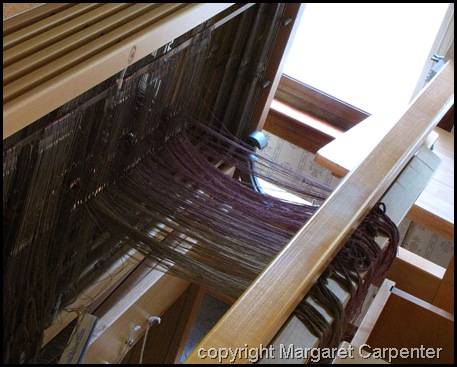
Reed half sleyed

At the front of the beater, you can see that I have tied the warp ends in groups and slip-knotted them.  I have tied them in groups of 6-dents-worth.   That is, 24 ends are in each knotted group.  That is slightly more that one-half inch of warp—the size of the warp groups I will tie onto the front of the loom when I am done sleying.

POSITIONING THE BEATER FOR SLEYING

The beater would appear to be defying gravity in this photo. It is not because of the angle of the shot. It is because, on the left side of the loom, I have tied the beater to the frame so that what you see is the closest position to the front of the loom that the beater can fall.  It’s also tied so it cannot fall complete to the heddles either.  This makes for much easier sleying.

Some people like to have the beater straight up for sleying.  I find being able to move it between this more forward position and back to a more leaning position in the opposite direction suits my technique better.  One of the things I do, for example, when I am collecting the groups of thread to tie them is to look at them as they come from the reed at the rear side of it, holding the group taut with my hand.  It is much easier for me to see that way than looking from the front of the beater.

USING THE AUTO-DENTER

image With my auto-denter, sleying a 15-dent reed (4 ends per dent) is easy, if slow, work.  The auto-denter moves kind of automatically from dent to dent.  I hear a click when it has moved successfully. If I don’t hear a click, I do it again.  This greatly reduces the anxiety that comes from staring and staring at the gosh darn reed’s openings.  That can leave me frazzled after awhile.

Still, it is sometimes not without its problems.  The auto-denter did come apart at one point.  This is not really a problem.  It is made in two parts. If you look carefully at the photo, you can see where the two halves are joined.  When they become separated, it is easy to put them back together.   Because this happens so rarely, when it does happen I never remember exactly how to do it so I have to fiddle with it a bit to get it to work right.  And the instructions that came with the tool are no help here. 

TWO MISCELLANEOUS SLEYING ISSUES

1. I discovered that I had threaded two threads in one heddle.  Clearly the two threads had kind of stuck together, as there was no threading error involved.  So all I did was pull one thread out, unwind it and wound it around a bobbin.  I will just gradually let it unfurl as I weave.

2. I discovered two threads that were crossed on the lease sticks.  An easy fix.  I unthreaded the two heddles and then threaded them in the correct order.

ON TO PART TWO

Now to see what will happen as I sley the second half of the warp.

Related Post:  Sleying the Reed

Sleying the Reed Half Done”  was written by Margaret Carpenter for Talking about Weaving and was originally posted on June 30, 2010. ©2010 Margaret Carpenter aka Peg in South Carolina.
Tuesday, June 22, 2010

THINKING ABOUT AFGHAN FROM HANDSPUN

Posted by Peg in South Carolina 

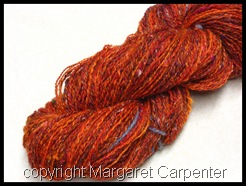
I love to spin.  I do not get a lot of chances to do it, but when I can, I do.  I rarely spin for Orange Plied Skein a particular project.  I spin because I have found some fiber I love.  The result of this is that I generally purchase only 4 ounces of any given fiber and the result of that is that I never have a lot of yardage of any one particular fiber. 

Spinning this way has never bothered me.  Spinning, for me, is simply an indulgence.

A piece in the latest Spin-off magazine* about using small amounts of fiber in hand knitting projects got me started thinking.  What about modular knitting?  I could design a modular knit afghan, not unlike the one I knit for our grandson when he was born.

And then I thought about weaving a patchwork afghan.  But when I thought about sewing the pieces together, I balked.  So I thought about weaving long strips.  Still didn’t like the idea of sewing strips together.

So, what about putting on a warp with narrow or broad stripes of the different handspun yarn and then weaving with those to create small or large checks.  And what about doing it double width.  Voila.  The germ of an idea finally arrived.

*The essay is by Ingrid Brundin and is called “Making Shells—Using up small bits of handspun with modular knitting.”

Related Post: 
Reflections on the Baby Blanket

Thinking about Afghan from Handspun”  was written by Margaret Carpenter for Talking about Weaving and was originally posted on June 22, 2010. ©2010 Margaret Carpenter aka Peg in South Carolina.
Wednesday, June 16, 2010

THREADING AND DYEING

Posted by Peg in South Carolina

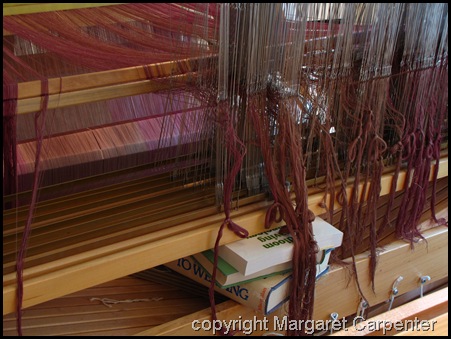
The threading is done.  This block seemed to require more care and attention to avoid errors than the rest of the warp did.  Perhaps it was my eagerness to get done that I was having to compensate for.  In any case, it is done, and the reed is in.  15 dents, to be sleyed at 4 ends per dent.  Thank heavens for the auto-denter.  The only problem is that I use it so infrequently there is always a learning curve to start.  Still, it is a marvelous tool for fine threads and the learning curve is now short indeed.

I began to realize that I had not yet dyed the 120/2 silk I plan for using for the binder shots.  And I also saw that the amount of yarn I ordered from Treenway was half of what I had thought I needed.  But I am going to get on with dyeing what I have and see how it goes.  It’s expensive stuff and I certainly don’t want to order much more than I will actually need.

There is, however, a slight hitch in the dyeing plans.  I will have to make some stock solutions from dye powder.  I do this in the garage.  The temps here are running in the high 90’s with heat indexes up to 110.  Doesn’t seem to be much end in sight.  Do  you think I look forward to working in the garage………….even with the door open?

But daughter and grandson are planning to come on Friday for a long weekend.  Perhaps by Tuesday the weather will have improved.

Related Posts: 
More Dye Stock Solutions
Dyeing in the Kitchen


Threading and Dyeing”  was written by Margaret Carpenter for Talking about Weaving and was originally posted on June 16, 2010. ©2010 Margaret Carpenter aka Peg in South Carolina.
Monday, June 14, 2010

ADDING HEDDLES

Posted by Peg in South Carolina

I was at the last block.  So close to being done.  I pulled out the 8 heddles for the first two units.  Or at least I tried to.  I needed two heddles from the second shaft.  There were no heddles on the second shaft.

Yes, I had counted everything out before I started theading.  Added several hundred heddles.  I knew how many heddles I needed on each shaft.  Even so, I allowed for many more than I needed on both sides of the middle.

What went wrong?  I have no idea. But it had to be done.  There was no help for it.

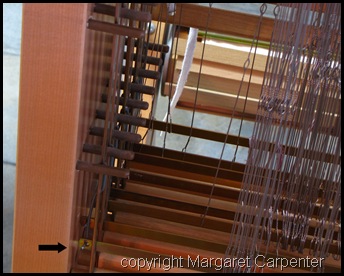
View of shafts Here is a photo of the situation I had to deal with. The black arrow points to the bottom of the heddle frame held in place by that devilish metal device that goes into the hole of that frame.  There is a similar fiendish metal device at the top of the frame.

You have to pull that device either backwards or forwards (depending on its location vis-a-vis the shaft) to slip it out of the hole and so release the shaft.  Then you get to reverse the process in order to reattach the shaft.  This is not fun. Especially working in such close quarters.

So, with the help of a screw driver for leverage, I pulled 15 heddles off the first shaft and put them on the second shaft.  The screw driver saved my fingers.

Having added the heddles,  I threaded the last block. 

I went to check the threading.  Grouped between two heddles were 10 empty heddles on shaft one.  This block used no heddles on shaft one.  Did I mention that they were grouped between two heddles in the first unit I threaded?  Well, of course.  Why not? 

I have carefully pulled all those fine silk threads—threads that tangle if I breathe too hard but fortunately the humidity in the house is 70% (I haven’t turned on the air conditioning yet) so the tangles were fairly easily untangled.  They now sit waiting to be threaded.

I am NOT done threading.  Do you think I am a wee bit upset?

Related Posts: 
Cutting a Wire Heddle off the Shaft
I Ought Not to be a Weaver


Adding Heddles”  was written by Margaret Carpenter for Talking about Weaving and was originally posted on June 14, 2010. ©2010 Margaret Carpenter aka Peg in South Carolina.

Wednesday, June 9, 2010

CUTTING A WIRE HEDDLE OFF THE SHAFT

Posted by Peg in South Carolina 

A CROSSED HEDDLE

As I was threading I came across an unbelievably crossed heddle.  The heddle was attached to the top of the shaft, to the right were five more heddles, and then to the right of these was the first heddle but attached to the bottom of the shaft. I walked away.  Then I came back.  Nothing had changed.

I was not about to remove the 50 or so heddles from the shaft I would need to in order to get the mess straightened out.  On this loom it is possible but extraordinarily difficult to remove and add heddles from and to the shafts when the loom is threaded.  Or in this case, partially threaded.

WIRE CUTTERS

A wire cutters seemed to be needed to save the day.  I don’t know much about wire cutters.  But I did think that I had a pliers with a wire cutter as part of it.  Couldn’t find it.  Decided I would have to go buy one.

First, however, I decided to send an email to the WeaveTech list to see what kind of wire cutters I should buy and if anyone had guidance for using it.

SCISSORS

The response was gratifyingly immediate.  Just use a scissors and cut it straight on.  I got an old scissors and cut it off.  Doing that certainly took care of my excuse to discontinue threading the loom………….

HOW TO SAVE THE HEDDLE

I got some other answers as well. I read these after I had cut off the heddle with my scissors.  Several people told me to use a wire cutters and to cut carefully at either end so that I could just slip the heddle off for use later as a repair heddle.  I could tape the cut end so that it wouldn’t snag on things.  I will have to remember that.

I have made a note to order/buy the recommended diagonal wire cutter.  This is what I would need to make the careful cuts that would preserve the heddle for future use as a repair heddle.


Cutting a Wire Heddle off the Shaft”  was written by Margaret Carpenter for Talking about Weaving and was originally posted on June 9, 2010. ©2010 Margaret Carpenter aka Peg in South Carolina.

Monday, June 7, 2010

Renegotiating Weaving (and Blogging)

Posted by Peg in South Carolina

Sunday was this blog’s third anniversary.  I think this is a good time for me to admit—to myself as much as to anyone else who might be interested—that weaving is no longer top priority for me.  I have known this for awhile.  It was really the ease with which I (temporarily) gave up weaving because of back pain issues and so easily and—dare I admit it?-- joyfully embraced the time for practicing for my voice lessons that told me life had changed a bit for me.

Music has been an important part of my life since the time I began piano lessons in second grade.  And singing—at least singing in choirs and community groups—has been an important part of my life since junior high school.  I have taken piano lessons, ballet lessons, viola lessons.  But my gifts in these areas, though present, were not nearly great enough to take me anywhere professionally.  So I began college with the intent of getting a BA in music and then going to library school to become a music librarian. 

The BA program in music was much too rigorous for most of us who started in it, so most of us turned quickly to other majors.  I to English.

For the rest of my life, music---choral music—was the one constant joy.  I dreamed of voice lessons. But the idea of actually singing in front of a person—it was far too dangerous, far too revealing.  So whenever the notion came into my head, I dismissed it, unhappily dismissed it.

But about one year ago, our church choir director suggested I take voice lessons.  No, not because my voice was horrible, but because she saw solo potential.  I thanked her for the compliment but that just seemed an impossible dream that I had long ago given up. 

And then the choir sponsored a vocal workshop for choir members with one of the local voice teachers---the one, in fact, that my choir director had recommended.  Barely five minutes into the workshop I realized that was it.  I could sing for her.  I could learn from her.  I was so excited that I could barely wait for the end of the session so I could find out if she was taking new students and, if she was, if she would consider me (at age 71, you understand!).  The answer was yes on both counts.  And the answer from my husband was yes as well.

So now I find myself organizing my days around, not weaving, but singing.  Weaving is still a top priority, but it is second to singing.  I will continue to make a determined effort to weave daily, but if I can’t, it won’t break my heart.  And the daily weaving will not last as long as it did.

Unfortunately I find myself with a wide warp with a complicated threading (and treadling) and with very fine threads.  I almost thought of removing it and beginning work on more “realistic” things.  But then I realized, I am enjoying this.  I am enjoying doing the threading.  The slow patience.  The weaving will take far longer than it might have otherwise, but I am now OK with that.

I will continue to blog about my weaving.  But because weaving is no longer top priority and so will consume less of my time and energy, I will blog less frequently and quite irregularly.  But, so long as I am weaving, I will continue to blog about it.

By the way, I have no intention of starting a voice blog.  Starting a voice blog just somehow does not seem right.  Singing is far too personal and intimate, at least for me right now.

Related Posts:  
Slow Weaving
Blog Writing


Renegotiating Weaving (and Blogging)”  was written by Margaret Carpenter for Talking about Weaving and was originally posted on June 7, 2010. ©2010 Margaret Carpenter aka Peg in South Carolina.

Tuesday, June 1, 2010

CHECKING THE THREADING

Posted by Peg in South Carolina

MY THREADING PROCESS

When I thread, I pull out a group of heddles.  In the case of this crackle warp, I pull out eight heddles—the four heddles for the first unit on shafts 1-4 and the four heddles for the second unit on shafts 5-8.  After I have threaded them I pull out the next group of eight from that block, thread them, then go on to the next eight.

CHECKING FOR ACCURACY

When I have threaded all the heddles for a given block I go about checking my accuracy. 

To do this I normally pull at each thread and, if it is threaded correctly, put it in my right hand, continuing this way until all the threaded heddles have been checked.  Assuming they are all correct, I then tie the group in a slip knot and then proceed to the next threading block.

Threading heddles

In the photo (the colors are totally inaccurate, but for this color accuracy is unimportant) you can see the checked groups of warp ends with their slip knots.  To the left is the next group of warp ends to be threaded, but I have not yet pulled out any heddles.

DIFFICULTY WITH FINE THREAD

But checking a 60/2 silk threading?  I can’t see the gossamer stuff! Even with my miner’s light on my head, trying to find individual warp ends is a nightmare.  More than halfway through the threading I realized that I do NOT have to grope for the thread itself;  I can simply select the correct heddle.  If the correct heddle is threaded (and not crossed), I slip the warp end high into my right hand and proceed until I am done and ready to tie the slip knot.

WHY I MUST TOUCH EACH WARP END

Once upon a time I used to just eyeball the threading.  I could get away with it (well, pretty much) if I were using thick yarn.  But the finer the yarn, the more I need to actually check each warp end individually using my fingers.

Of course, this method appears to slow things down.  In reality it does not.  Nothing is more time-consuming than re-threading to correct an error, even if the only thing that needs to be done is to insert a repair heddle.  More likely, total rethreading of a large number of warp ends is called for when there is an error.  And that is really time-consuming.


Checking the Threading”  was written by Margaret Carpenter for Talking about Weaving and was originally posted on June 1, 2010. ©2010 Margaret Carpenter aka Peg in South Carolina.