Wednesday, July 21, 2010

WINDING 120/2 DYED SILK ONTO CONES

Posted by Peg in South Carolina 

DONE WITH SLEYING THE REED

I have finished sleying the reed.  I found another doubled warp end.  That was a real surprise, since this is the second time I sleyed this part of the warp.  Clearly didn’t catch it the first time.  So the front beam is back on and I am ready to get to work I need to do before attaching the warp to the front rod.

WINDING SKEINS ONTO CONES

Now it’s time for a change of pace and turning to winding the 120/2 skeins I dyed earlier onto cones.  I approach this with fear and trepidation.  After setting up the apparatus, I carefully put the warp onto the skein winder, making sure that the knots on the ties all faced the same direction.  I found the two ends, separated them and tied bits of white yarn to the ends of both so that they could be easily found.  I removed the skein ties.  Then I determined which of the two ends would wind off the top.  I got the right end attached to the cone winder and started winding, gleeful at how good I have gotten in dealing with these silk skeins.

THEN AN END BROKE

Sigh.  Of course it got buried somewhere in the midst of the skein.  It would be easier to find a lost end on a spinning wheel than to find this end. 

I tied a couple of ties around the skein, removed it and turned it inside out.  The last time I did this I had not put the ties in.  I decided that not putting a couple of ties on was quite foolish.  Anyway, I had to do turn the skein inside out because that would make it possible to unwind from the other end with it working across the top of the skein instead of the underside. I’m back winding the cone again. 

And I am very nervous.

I am going to be very careful, because if this end breaks I am in serious, serious trouble.

And no, I do not know why the first end broke.  In the process of unwinding I have seen one knot.  I hope this yarn is not tender and easily breakable……….

Related Posts:  
Winding Commercial Silk Skeins onto Cones
More on Winding Fine Silk onto Cones


Winding 120/2 Dyed Silk onto Cones”  was written by Margaret Carpenter for Talking about Weaving and was originally posted on July 21, 2010. ©2010 Margaret Carpenter aka Peg in South Carolina.
Tuesday, July 20, 2010

GRAY SCALE AND COLOR

Posted by Peg in South Carolina 

I have always been interested in, have always loved, color.  But grayscale?  I hate it.  Why?  Because I simply cannot judge the grayscale values of color, except in really extreme cases.  But digital photography has made this a snap.  Thanks to this technology I could take the colored photo and transform it into a grayscale version.

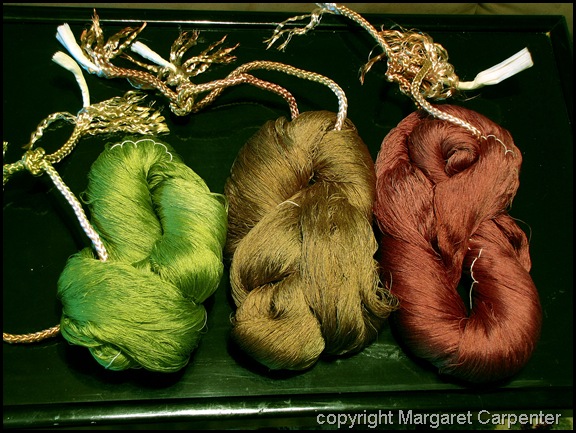
Dyed Binder Yarns

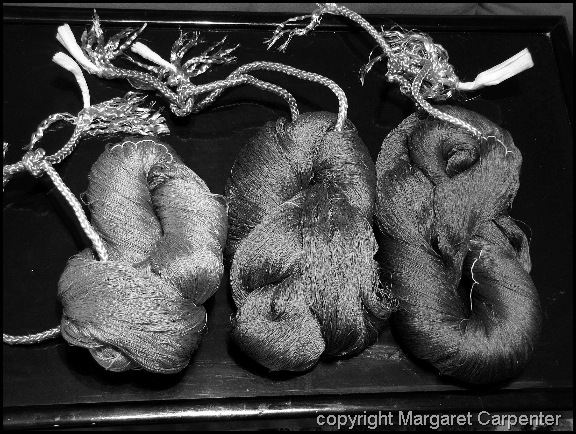
Grayscale version of the photo:

Dyed Binder Yarns gray scale

Having transformed the photo, thanks to Paint Shop Pro, I could see that the lime green was definitely lighter on the grayscale than the others.  But, until I converted the image to grayscale, I would have guessed that it was a great deal lighter than either of the two other skeins.  Not so.  It is a great deal lighter than the skein on the right, but not so much lighter than the middle skein.

MUNSELL+DYE STUDY GROUP

I have Karren Brito’s new Weavolution group to thank for this helpful trick.  Karren, an accomplished dyer, especially in using Lanasest/Sabraset dyes on silk, has started a new group there called the Munsell+Dye Study Group.  If you go to the group’s Forum here, you will see the post and photo that inspired me.

By the way, Karren is also a weaver, a craft she has lately returned to.  She has a web page/blog which she calls Entwinements. She also has a Facebook page, for anyone interested in social networking.

I am not, by the way, a member of Karren’s study group.  By the time I learned about it, the group was closed.  However, at Karren’s suggestion, I am now working on collecting names for a second group.  If you are interested, go the Munsell+Dye Study Group on Weavolution and either post your interest on that group’s forum (you will see the appropriate topic there) or send me a PM.

So now I have a new tool to help me judge colors, the placement of colors, and the amount of colors in weaving piece I am designing.


Gray Scale and Color”  was written by Margaret Carpenter for Talking about Weaving and was originally posted on July 20, 2010. ©2010 Margaret Carpenter aka Peg in South Carolina.
Wednesday, July 14, 2010

WHY IS THE BLACK TABLE GREEN?

Posted by Peg in South Carolina

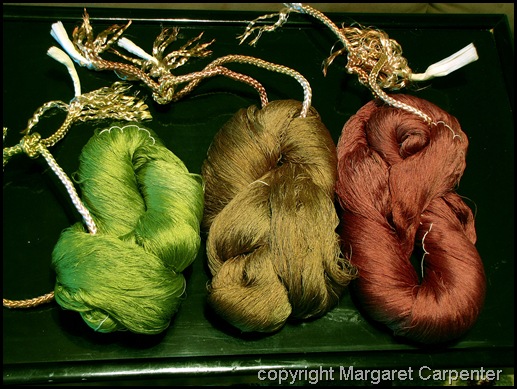
Dyed Binder Yarns

GREEN IS GOOD

Yes, the table in reality is actually black.  Why is it green in the photo?  Because I fiddled with Paint Shop Pro to get the colors right.  This meant ramping up the green and also, a bit, the yellow;  and lessening the red.  Doing this affects the whole photo, so the table got to be green as well. 

How to avoid this?  Yes, it is possible.  Select the skeins out from the background, create a new layer, and work only with that on the color.  I have not mastered the skill of selection and do not feel the need to.  This photo is not for professional publication, after all!

So, what was the problem that led me to doing this?  The green yarn on the left wasn’t quite bright enough.  The yarn in the middle did not have enough of a green cast and the yarn on the right was way to red.

The results are not perfect, though there is definite improvement.  The color of the green yarn is accurate.  The red is still a tiny bit too red.  The brown is quite off the mark. It definitely needs to be more of an avocado, though a dulled avocado.

TOO MUCH REDDISH YARN

But there is another problem, and this one is a bit more serious.  The yarn on the right was to be my main binder yarn so I dyed three skeins of it.  But it turned out way too red for that purpose.  The middle skein turned out exactly right for that purpose.  Clearly, when I moved from dyeing small sample skeins to dyeing 100 gram skeins, something went amiss in my calculations.

MORE DYEING TO DO? 

Based on what I saw, I changed the dye calculations and came up with the middle skein. I am not going to dye any more of this color until I have started the weaving and can get a better estimate of how much more yarn I will need.

I would, however, like to dye a smaller amount of a green that is between the brightest green and the avocado green and also a smaller amount of quite a bright version of the red.

BACK TO SLEYING THAT REED…..

Not to mention winding skeins onto cones………..


Why is the Black Table Green?”  was written by Margaret Carpenter for Talking about Weaving and was originally posted on July 14, 2010. ©2010 Margaret Carpenter aka Peg in South Carolina.
Friday, July 9, 2010

FINISHED SLEYING? WELL, NO

Posted by Peg in South Carolina 

I finished sleying the warp.  The dyeing is done.  Now to wind cones from the skeins and then pirns from the cones.  Now to tie on the warp to the front beam.

RE-CHECKING THE RIGHT HALF

But I have not forgotten.  Here is what I wrote at the end of a recent post, Sleying Left Half Faster—Why?

This alternation between front and back shafts did not happen on the right side……Whoops?

So, finished with the left side, I went back to check out the right half.  I found the problem:  5 ends in one dent.  Did it happen near the selvedge?  Of course not!  It happened very close to the center.  That would give me the privilege of resleying almost half the warp instead of just a few ends.

MAGIC IN THE PATTERN

When I started the sleying process, I had not thought about any kind of pattern to the threads.  I thought only about drawing out 4 ends for each dent.  Had I realized that there was a pattern—that all four warp ends would be either from the first four shafts or from the second four shafts, I would have immediately seen the error.  I would not even had to have counted the ends.

LESSON LEARNED: LOOK FOR PATTERNS

Now, to finish the sleying, winding skeins, winding pirns…………….
 

Finished Sleying? Well, No”  was written by Margaret Carpenter for Talking about Weaving and was originally posted on July 9, 2010. ©2010 Margaret Carpenter aka Peg in South Carolina.

Wednesday, July 7, 2010

NOW IT’S TWO, NOT ONE, EXTRA WARP ENDS

Posted by Peg in South Carolina

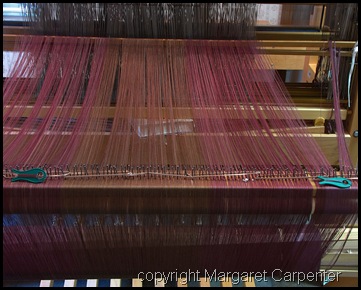
2 loose ends One loose end on the right half;  now one loose one on the left. The one on the right side (left in the photo) was the result of inadvertently threading two ends in one heddle.  The other one was a thread that was appropriately in the lease sticks but simply had been apparently dropped as I was threading. 

Note how I put that the main part of that last clause in the passive voice:  I absolutely disclaim any responsibility for that error!

I have wrapped each end around a knitting fair isle bobbin.  Who knows, maybe as I weave a will break a nearby warp end and there will be one to neatly replace it!

SLEYING SAME ENDS THREE TIMES

The few remaining warp ends that need to be sleyed are through the lease sticks on the right side of the photo.  I didn’t finish today.  Aside from having spent the last two days dying, I ended up sleying one group of ends THREE times.   Sigh.  I have to be very careful when I near the end of something.  Try as I may, some kind of hopeful energy surges through me and I start making mistakes.  I was so sure I would finish sleying during this session…….

WHY  DOES MY CAMERA SEEK OUT RED?

This warp, by the way, is not red.  Not red at all.  It is brown and a browned yellow-green.  Red, however, was one of the colors in the dye pot.  Every time I take a picture, I am astonished to see how desperate my camera is to bring that red into the foreground.  I have given up fussing with Paint Shop Pro to correct the issue.  I am going to allow my camera to have its own way.  Sometimes one simply must.

Related Post:  Sleying the Reed Half Done

Now It’s Two, Not One, Extra Warp Ends” was written by Margaret Carpenter for Talking about Weaving and was originally posted on July 7, 2010. ©2010 Margaret Carpenter aka Peg in South Carolina.

Tuesday, July 6, 2010

PRE-ORDERING DOT’S NEW SPINNING MAGAZINE

Posted by Peg in South Carolina

I saw today that Dot’s new spinning magazine, called YarnMaker,  is nearly ready to be printed. From the description of the magazine on her blog, Dot’s Fibre to Fabric, it looks like it’s going to be a wonderful magazine.  And from having observed Dot’s blogging, I believe it will be extremely well done.

I was all set to pre-order it.  I went to her website from the link in her blog and there I found the order form. She makes it possible to use a credit card—very easy for those of us on the other side of the pond! But after I had printed out the order form, I discovered that she was going to enable Paypal payment towards the end of July, so I decided to wait for that option.

I am so excited!  I have missed Dot’s blog posts, but she has been using her time well.

And yes, I do spin, though not as much as I would like.


Pre-ordering Dot’s New Spinning Magazine” was written by Margaret Carpenter for Talking about Weaving and was originally posted on July 6, 2010. ©2010 Margaret Carpenter aka Peg in South Carolina.

WARP AND WEFT PAINTING RAISED TO A NEW LEVEL

Posted by Peg in South Carolina

I have, thanks to the Weave Tech list, discovered a new-to-me weaver with an intriguing technique.  Her name is Fuyuko Matsubara.  She is Japanese but now lives in the United States.  To learn more about her, read this piece.  Go here to see an example of one of her pieces.

To oversimplify vastly, this is, at least in part, what she does.  She weaves two pieces of cloth in white.  She cuts them off the loom and paints the two of them with MX dyes.  The designs she paints on the two pieces are identical.  The colors, however, are different.

When done with the painting, she washes the painted fabrics and  then unweaves the two cloths and puts the warp back on the loom.
 
For the first warp, she weaves with the weft from the second piece of cloth.  For the second warp, she weaves with the weft from the first piece of cloth.  And this weaving with the now colored yarns is done in a structure different from the one she used when weaving the white cloth.  From what I could see, it looks like she uses a jacquard loom for the final weaving.

As she herself admits, this is a very tedious way to make cloth.  What she does, requires extraordinarily kinds of calculations.  What she does is far more complex than what I would even dream of attempting.

BUT

The process, on a small and much less complex scale, really intrigues me.

ON THE OTHER HAND

Why can’t I just push myself into exploring a bit of weft ikat?

Warp and Weft Painting Raised to a New Level” was written by Margaret Carpenter for Talking about Weaving and was originally posted on July 6, 2010. ©2010 Margaret Carpenter aka Peg in South Carolina.

Monday, July 5, 2010

SLEYING LEFT HALF FASTER – WHY?

Posted by Peg in South Carolina 

Sleying the left half has been going extraordinarily easily and quickly.  Two reasons are possible:

1. The experience I have built up sleying the right side has made me faster.

2. Moving right to left, as I do on the left side of the warp, instead of left to right, as I did on the first half,  might be more natural for me.

Both of these answers may be involved, but they are not the real reason.  The real reason has to do with the grouping of the threaded heddles.

The crackle units consists of 4 threads to a  unit.  Even though they threading changes from time to time, the 4 threads consistently alternate between the front 4 shafts and the back 4 shafts.  On the left side.  This makes picking out the 4 threads a whole lot easier and faster and is another double-check on accuracy.

This alternation between front and back shafts did not happen on the right side……Whoops?


Sleying Left Half Faster – Why?”  was written by Margaret Carpenter for Talking about Weaving and was originally posted on July 5, 2010. ©2010 Margaret Carpenter aka Peg in South Carolina.

Friday, July 2, 2010

MORE ABOUT MY SLEYING PROCESS

Posted by Peg in South Carolina

Sleying fine threads threaded in a crackle structure is not the easiest thing in the world.  I have a friend who loves to weave overshot but swears after each warp is threaded that she will never ever do another overshot draft again.  She of course tends to change her mind on that one.  But then she is not working with excessively fine threads.

FINE THREADS + COMPLEX DRAFT

It is the combination of a draft where (as in overshot) the threading is continually changing and where there will frequently be threads next to each other but not on adjacent shafts, it is the combination of this plus the fine threads that has taught me quiet patience. Well, sometimes I do have to work at keeping the internal screaming under control….  But it has also taught me to find ways to help ensure a correctly threaded and sleyed warp.

SELECTING ENDS TO BE SLEYED

With this warp, the process of sleying involves pulling out from the threaded heddles four groups of four warp ends each.  To choose the four ends, I look at the heddles.  I make sure that I am pulling threads threaded into four heddles. I lay each group of – hopefully – 4 ends across the top of the beater and put the rest of the ends over the top of the shafts.

CHECKING AND DOUBLE-CHECKING

At this point I count the number of ends in each group.  This is a necessary double check.  On this warp at one point I found two ends threaded through a heddle.  Had I not counted the individual ends, I would have ended up with five ends instead of four in one reed space. It might also be possible for an empty heddle to get grouped in.  Assuming that the empty heddle does not represent a threading error, I would then be in danger of putting three ends instead of four in one reed space.

I check and double check. And check for an errant thread that may have slipped from its neighbors and is hanging there, alone, from its heddle. Then I pull each of the four groups through their respective dents, making sure I still have four heddles and four ends in a group. 

I do three sets of these.  Then I return to where I began.  I pull the ends taut and look at the reed spaces to make sure there are no skipped spaces and then to make sure that there are no thick groups, indicating I sleyed two groups in one space.  I then pull the first six groups taut, double check them and tie them together in a slip knot.

REPEAT * REPEAT * REPEAT

I repeat this for the next group.  then I begin the whole process again.

Related Post:  Sleying the Reed Half Done

More About My Sleying Process”  was written by Margaret Carpenter for Talking about Weaving and was originally posted on July 2, 2010. ©2010 Margaret Carpenter aka Peg in South Carolina

Thursday, July 1, 2010

DYE STOCK SOLUTIONS MADE

Posted by Peg in South Carolina

I made the three dye stock solutions I was low on but that I needed for creating the colors for the 120/2 silk yarn I am getting ready to dye.  Sabraset/Lanaset Violet and Sun Yellow and Washfast Acid Magenta.  The first and third I generally do not use much of in my dyeing, but, over time, the solutions needed to be replenished.  Sun Yellow, because of its weak coloring strength, I go through tons of.  Well, liters of…..  So now I have the stock solutions I need make the colors I want.

Making dye stock solutions is not my favorite task.  It’s not really the danger that the powder poses, except indirectly.  I need to do this out of the house/in the garage.  Because the garage gets much too hot and humid in the summer, I am not willing to risk storing dye powders there. Nor am I willing to even think about storing anything plastic there.  Consequently I need to bring everything out there from inside.  And then, of course, bring everything back in after I have cleaned up. 

Not my favorite thing to do. And so I drag out the process, which goes something like this:

1. Check formulas to see how much I will need of each dye stock solution.  Did this a couple of weeks ago.

2. Check stock solutions to see which ones, if any, need to be replenished.  Figure out how much I need to make. Did this a week ago.

3. Gather up the supplies I need and put on a tray.  Did this two days ago

4. Prepare garage space and bring out the supplies.   Did this before lunch.

5. Get to the gosh darn work of making the solutions and then cleaning up.  Did this in the middle of the afternoon.

This kind of dragged-out process is quite typical of my behavior.  It does get done, but sneaked in between other activities.

FOR LOVERS OF RED

By the way, if any of you love anything red as I do, do check out Sandra Rude’s latest post, “Fire Warp Beamed.”  It is drop-dead gorgeous.  And here I am working with a primarily green warp.  Sandra also dyes her yarns.  They are always beautiful.

Related Post:   Making Stock Solutions


Dye Stock Solutions Made”  was written by Margaret Carpenter for Talking about Weaving and was originally posted on July 1, 2010. ©2010 Margaret Carpenter aka Peg in South Carolina.