Friday, January 29, 2010

Thursday, January 28, 2010

Wednesday, January 27, 2010

OVERSHOT TREADLING EXTENDED AND REVERSED

Posted by Peg in South Carolina
image
The draft is incomplete at both top and bottom.  Still, though, it shows the pattern quite well.

Related Post:  4-Shaft Crackle 01.08.10


Overshot Treadling Extended and Reversed” was written by Margaret Carpenter for Talking about Weaving and was originally posted on January 27, 2010. ©2009 Margaret Carpenter aka Peg in South Carolina.

Tuesday, January 26, 2010

WEAVING SKETCHES

Posted by Peg in South Carolina 

I recently read about Susan Jarmain on Nigel’s blog.  Go here to read the entire post.

Susan is a Canadian weaver who uses silk as her fiber and ikat as one of her techniques. What caught my attention was the fact that she uses a very small portable loom to make what Nigel refers to as mini-mockups of her larger pieces.

The loom is unbelievably simple.  It is nothing but a piece of foam board with pins angled in at top and bottom from which to wind the warp.  She needle-weaves the weft. Nigel describes these mock-ups as pretty accurate.  Nigel has an image of her setup on the blog post I linked to above.

Go to Susan’s website to see some of her work.

I am fascinated. But I simply cannot imagine plotting out a large piece using this kind of small scale loom. Even doing this in black and white or black, white and gray.  Yet artists do that very thing.  How would I do it?  Perhaps I just have to try it to find out.

POSTSCRIPT

I  have been thinking for quite some time about the possibility of combining ikat and crackle.  Go to this post written in 2007 for how I was thinking then:  Leaving the Comfort Zone   No, I have not yet left the comfort zone…….


Weaving Sketches” was written by Margaret Carpenter for Talking about Weaving and was originally posted on January 26, 2010. ©2009 Margaret Carpenter aka Peg in South Carolina.

OVERSHOT TREADLING EXTENDED

Posted by Peg in South Carolina
image
Again, the tie-ups of the two drafts are written in opposite directions.

Related Post:  4-Shaft Crackle 01.07.10


Overshot Treadling Extended” was written by Margaret Carpenter for Talking about Weaving and was originally posted on January 26, 2010. ©2009 Margaret Carpenter aka Peg in South Carolina.

Monday, January 25, 2010

6-SHAFT CRACKLE THREADING TREADLED OVERSHOT

Posted by Peg in South Carolina
image
Again, there are warp blocks and weft blocks, just as in the 4-shaft crackle.  But there is something in addition in the 6-shaft crackle:  a set of blocks which almost gives the appearance of basket weave.

Also note that though I have treadled both the 4-shaft and the 6-shaft in the same direction, the treadled pattern appears to go right to left in the 6-shaft version and left to right in the four-shaft version.  Why?  I reversed the tie-up.  Accidentally……..   I wasn’t paying attention.
There are so many details that demand attention!

Related Post:  4-Shaft Crackle 01.05.10

6-Shaft Crackled Threading Treadled Overshot” was written by Margaret Carpenter for Talking about Weaving and was originally posted on January 25, 2010. ©2009 Margaret Carpenter aka Peg in South Carolina.

Friday, January 22, 2010

WEAVING SOFTWARE MAKES ME CRAZY

Posted by Peg in South Carolina

My introductory post on 6-shaft crackle got me thinking more about weaving software.  The more I thought, the crazier I got.

THREADING

First, PixeLoom is set up so that the easiest way to do the threading is to begin at the right side and move to the left.  However, some weaving texts set the threading up to go from left to right. 

I have set up my 6-shaft crackle threading so that the blocks start on the left and move to the right. 

When we read, we read left to right, so it makes sense to set up the threading that way.  But for people like me who are right handed, it makes more sense to set it up from right to left because that is how we thread the loom.  Or at least that is how I thread the loom.

TREADLING

In my weaving software, the treadling goes from top to bottom. And that is how I read the treadling when I am at the loom. 

But some weavers (Scandinavian?) read the treadling from bottom to top.  When it comes to weaving, that makes more sense because that is how we actually weave.  If we have a particular design, and it is not the same both ways, it is going to matter which direction you treadle or the top side is going to turn out to be the bottom and the bottom the top.  Which changes your threading pattern to go in the opposite direction.

But we read books from top to bottom, so that is our basic instinct when we read a treadling draft.  Yet we have no trouble reading a threading from right to left, which is not a basic instinct.

Knitters generally read their lace, stitch, or color charts from bottom to top.  That is how they knit.  If they are knitting from the top down (which I often do because that is how I knit circular raglan sweaters) they then read the charts from the top down.

I have absolutely no trouble reading knitting charts from bottom to top.  But I would get very confused (I think) if I read my treadling charts from bottom to top.

CONCLUSION?

Much of the time this doesn’t really matter.  But in the kind of weaving I do it sometimes does matter.  When it does, I am going to have to pay attention.

POSTSCRIPT

I have just received Alice Schlein’s latest publication, The Liftplan Connection. I note that in her third chapter she addresses this very issue I have just been discussing and makes clear how she is handling it.


Weaving Software Makes Me Crazy” was written by Margaret Carpenter for Talking about Weaving and was originally posted on January 22, 2010. ©2009 Margaret Carpenter aka Peg in South Carolina.

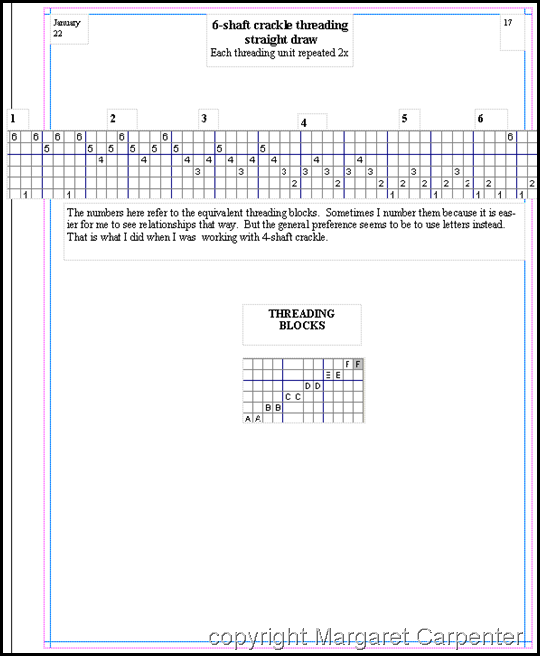
BEGINNING 6-SHAFT CRACKLE

Posted by Peg in South Carolina 

image

Note that I have numbered my blocks from left to right.  And so my threading also moves from left to right.  Some weavers do it this way.  Other weavers reverse it.  I suppose that in the end it does not really matter.  What really matters is the result you get.

Also, I have not included the tie-up because there is more than one possible tie-up with 6-shaft crackle.  And so the tie-up can create more design possibilities.

I have overstepped the bounds that Publisher allows for a page, but these are facing pages, and so they will print out fine.  Just not very neatly. 

I did it this way because to reduce the size of the threading draft to accommodate the page size made for a confusing looking draft.  I could have sliced it and put it on in two sections, but what I did seems more logical.

I am not done, by the way, with 4-shaft crackle.  I just decided at this point to go through basics with crackle on more than 4-shafts and then return to 4-shaft crackle for more advanced playing.


Beginning 6-Shaft Crackle” was written by Margaret Carpenter for Talking about Weaving and was originally posted on January 22, 2010. ©2009 Margaret Carpenter aka Peg in South Carolina.
Thursday, January 21, 2010

NOT FAIR

Posted by Peg in South Carolina

Having found such an interesting and delightful draft in applying PixeLoom’s tromp-as-writ feature to standard 4-shaft crackle, I just had to……….    Yes, I just had to try it with the draft I am using for my current green crackle project.  And here is the result.

image

It uses only four treadles.  It requires no tabbies.  And…….it’s beautiful!

Just to see what would happen, I used Zielinski’s tie up for six treadles and manually entered in a treadling similar to the one that PixeLoom generated.

image

This uses six treadles.  It does require tabby.  And I like the first one above much better.

Still, I will have to try both when I get the warp on the loom.  Weaving software can only give an approximation of what the piece will look like.

For example, one reason I do like the idea of tabbies (yes, I am truly nuts!), is that in the tabbies I can give hints and glimmers of another color, a very strikingly different color if I so choose, that would look just terrible as a pattern weft but would give some punch in the tabby.  Computer software, so far as I can see, cannot give even a glimpse of such possibilities.  I know about them only from my own actual weaving.


Not Fair” was written by Margaret Carpenter for Talking about Weaving and was originally posted on January 21, 2010. ©2009 Margaret Carpenter aka Peg in South Carolina.

Wednesday, January 20, 2010

TROMP AS WRIT

Posted by Peg in South Carolina

image

I don’t know why this treadling should have so surprised me, for it does, quite literally, repeat the threading.  If you look at the reduced-size draft, you can get a clear glimpse of this mirroring.

Related Post:  Weaving 4-Shaft Crackle

Tromp as Writ” was written by Margaret Carpenter for Talking about Weaving and was originally posted on January 20, 2010. ©2009 Margaret Carpenter aka Peg in South Carolina.

Tuesday, January 19, 2010

Monday, January 18, 2010

THICKENING THE TABBY SHOTS

Posted by Peg in South Carolina

image


Related Post:  Adding Tabbies

Thickening the Tabby Shots” was written by Margaret Carpenter for Talking about Weaving and was originally posted on January 18, 2010. ©2009 Margaret Carpenter aka Peg in South Carolina.

USING THE WARPING BOARD

Posted by Peg in South Carolina

I am winding bouts 52 ends wide, or very slightly less than one inch.  Because colors are changed at precise places, I keep a running record of what I am doing.  It looks, in part, something like this:

212-264
265-317
318-370 (change to middle green with end #354)
371-423

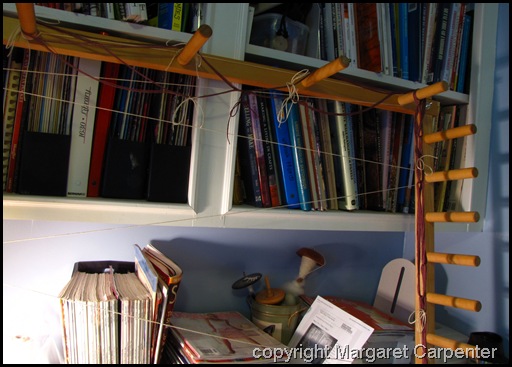
I chain each warp bout.*  The following photo shows the chain looped to the last top peg on the right and hanging down from that peg.

Chained warp on board

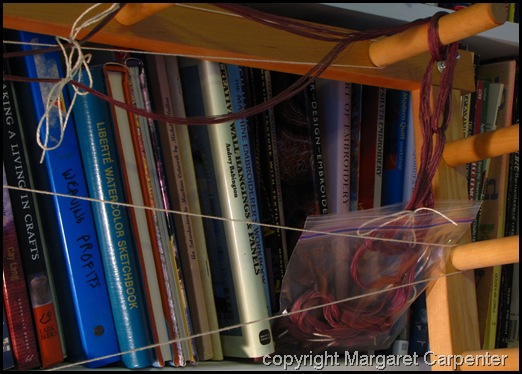
Before I take it off the warping board, I put the chain in a sandwich baggie.

Chained warp bagged on board

Then I put a pickup stick in each side of the cross and another stick at the opening formed at the end peg. 

I remove it all from the warping board and bring it to the dining room table.

Chained warp on table

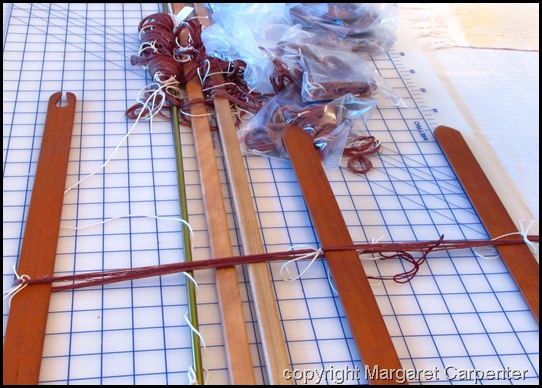
Here the bout is lying over the end stick and lease sticks.  So the next thing I do is insert those into the places the the pick up sticks and stick shuttle are in, remove them, and slide it down to lie against the rest of the warp bouts.

Chained warp in lease sticks

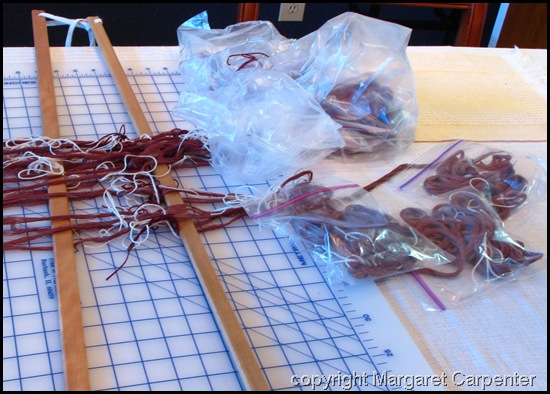
In this photo is visible a large plastic bag tied at the top.  This contains all the individually bagged warp bouts done in color #1.  My next step is to place the three individual baggies here into a large plastic bag, because these are all color #2. 

I had quickly decided that having dozens of individual baggies hanging free was a recipe for disaster when I take them to the loom to proceed with the warping.

There is another thing I am doing differently with this warp.  Normally I make all the bouts and then, when I am done, I bring them to the dining room, insert the end stick and lease sticks in preparation for taking the whole mess to the loom for warping.  But because these bouts are so small and because there are so gosh darn many of them, I decided it would be better to get them on the lease sticks and end stick as I went.

They are sitting on rotary cutting mat because it is easy to pick up the mat with all the bouts and sticks and move it somewhere else when I want to use the dining room table for----shock!---dining…..

I think I am going to do the same thing from now on when I make warps, at least warps with fine yarns.**  I always have a devil of a time trying to figure out exactly which yarns are supposed to be up and which down when I put in the lease sticks, and how to get the loops onto the end rod without twisting them.  The way I am doing it with my current warp solves those issues.

COLOR AND THE CAMERA

The color in the photos, by the way, is not at all accurate. All the yarns look just plain red.  Not true.  But color accuracy is not the point of this post.

*I must confess that I had forgotten all about the technique I discussed in this post:  Chaining the Silk Warp—Not.  Sigh.  Still, I would have had to buy more (lots more!) bobbins had I chosen to use that technique.  I probably would have, though.  And I probably would have used much thinner yarns to tie the warp bouts. And I would probably have grouped the bouts into plastic baggies to make life a little easier.  Still, I think the technique I am using will work just fine.

**Or at least that is what I planned on doing until I “found” the above blog post I had written earlier………..  Now, who knows what I will do next time!!

Related Posts:  
Warping the Green Crackle Project
Preparing to Raddle:  Some Problems

Using the Warping Board” was written by Margaret Carpenter for Talking about Weaving and was originally posted on January 18, 2010. ©2009 Margaret Carpenter aka Peg in South Carolina.

Friday, January 15, 2010

Thursday, January 14, 2010

TURNING THE CRACKLE DRAFT

Posted by Peg in South Carolina

image

The image of the draft, by the way, could be a bit misleading.  Many people who weave crackle use a weft that is heavier than the warp when they weave it unturned.  Turning the draft would mean you would then put the heavier yarn in the warp, and the lighter yarn in the weft.  This would give greater emphasis on the warp stripes.

There is another advantage of the turned draft and so putting the tabbies into the warp (not shown in the draft).  It would be very easy to thread the tabbies the same color as each of the warp stripes.  Trying to do that weaving in the normal way would probably drive even me insane!

Not the continually changing warp colors is a piece of cake……..!

Related Post:  Playing with Color


Turning the Crackle Draft” was written by Margaret Carpenter for Talking about Weaving and was originally posted on January 14, 2010. ©2009 Margaret Carpenter aka Peg in South Carolina.

Wednesday, January 13, 2010

PLAYING WITH COLOR

Posted by Peg in South Carolina

image

Related Post: 4-Shaft Crackle 01.12.10


Playing with Color” was written by Margaret Carpenter for Talking about Weaving and was originally posted on January 13, 2010. ©2009 Margaret Carpenter aka Peg in South Carolina.
WARPING THE GREEN CRACKLE PROJECT

Posted by Peg in South Carolina 

I am using three variants of the medium to very dark green/browns I dyed earlier for the warp yarns.  I had thought of many very complicated ways of using these three shades.  But then reason prevailed:  since the color/block designing in the weft yarns as I weave is going to be fairly complex, best to keep the color design of the warp very simple.

I decided on a formula I thought might be pleasing:

Two-thirds of the warp will consist of the two darkest shades (what I call dark and very dark; one-third will consist of the medium shade.

Then for the two-thirds part (the darkest part), two thirds of that total will consist of the darkest shade and one third of that total will consist of the next darkest shade.

And so I came up with the following numbers:

#1 (darkest green/brown) = 706 ends or 353 ends on   each outside end 
#2 (dark green.brown) = 350 ends or 175 ends on each side next to middle 
#3 (medium green brown) = 544 ends in middle

As for arrangement, the shades are going to progress from the darkest on the outside to the medium in the center back to the darkest on the other side.

Translated into numbers that I can actually work with at the warping board:

Warp ends 1 through 353 = darkest green/brown
Warp ends 354 through 529 = dark green/brown
Warp ends 529 through 1,070 = medium green/brown
Warp ends 1,071 through 1,246 = dark green/brown Warp ends 1,247 through 1,600 = darkest green/brown

I will also make sure that I use the darkest green/brown for floating selvedges.

Related Posts: 
Iridescence
Designing and Mathematics


Warping the Green Crackle Project” was written by Margaret Carpenter for Talking about Weaving and was originally posted on January 13, 2010. ©2009 Margaret Carpenter aka Peg in South Carolina.
Tuesday, January 12, 2010

Monday, January 11, 2010

4-SHAFT CRACKLE 01.11.10

Posted by Peg in South Carolina 

image


For me, this is where the fun begins. 

I have no immediate plans for weaving 4-shaft crackle but my head is going wild playing with these treadlings and thinking about changing threadings and adding color.

I find myself reminded of just how flexible even “ordinary” 4-shaft crackle is.  Nothing “ordinary” about it at all!


4-Shaft Crackle 01.11.10” was written by Margaret Carpenter for Talking about Weaving and was originally posted on January 8, 2010. ©2009 Margaret Carpenter aka Peg in South Carolina.
Friday, January 8, 2010

4-SHAFT CRACKLE 01.08.10

Posted by Peg in South Carolina

image


Looking at the top of the page shows that the little Microsoft creature had not totally disappeared when I took this screenshot……


4-Shaft Crackle 01.08,10” was written by Margaret Carpenter for Talking about Weaving and was originally posted on January 8, 2010. ©2009 Margaret Carpenter aka Peg in South Carolina.
Thursday, January 7, 2010

Wednesday, January 6, 2010

4-SHAFT CRACKLE 01.06.10

Posted by Peg in South Carolina
image
If you have trouble reading this, you can enlarge the image by double-clicking on it.

4-Shaft Crackle 01.06.10” was written by Margaret Carpenter for Talking about Weaving and was originally posted on January 6, 2010. ©2009 Margaret Carpenter aka Peg in South Carolina.

Tuesday, January 5, 2010

WINDING COMMERCIAL SILK SKEINS ONTO CONES

Posted by Peg in South Carolina

For a long time I thought that the direction the skein unwound from the skein winder made a difference.  Was I ever wrong!

COMMERCIAL SKEINS VERSUS MY SKEINS

I also assumed that commercial producers wound skeins the same way I did.  I wind skeins one section at a time.  After winding a section of say 200 yards, I loop a contrasting yarn around it.  Then I wind another section and, making a figure-of-eight, I loop the contrast yarn around it. And I continue in this fashion until the skein is complete.  As a result, the beginning of the skein is at one side of the skein;  the end of it is at the other side of the skein.

The commercial producers of silk yarn I deal with* do not wind skeins in this way.  They make skeins by winding the yarn back and forth across the width of the skein.  As a result, the beginning of the skein is at the bottom of the skein;  and the end of the skein is at the top. 

WHICH END TO START WITH?

I am now sure that a main key to smooth unwinding of commercial silk yarns is to make sure I start with the right end.  The right end is the one that unwinds from the top of the skein as it sits on top of the skein winder.  The wrong end is the one that, as I pull on it, comes from the underside of the skein.

So, what I did after I had put the skein on the skein winder was to cut the skein at the knot where the beginning and the end were joined together with a knot, and then to attach a small bit of contrast color yarn to each end.  Then I tried to unwind with one of the ends.  It was difficult to get it started because it kind of interweaved with the rest of the warp ends.  But by the time I had unwound it one whole round, it was clear that this yarn was going to be drawing from the underside.  That was not going to work.

I took the other end and did the same thing.  It too was difficult going for the first round, but then it became clear it was going to unwind from the top of the skein.  So that is the end I chose to use.  And that is the end that worked.

Except……

A YARN BREAKS

As I was winding the first cone, an end very nicely broke.  Thank you.  I could not find it anywhere in the skein.  Thank you again.  Sigh.

If I started with the other end, it was going to unwind from the bottom of the skein.  As I full well knew, doing that would give me nothing but grief.

The solution?  Remove the skein from the winder.  Flip it inside out so that the inside of the skein is now on the outside.  Voila!  the other end unwound from the top.

I would probably advise anyone removing and flipping the skein to make a few figure-of-eights around the skein before removing and flipping.  This will make sure that the skein is as it should be.  Brazen soul that I can be, I did not do this.  It worked.  Thank you.

ONE MORE TRICK

The only other trick that I need to remember when I deal with these skeins is to put the tension block between the skein winder and the cone winder.  Doing that keeps the tension even as it enters the cone winder with less likelihood of incorrect cone winding. Doing that also means I do not have to watch the yarn as it leaves the skein winder.  That leaves me free to focus on the yarn as it goes around the cone, which means that I catch immediately any slipping of the yarn and can easily make the necessary correction.

THE NECESSITY FOR PATIENCE

It is all about patience in getting started.  Patience is not one of my strong suits!

Related Posts: 
Silk Yarns 
Coning the Warp Yarn
Tension Box: Another Good Use
More on Winding Fine Silk onto Cones
Winding the Dyed Silk onto Cones


*My silk yarns come from Treenway Silks.  I cannot speak for skeined silk yarns that come from other sources.


Winding Commercial Silk Skeins onto Cones” was written by Margaret Carpenter for Talking about Weaving and was originally posted on January 5, 2010. ©2009 Margaret Carpenter aka Peg in South Carolina.

4-SHAFT CRACKLE 01.05.10

Posted by Peg in South Carolina
image

Observable in this e-sketchbook page are the little black squares surrounding one of the gray text spaces.  They indicate that that particular text space is active and I can type in it.

When I took the screen shot, I simply hadn’t clicked on the page to remove those black squares.


4-Shaft Crackle Threading Straight Draw” was written by Margaret Carpenter for Talking about Weaving and was originally posted on January 5, 2010. ©2009 Margaret Carpenter aka Peg in South Carolina.

Monday, January 4, 2010

4-SHAFT CRACKLE THREADING STRAIGHT DRAW

Posted by Peg in South Carolina

image

This is my first entry.  What is on this page will be the basis for the first sequence of full drafts. 

Note at the bottom right of the page I have indicated where the WIF files for this can be found. 

If I were to print out this page, the light gray boxes would not show.  These are simply the boxes I create to enter the data I want.  I can move these boxes around the page, change their sizes, frame them, change colors.

Also, the gray of the grayed blocks in the diagrams are irrelevant.  I shall try to watch myself in the future to see if I can avoid this when I copy drafts into my E-Sketchbook.

For more information about threading 4-shaft crackle, check out this post I wrote about 2 1/2 years ago.  One thing you will notice is that the block order is reversed.  But it is still a straight draw order.

Related Post:  Threading 4-Shaft Crackle


4-Shaft Crackle Threading Straight Draw” was written by Margaret Carpenter for Talking about Weaving and was originally posted on January 4, 2010. ©2009 Margaret Carpenter aka Peg in South Carolina.

Friday, January 1, 2010

SOMETHING-A-DAY PROJECT

Posted by Peg in South Carolina

OTHER BLOGGERS

For a while, now, I have been fascinated by the daily project phenomenon on blogs.  I have seen this in art blogs, with people painting or drawing a picture a day.  I have seen it on photography blogs where people fully finish a photo a day. I have seen it on fiber blogs where people do a small surface design piece each day.  And I have even seen it on weaving blogs.

I have followed Janet Dawson’s Scarf-a-day blog with great interest and admiration.  Though this doesn’t mean that she puts on a warp a day, it still has been a very ambitious (and successful!) project for her.

I have also followed Tommye Scanlin’s tapestry-a-day on her blog Works in Progress. She doesn’t actually weave a whole tapestry each day.  Rather, she put on a long but narrow tapestry warp and then each day wove in a building.  She has been recording her progress in the side bar of her blog. Tommye called her piece a tapestry diary for the year 2009. 

If I had a second loom, I could put on a long crackle warp and weave a sample a day.  But, I don’t have another loom.  So, what could I do?

A friend suggested I already have a project not unlike this since I do something weaving-related every day.  But I want to do something that will notch my growth as a weaver up a bit more.

SOFTWARE TO THE RESCUE

Weaving software, I thought.  At first I kind of cringed since fiddling with weaving software is definitely not weaving.  Then about a week ago I woke up with the brilliant idea (ideas in the middle of the night always seem to be “brilliant”…….!)of exploring crackle drafts.  So, here is what I am going to do.

A NEW E-SKETCHBOOK

I have started called a new E-sketchbook called “A Crackle Draft Project 2010.”  I have put a shortcut to it on my computer desktop.  Each day (for five days a week) I will put in a new crackle draft. 

I will begin with the very simplest of drafts, a straight draw 4-shaft crackle threading with standard twill tie-up.  I will explore each day a new way of developing and altering this very simple draft.  Some explorations will be very simple and take very little time.  Others will be more complex. 

I will move from there to other threading possibilities and then on to six- and eight-shaft threadings of all kinds.  Everything is subject to investigation: threading, tie-up, treadling, color, texture….

WIF FILES

At the same time, I have started a folder on my computer called by the same name and will include in that folder all the drafts as WIF files that I will place in my E-sketchbook. I will try to remember with each entry in my E-sketchbook to include the location of the draft in my computer folder.
If I save these drafts as WIF files, why, then, bother putting them in an E-Sketchbook? 
In the E-Sketchbook I can make comments. 

COMPUTER DRAFTS AND PENCIL SKETCHES

There is, of course, a limit to what can be accomplished in terms of design with weaving software.  But I can think of them as the painter’s equivalent of pencil sketches.  Many artists have kept reams of pencil or pen-and-ink sketches they made, either for fun or as preparations for a final painting.  Weaving software provides the equivalent kind of experience in weaving design.


"Something-A-Day Project” was written by Margaret Carpenter for Talking about Weaving and was originally posted on January 1, 2010. ©2009 Margaret Carpenter aka Peg in South Carolina.