Showing posts with label finishing. Show all posts

Wednesday, December 16, 2009

WET FINISHING THE HANDSPUN SCARF

Posted by Peg in South Carolina

I followed the same procedure as I did for the sample.  I fulled it a tiny bit more so it was both a tiny bit narrower and shorter than predicted.

Final Width:  6”
Final Length: 65”

I let it dry and then steamed it with lots and lots of hot steam.  Never touched the iron to the fabric.  I simply used my hand to gently press at the just steamed areas.  It is lovely.

Will trim the fringes and get a picture up next week.  I want to learn how to use the delay timer on my camera.


"Wet Finishing the Handspun Scarf” was written by Margaret Carpenter for Talking about Weaving and was originally posted on December 14, 2009. ©2009 Margaret Carpenter aka Peg in South Carolina.


Tuesday, December 15, 2009

SAMPLE WET FINISHED

Posted by Peg in South Carolina 

WET FINISHED BY HAND

In the first set of images, the sample has been soaked for one hour in hot soapy (Johnson’s Baby Shampoo) for one hour, then massaged or otherwise tortured by hand for about three minutes.  The second image  is a detail view.

Sample hand washed

Sample hand washed detail

The width has stayed the same:  7”
The length has shrunk from 15” to 12”

The sample has lost some of the fragility it had when it first came off the loom.  But it is still quite delicate and soft.  Very feminine in its delicacy.  It needs to be washed again since this is to be a present for a man.

WET FINISHED IN THE WASHING MACHINE

The next set of images shows the sample after it has been washed by machine in hot water with Johnson’s Baby Shampoo for four minutes. I put it in a nylon lingerie bag.


Sample machine washed Sample machinewashed detail


The width has now drawn in to 6.25”
The length has shrunk down to 10.75”

The sample is still a bit delicate, but not at all fragile.  The fulling process has thickened it up just as bit, as well as softened the fabric.  I would be tempted to try fulling it just a bit more, but then I think it might start getting thicker than I want.  Plus it would be getting way too narrow.

Based on the on loom measurements (7” x 15”), this represents a widthwise loss of roughly 10% and a lengthwise loss of approximately 22%.  This means that, should I wash the scarf itself for the same amount of time, its length would shrink from from 88” (measurement on the loom) to roughly 68.5”.

The lengthwise shrinkage is in reality not that much.  The drop of 3” in length of the warp represents simply that the yarn was stretchy and stretched quite a bit as I beamed it on.  Likewise the length of the scarf  off the loom went from 88” to 78”. 

I had anticipated this kind of shrinkage from the beginning.  Even when I wound the yarn on the warping board, it snapped back probably about 5” after I removed each bout.

Related Post:  Winding the Handspun Warp


"Sample Wet Finished” was written by Margaret Carpenter for Talking about Weaving and was originally posted on December 13, 2009. ©2009 Margaret Carpenter aka Peg in South Carolina.

Monday, December 14, 2009

HANDSPUN SCARF OFF LOOM

Posted by Peg in South Carolina

Mended but not washed.

Scarf off loom

Actually, there was no real mending to be done.  Simply trimming off the ends left from changing bobbins.  I will trim the fringe after wet finishing.

Measurements:

Width: 7.25” (same as on loom)
Length: 78” (on loom, 88” = approximately 11% loss)

Dave Daniels commented on my last post:

FOURTEEN? Wow, good for you for getting that much extra out of it. Amazing!

The reason I could weave so close is that I have a big loom.  It is a Nilus II LeClerc with rear-hinged treadles and from front beam to back beam measures 47”. 

The longer warp length also reduces stress on the warp ends. That is why I can weave under high tension with little or no warp breakage.

Small looms are wonderful for little spaces and for travelling.  But nothing beats weaving on a larger loom.


"Handspun Scarf Off Loom” was written by Margaret Carpenter for Talking about Weaving and was originally posted on December 12, 2009. ©2009 Margaret Carpenter aka Peg in South Carolina.

Thursday, December 10, 2009

HANDSPUN SCARF IS WOVEN AND I HAVE A QUESTION

Posted by Peg in South Carolina
Final hemstitching Here is the scarf, still on the loom.  On the loom, it is 88” long and the width is 7.25 inches (the width at the reed is 8.0 inches.

I have done the hemstitching…..after re-checking the directions! I find it amazing how easy it is to hemstitch this fabric as compared to hemstitching my 60/2 silk pieces.  And how much better the hemstitching looks here.

And now I have a question.
Last Bit of weavable warpI wonder how long I will be able to make the end-of-the warp sample I would like to have for testing wet-finishing?


"Handspun Scarf is Woven and I Have a Question” was written by Margaret Carpenter for Talking about Weaving and was originally posted on December 10, 2009. ©2009 Margaret Carpenter aka Peg in South Carolina.


Wednesday, April 1, 2009

HANDSPUN SHAWL DONE…ALMOST

Posted by Peg in South Carolina

I haven’t trimmed the fringes yet………

Handspun shawl off loom

Peg Wearing Shawl

I soaked the shawl in hot soapy water for almost two hours.  I changed the water once and kneaded the fabric from time to time until my hands came out.  Then I hung it to dry.

When the fabric was dry I looked at it. It certainly had not fulled and definitely needed a trip in the washing machine.  It certainly looked nothing like the earlier sample I had woven of commercial wool.  Go here to see that sample.

But then I looked again. I felt the fabric.  Yes, the weave was still open, but the fabric was no longer fragile.  And canvas weave is a lace structure.  This is lace!

My intention had not been to weave lace.  My intention had been to create a fabric with floats in both weft and warp to show off the handspun.  And that is what had happened in my earlier trial.  But lace I wove and lace it shall be. Far be it from me to turn it into something it does not want to be.

I then pressed it with lots of steam.  My first round of pressing is always rather gentle.  And then I realize that pressing hard does not damage the cloth at all. Instead, pressing smoothes it out and creates a very thin, draping cloth.  So after that initial round, I did two more rounds pressing hard on the iron with both hands.

My iron is a Rowenta steam generator, so I get lots of steam before I have to add water.   It’s old but still works fine, though I do like some things about the new version.  But I shall wait till this breaks first.

Even though the fringes still needed to be trimmed, I just had to try it on.  It is light, airy, and warm and long enough so that I can swoop one end around my should to the back—the perfect wrap for late fall and mild winter days in the South.

FINAL MEASUREMENTS

Width: at reed: 27.5”; off loom and after washing:  20.5”.   This is 3.5” narrower than I had planned the finished shawl to be.

Length: on loom: 97.5”;  off loom and after washing: 79”.  This is 7” longer than I had originally planned.

PHOTOGRAPHY POSTSCRIPT

For my birthday I am thinking of asking for a tripod.  I have a monopod which works pretty well but sometimes even with that I am shaky.  And taking a clear picture with one hand is impossible!  You should see all the attempts I culled out.

Related Post:   Handspun Shawl off the Loom


Handspun Shawl Done…Almost” was written by Margaret Carpenter for Talking about Weaving and was originally posted on April 1, 2009. ©2009 Margaret Carpenter aka Peg in South Carolina

Monday, March 30, 2009

TWISTING THE FRINGE

Posted by Peg in South Carolina

Now I am twisting the fringe.  I am using the directions Susan gave in her blog.  Go to her post, “A Good Twist to the Yarn,” to read about and see the process in detail.  I was so impressed by her post, and I had so much trouble with the fringe twister that I have been using, that I ordered the fringe twister she uses.  It is made by Forsyth (where it is called a cord twister).  More information is available here.

Susan hemstitched her scarves.  I did not hemstitch this shawl.  I had found in some of my earlier things where I braided rather than twisted the fringe, that hemstitching was not needed.

Fringe Making Overview I set up my work station similar to Susan’s.  But for my board I used a sewing board that is used for cutting out fabric.  It is already marked in inches and is generally available in stores like Hancock’s and JoAnn’s.

Susan used long pins for blocking knitted lace.  Having none of those, I used the ordinary pins knitters use to pin seams before they sew them. 

Because the woven fabric is so loose and fluid at this stage, I also added the weight of two books.  This helps keep the woven weft from pulling forward, but does not prevent it. 

Also, because I did not hemstitch, I keep the woven warp protector (the white weft shots at the bottom of the shawl) in for as long as I can.  I remove it only from the area where I am actually working.

Fringe Making Detail Here is a detail of the working area with the fringe twister on view at the right side of the photo.

I am twisting two ends in each clip, resulting in a twisted braid of four ends.  I am twisting the groups of two ends 20 times to the right.  Then, when I join them to make the group of four, I twist the 40-end group to the left 20 times.

To place the overhand knot I tried using a very thin crochet hook, inserting it into the untightened knot, placing it where I wanted it to be, and then tightening it, as Susan instructed.  Then I stopped using it because it didn’t seem to guarantee all that much accuracy.  That, however, is not the fault of Susan’s instructions.  It is because I had not yet figured out how to deal with the flimsiness of the fabric.

Related Post:  Hemstitching


Twisting the Fringe” was written by Margaret Carpenter for Talking about Weaving and was originally posted on March 30, 2009. ©2009 Margaret Carpenter aka Peg in South Carolina

Tuesday, February 17, 2009

OUT OF THE WASHING MACHINE

Posted by Peg in South Carolina

After I corrected the treadling errors in the wool crackle sampling (go here to read about that), it was time to wash it. First I hand washed it. I soaked it in very hot water with some Ivory detergent for 30 minutes. Then I squeezed and pummeled and squeezed some more for a couple of minutes. I let it soak for another 30 minutes, then squeezed and pummeled some more. I rinsed it, squeezed the water out of it by hand, then put it flat in a bath towel which I then stood on to get the rest of the excess water out. Then I hung it to dry.

Here is what it looked like when I was finished.

Cracl;e sample after hand fulling

Some fulling had taken place. It was OK. It had softened up a bit. It looked a lot more cohesive than when it was unwashed. But I was not satisfied. I thought I could do better with the washing machine.

I put a bit of Ivory detergent in the machine filled half way with hot water. I put the sample in and let it sit for 10 minutes. Then I let it agitate for 5 minutes. I stopped the machine and looked at it. Needed some more agitation. I repeated the process twice more and here are the results.

Crackle sample after machine fulling

crackle sample close after machine fulling

I am quite pleased. It is fuzzy and soft and nicely blurred. The colors have softened. And it is plushly thick. Yet the design shows. I also liked the thin red tabby though I think I different color or shade of red would have been better. But I got the effect I was after of these red dots peeking through.

There was a bit of bleeding from the red but I liked the result: an ever so slight pinkish cast to the piece which pulled the whole thing together nicely. Kind of like overdying!

Despite its fuzzy softness, it is too heavy for a scarf. I will cut it up to send to the March Complex Weavers’ Crackle Exchange. I do hate to cut it up. I would like to keep it whole just to fondle it and look at it from time to time. A totally useless piece but it pleases me.

Because I like this so much, I am now playing (in my head) with the idea of weaving wool crackle scarves for Christmas. But I will weave with (surprise!) a much finer wool. And I might see if I can’t think about some planned overdying…….

PHOTOGRAPHY NOTE

The last two photographs are quite an accurate representation of the fabric. And there was no playing with the software (except for adding borders, watermark). The first one is not at all accurate. I tried and tried and tried playing with the software, but I simply could not get it right.

They were photographed in two different rooms. The first one on my weaving bench where there are a lot of windows. So natural light and incandescent light were conflicting. The second two were photographed in a room where there was very little natural light.

I shall have to test out the resulting hypothesis in the future……….

Related Post: Slow Weaving


Out of the Washing Machine” was written by Margaret Carpenter for Talking about Weaving and was originally posted on February 17, 2009. ©2009 Margaret Carpenter aka Peg in South Carolina

Monday, February 9, 2009

CORRECTING TREADLING ERRORS

Posted by Peg in South Carolina

After I used the sewing machine to zigzag the edges of the crackle sample,  I trimmed off the ends.  Then I took the fabric to my little work table in the family room.  Here, with good light, I checked the weaving for treadling errors. 

Earlier, while the fabric was still on the loom, I had seen a couple of errors with the red tabby weft.  Those I corrected on the spot.

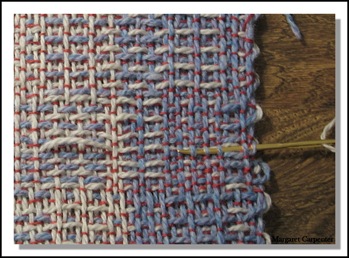
Treadling error Looking at the fabric off the loom, I discovered only one more treadling error.  It was clear only on the wrong side of the fabric, though had I looked carefully enough, I would have seen it on the right side of the fabric as well. In the photo you can see the long overshot in the center where I have pulled the loop up slightly to make it more visible.  Looking to the left, the same weft produced another error on the left side. 

Keep your eyes on the right side, however.  Notice anything?
Correcting error begun


I threaded a darning needle with a length of the light gray weft, long enough to go across the entire width plus extra.  What I am going to do is to replace that entire weft shot with a new weft.  With this yarn, the weaving in is easy and will create a much neater look than if I had used separate threads to mend the center float and the float on the side.  This photo shows the beginning of the mending. The weft yarn stays in because it provides, at least in part, a duplicate of the path the yarn I am weaving in is to go.  So weaving that part in is easy.

At this point the photo shows my needle just following the path of the weft yarn originally woven in.  If you haven’t been able to answer the above question, look again at where the needle is going.  Is it going where it should be?
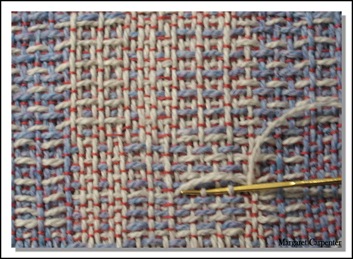
Correcting central threads In this next photo, I am mending the long float in the center.  How do I know where to put the needle?  Look at the light gray rows below.  These were all woven the same because they are part of the same woven block.  I am using the weft threads there as my pattern.

Where I have stopped the needle is where I have gotten confused.  I don’t know where to put the needle in next.  Looking at the row below shows that there should be no weft floats on the top side there, but there are.  So I turned the work over.  That is where the weft floats should be.  So I then worked on the underside, following the pattern there.  When I got to where the weft floats on the underside stopped, I turned back to this side and continued working.  And I worked until I had mended that float on the left.

Weaving back in Next I carefully pulled the woven weft floats out, using the tip of my darning needle to grab them. I pulled out the entire length of the weft. But I still had one more thing to do.  I had to weave the end of the woven weft back in at the edges for an inch or so to lock the wefts in.  The doubled end is visible.  But that is exactly what happens when I weave and have to end off with a thread and weave in a new one.

For those who haven’t figured out the question I asked about the right side, go back to the top two photos and look carefully.  Look not only at the weft thread on the right side, look at those gray weft threads in the rows below. There is no weft float….   In the block beneath, there are weft floats there.  Not in the block I am working with.

I totally missed it.  I didn’t see it until I started working with the photos.

I have already washed the fabric and it is drying. To wash and full it, I put it in a dishpan of very hot water to which I had added baby shampoo.  I let it soak for 15 minutes.  Then I kneaded and massaged it a bit.  I went through this routine twice more. But I don’t think it has yet fulled as much as I would like, so, once dry, I will put it in the washing machine to full a bit more. 

Before I do that, I can mend the error on the right hand side and after the second fulling, there should be little difference between it and the rest of the yarn.  Or to be more precise, that is my hope!

Wherever there were tails I cut them, but not off.  I left short tails.  The sett is so wide that I feared something might come unglued, whoops, unwoven.  I will cut them off after the cloth has dried. 

Related Posts: 
The Mending is Done
Mending Fabric
Treadling Mistakes


"Correcting Treadling Errors” was written by Margaret Carpenter for Talking about Weaving and was originally posted on February 9, 2009. ©2009 Margaret Carpenter aka Peg in South Carolina


Tuesday, January 20, 2009

NO MORE WINDOW SCREENING

Posted by Peg in South Carolina

I couldn’t wait for the washing machine to be returned.  I soaked the samples in very hot water with a bit of Johnson’s baby shampoo for 45 minutes.  Then I squeezed and churned them for a few minutes with my hands.  I rinsed them twice, each time squeezing and churning them a bit more.  The last rinse was in cold water—to shock the cloth just a bit more. 

No more window screening! 

They are fulled and soft.  Most have a great deal of nice texture.  But the texture inhibits the drapeability and so are not really suitable for the shawl I am planning. However, my handspun is more airy than this wool, and I am taking that into consideration in my decision.

Canvas Weave Sample 1

This sampling is the group that I beat to death.  It did turn out soft but very heavy.  This would have its uses—think upholstery.  Not meant for a shawl or scarf.


The second photo is of the first half of the more softly beaten group of

Canvas Weave Sample 3

samples.  There is nothing here that I am particularly fond of for the shawl that I am planning.  I don’t care for the color effects and the fabric is still quite heavy.  It would be very very warm!


Canvas Weave Sample 2 The samples in this third photo do have some promise.  The bottom group of samples consists of a number of rows of pseudo plain weave followed by a double overshot.  This group drapes nicely, is the right weight, but I don’t like them.  Mostly I don’t like the way the colors interact.

In the middle, however, is a sample I really like.  It is woven with white weft.  I like how the weft appears both on the white and on the blue. I also like a bit the sample below it.  It is treadled slightly differently, with blue weft, and has kind of a quirky basket-weave effect that I like. I like the color effects in both: when the blue and light gray combine, I like that the two colors seem to appear in non-equal amounts.  That is true of the sample at the top as well.  

So I am thinking right now that I like that white on blue and I think I might like the identical treadling with blue on white.  So I could envision the shawl as either all one color warp with a different color weft.  Or I could envision it as large blocks of color.

Meanwhile I’m off on a new threading. 

And I have ordered the silk yarn for the next crackle shawl, a project that is coming up quickly but needs more thinking and planning to be followed by more dyeing.

To learn a bit more about how to full woven (or knitted) fabric, go to this essay on All Fiber Arts.  To learn quite a bit on the history of fulling, go to this essay on Wikipedia.


"No More Window Screening" was written by Margaret Carpenter for Talking about Weaving and was originally posted on January 20, 2009. ©2009 Margaret Carpenter aka Peg in South Carolina

Tuesday, December 23, 2008

TOWELS ARE DONE

Finished towels

Posted by Peg in South Carolina

And I am pleased.

For the curious, this time there was shrinkage across the width:  1”.  This is the first time there was any shrinkage in this direction.

The shrinkage along the length was much less than after the first wash:  only 1”.

To summarize: the towels went from 27” wide (width at reed) x 37” long (measured on loom and NOT including hems) to 24” wide by 31” long (NOT including hems).

Merry Christmas and Happy Holidays to everyone!   This will probably be my last post till the new year.


"Towels are Done" was written by Margaret Carpenter for Talking about Weaving and was originally posted on December 23, 2008. © 2008 Margaret Carpenter aka Peg in South Carolina

Thursday, December 18, 2008

FINISHING THE TOWELS CONTINUES WITH SOME SURPRISES

Posted by Peg in South Carolina

FIRST SURPRISE: NO SHRINKAGE ACROSS WIDTH

I have washed and pressed the towels. And measured them. There was no shrinkage across the width. But there was 5” shrinkage along the length. That is between 10% and 15%—quite within the normal expected range. I do not know if my pressing technique had an effect here. Instead of moving the iron lengthwise along the towels, a moved it width wise across the towels. There will be another washing before I am done and that time, if I remember, I will iron them lengthwise.

The major visible effect of this lengthwise shrinkage has been the conversion of the squares to rectangles! Now I understand clearly why one needs to wash samples……..

SECOND SURPRISE: SIZE OF OUTSIDE “SQUARES”

But, even though there was no shrinkage widthwise, there was a bit of rearrangement going on. Now the outside “squares” are only 1/4” narrower than the rest of the squares. Before washing, they had been 3/8” narrower.

Reed marks in washed towelTHIRD SUPRISE: REED MARKS

Another surprise was that the reed marks still show. Not as much as they did before I washed them, but they still show. The black arrows point only to some of them. You may have to click on the photo to blow it up to really see them. Also, sitting back from the computer screen helps them become more visible.

FOURTH SURPRISE: TREADLING ERROR

Yet another surprise: a second treadling treadling error. Of course, this treadling error did not occur in the same towel the other one did. Actually this same error occurs twice, with only a few rows Treadling error 2 side 2 Treadling error2 side 1in between.

This treadling error was a bit difficult to figure out. On one side it appears as green weft floats; on the other side as white warp floats. The only thing I can figure out is that my foot may have accidentally caught a neighboring treadle.

LAST SURPRISE: NO ZIGZAGGING

Still one more surprise, and on this very same towel. When I washed the towels I wondered where the mishmash of blue threads had come from when I removed the towels from the washing machine. Today I found out. When I went to press up the hems prior to sewing them, I saw that I had never zigzagged this edge! This failure did not result in total disaster, however. Only in a narrow him.

MY TOWEL

I had intended originally to keep one of the towels for myself. Now I know which one. This blue and green one with the treadling error and one narrow hem.


"Finishing the Towels Continues with Some Surprises" was written by Margaret Carpenter for Talking about Weaving and was originally posted on December 18, 2008. © 2008 Margaret Carpenter aka Peg in South Carolina

Tuesday, December 16, 2008

FINISHING THE TOWELS

Posted by Peg in South Carolina

Many weavers seem to dislike the warping, threading, sleying, all the activities that go into getting the warp on the loom and ready to weave. I enjoy those activities. What I dislike is doing the finishing.  When I cut a piece off the loom my mind tells me I am Towels trimmed ready for washing done and shuts down. I am ready to get on to the next piece. I have to use every trick in the book to get me to continue with the finishing.

ZIGZAGGING EDGES

I have used the sewing machine to zigzag the edges of the towels to keep them from fraying.  I have cut the towels apart.  I now have what almost seems like a pile of towels.  But they feel coarse.  They look a bit like window screening.  There is more work to be done before they morph into towels.

I need to get rid of all the weft yarns thrown in between each towel.  I need to trim any threads not trimmed at the time of weaving.  I need to check each towel for errors. 

treadling errorPROBLEMS

I did check for errors. The first error I spotted was a treadling error:  I threw two consecutive shots in the same shed.  It is at the hem border—the (more or less…) horizontal line of cream at the bottom shows two wefts each in the correct shed.  But then, at the top of that line is an apparent thicker shot in a third shed.  Actually that apparently thicker shot is really two shots in the same shed. 

I may keep this towel for myself.  I had planned on keeping one or two for myself, but then I had also changed my mind.  Or I may simply point out the error to Amy as a reminder that her mother is not perfect.  Not that she needs reminding, mind you.

And in the course of trimming up, I saw the occasional notch in the Notch in selvedge selvedge where one or more weft threads had caught and pulled tight when I threw the shuttle across the warp.  The one in the photo was particularly bad.  The rest are not nearly so obvious.  Clearly my pirn winding, though much improved over what it was when I first started weaving with end feed shuttles, still needs work.  But my eyes still need to be more attentive as I weave so I can catch these problems while it is still reasonable to unweave and correct. 

MEASUREMENTS

After I trimmed the towels up, I measured them. The first five towels were 25” wide.  The last towel was 24 1/2” wide---narrower than the rest as expected.  These were also the widths on the loom.  That did not change.  However, the width at the reed had been 27”, so that means there was either 2” or 2 1/2” of draw in, depending on which towel I am discussing.  Roughly 10%, a figure that is in line with normal expectations.  I expect more shrinkage widthwise after washing.

Measuring the length of each of them from edge to edge (which includes the hems), four of the towels measured 37” and two measured 38”.  This, two I anticipated because I had gotten confused at some point whether I was measuring edge to edge or from the bottom of the towel to the other bottom of the towel, minus the hems.  Next time I weave multiple items that I have to measure on the loom, I will attach a reminder to my little bulletin board on the castle.  Right in front of my face……….   Perhaps in red ink………..

WHAT REMAINS TO BE DONE

Now I need to wash, hang dry and press.  Then sew the hems.  For towels I use the sewing machine for this.  Then I plan to wash them again and put them through the dryer this time, primarily to encourage more shrinkage, but also to soften them up a bit more. 

I will not put them in the dryer the first time round because I have read that wrinkles will set in cotton if the fabric is not carefully pressed first. Once that initial press is over, the dryer will create no wrinkles.  I do not know for sure whether or not this is true.  I only know that that is how I finished dish towels I wove many years ago and there is never a wrinkle in them.

WHAT I’D RATHER BE DOING

I would so much rather be making the warp for my next piece…..

I would so much rather be working on the design for my next crackle piece…..


"Finishing the Towels" was written by Margaret Carpenter for Talking about Weaving and was originally posted on December 16, 2008. © 2008 Margaret Carpenter aka Peg in South Carolina

Wednesday, May 7, 2008

HEMSTITCHING

I have chosen to finish the edges of this scarf with hemstitching and to cut the fringes fairly short.  I could make long fringes and finish those with some kind of braiding.  I enjoy doing that.   But with silk this fine, and with the interest being focused on the scarf itself, I think short fringes with the edges hemstitched is best. 

Because I planned to hemstitch, I left extra warp on the right when I threw my first shot of weft.   The amount I left was approximately 4-5 times the width of the fabric.  This is the end I put in the needle to do the hemstitching.

HEMSTITCHING DIRECTIONS

For hemstitching I use the directions in Virginia M. West's, Finishing Touches for the Handweaver, revised edition. On page 16, she has a clear diagram on how to do it at the beginning of the weaving and a second clear diagram for the end of the weaving.   Until I found this, I felt like I was trying to twist my head around 180 degrees to figure out how to mirror the hemstitching at the other end!

hemstitching step 1

STEP ONE

Here in the first picture you step step one of the hemstitching.  The needle goes down into the chosen space at the bottom edge of the fabric. Then the needle comes up to the left, still on the bottom edge of the fabric.


STEP TWO

Here is step two. The needle goes back to the first space it went in at the right.  But hemstitching step 2 when it emerges at the left, it comes up about six weft yarns into the fabric.  In this case, that means to the top of the woven section.  I had thrown six weft shots because that was how deep I wanted the hemstitching to be.

You continue by returning to step one, inserting the needle into the bottom edge of the fabric where it had emerged in the first part of step one.

The Weaver's Companion also has good directions and diagrams.  Here, however, the hemstitching is done from left to right instead of right to left. It doesn't matter which direction you go, just as long as you are consistent.

SIZE OF HEMSTITCHED GROUPS

I am grouping 12 ends in a unit.   This is three dents worth of threads.  It is easy to run my needle between the groups up at the reed and then use my finger to run the division down to where I am hemstitching.  This is easier than counting out 12 individual warp ends.

TAMING SILK ORGANZINE WITH "THREAD HEAVEN"

I quickly learned that this silk organzine did not want to behave as a sewing/embroidery thread.  So I have lubricated it heavily with "Thread Heaven," now available at most chain fabric stores such as Hancock's or JoAnn's.   It is what sewers now use instead of beeswax.  It does a good job and doesn't have those little bits and pieces tof wax that would come off beeswaxed threads.  This organzine has become very sleek and docile.

Monday, December 10, 2007

Crackle Yardage Two

Here is a photo of the second crackle yardage bit I wove. It has been mended. That is not quite true. Aside from an unfixable mis-treadle, there was no need for mending. All I had to do was cut off all the extra bits of weft thread. Then I washed and hard-pressed it. And here it is as it looked while still on the ironing board:


Yes, the ironing board looks a bit big. That is because I have laid something called a Big Board over the top of the ironing board. It is covered with padding and muslin, just like a regular ironing board is. Sometimes, though, when I want a really hard press, as for silk, I press directly on the board itself with no padding or muslin cover. This has been a wonderful tool for me. For more information, check out the website for Big Board.

And here is a picture of the fabric draped over a lamp:


The fabric is quite light weight and, considering the structure, drapes rather nicely. The lampshade underneath, of course, causes the fabric to look bulkier than it really is.

My original intention was to use this piece as trim. Of course, that was only an intention. I do not know what will finally become of it. I do like it, however, and almost wish this had been the main yardage.

Monday, November 26, 2007

Crackle Yardage Sample

Here is a photo of the sampler piece that I saved to do some washing experiments on. I washed and hard-pressed the sample two times.


What totally surprised me was how fine and drapeable this little piece is. There is no feeling of the warp having been sett too far apart. Looking at the figures explains this unexpected result.

At the reed, the width of the fabric on the loom was 36.5"
The width on the loom, measured at the front, was 34.0"
The width off the loom was 33.0"
The width after the first washing in hot water and drying on perm press setting was 32.5"
The width after the second washing in hot water and hot dry was 32.25"

The total shrinkage in the width was 4.25" The total shrinkage in the with was a bit more than 10%

The length on the loom was 7.25"; the length after the first and second washings was 7.0" That is less than 5%.

I also computed the epi in the plain weave section. The epi turned out to be 34, in contrast to the weaving sett of 30 epi.

I also measured the picks per inch in that section,. The ppi turned out to be 32.

I find it humbling to hold finished cloth up to the light to see how evenly I managed to treadle. Perhaps I would be better to say, how UNevenly I treadle. Really humbling. And the cloth always looks like window screening. Here is a photo of that fabric, before washing, taped to a window:


And here is another photo of the same fabric, but after the final washing and pressing:


The closing up of the "window screening" is quite obvious. Also, the imperfections in the treadling have disappeared.

I have hopes for the fabric once I have mended, washed, ironed................ But, I will have to rethink what I was planning to make. A somewhat fitted jacket will no longer do. The jacket must be much looser and more fluid.

Monday, November 19, 2007

Crackle Yardage Progress

The crackle yardage has been sitting lumped in my sewing room over a chair. Out of sight, out of mind. I try to devote at least a part of my weekend to sewing and/or spinning. Of course, when I went to my sewing room to continue work on a pair of slacks I am making, there it sat. An ugly lump on the back of my chair. OK, I promised myself that once I had zigzagged all the edges and cut the pieces apart, I could then move on to my slacks. I did just that.

In the course of the zigzagging I discovered just how vulnerable the yardage was. As I was adjusting and sewing, it would catch on edges of my sewing table (rounded edges, mind you), and groups of yarn would pull out of place. Here was but more evidence that the sett for the polychrome was too wide. Sigh..........

When I cut up the pieces I had, in addition to the three deliberately woven pieces, a series of sample treadlings preceding the third piece. I saw something there I rather liked so decided to save that.

I am going to use that sample piece to experiment with the washing process. I will measure it, wash it in hot water and dry it in the dryer. Measure. Wash and dry again. Measure. I will probably also hard press it after the first washing and again after the second washing. What I am trying to do is to shrink the fabric to see if that helps the fragility of the weaving caused by the too-wide sett. I will report back.

Meanwhile, I now have no excuse not to start examining the three fabrics for errors to correct and loose ends to cut off.


At the very bottom of the stack, barely visible, is the original yardage. On top of that (blue dominant) is the yardage I wove for trim. On top of that (yellow dominant) is the bit I wove with the same treadling as the trim fabric, but using 10/2 pearl cotton instead of 20/2. The top piece is the little sample I will be doing my washing/drying experiment on.

I do have, by the way, a couple of wool jackets I have made with some long floats. These floats do tend to catch and occasionally break. When they do, I cut them off. With wool this is not such a horrible problem because the wool will kind of stick to itself. Mercerized cotton, on the other hand, is much too slippery to do that. Another sigh.

Tuesday, November 6, 2007

Off the Loom but not Finished

The fabric is off the loom, and waiting....... The first and main yardage is, as I was beginning to guess, a bit sleazy. The reason for this is that the sett was for plain weave but the treadling was really a twill treadling. Twill treadlings require a closer sett than plain weave treadling. The photo does show how nicely it drapes, even unfinished, but it does not show the sleaziness of the fabric. I am hoping that washing and pressing will help reduce that. I'm sure it can be made up into the jacket that I planned.


The second yardage, designed for trim, is nice, not at all sleazy. It is woven on opposites. It is in essence a plain weave. The sett, really a rather firm sett, seems to have been just right. Washing and pressing will reveal the truth of this.


The colors are a little strange on the photo of this last sampling. I guess I was losing patience..........As in the second yardage, this sampling is not sleazy. However, it is a bit firmer and thicker than the second yardage. The fabric's resistance to draping seems quite clear. It is treadled in the same way as that yardage--on opposites. But instead of the 20/2 mercerized cotton, I used 10/2 mercerized cotton. The 10/2 is twice as thick. Perhaps a slightly looser sett was in order there? Only sampling would really tell the truth of that. But again, washing and pressing might change some things here.


So now I am ready to finish the fabric.

But first, there is the loom to clean up. Things to put away. Dusting to be done. Vacuuming to be done. Then my weaving space will be bright and clean and ready for work.

Then there is the machine zigzagging to do on the fabric to keep the ends from ravelling. But then comes one of my unfavorite activities: checking both sides of all three pieces for errors. In unrolling it off the loom I noticed one place which is probably a treadling error. Regularly long lengths of yellow weft appear across the width in one shot. Can this be mended? We shall see. In any case, I have a new warp to put on, so I can always take my time with the checking and re-weaving........ I'm fairly good at procrastinating.

Then there is the measuring. Lengths and widths.

Then comes the washing and then the pressing. And more measuring.

All in all, I am not unhappy with what the loom has produced. One way I can tell is that I am suddenly getting inspired to get the details of the next silk warp in order so that I can start the dyeing, so that I can make the warp, so that I can weave..........

However, the next warp is still going to be the dark red 10/2 mercerized cotton warp. I am much too curious about what that is going to teach me.

Wednesday, July 25, 2007

Killing Acrylic Yarn

Donna had a question about the acrylic yarn I was using. She explained that the yarn she has used does not result in a very soft fabric even when woven in twill. I don’t think it is the brand of yarn that is the real issue. As a point of information, however, the yarn I have been using is 2/14 Kitty by Tamm. My source is the KnitKnack Shop The yarn is designed for the knitting machine but it work very well on the loom. Because it is designed for the knitting machine, the yarn has a kind of oily finish to enable it to go through the machine easily. That oily finish washes out just fine.

I suspect that the real issue involves the finishing of the fabric. I killed mine. I suspect she did not. Killing? That is the term for pressing/steaming acrylic yarns. This creates a very soft fabric which drapes nicely. But it no longer feels quite like wool. And the effect is not reversible. If you do not like it, you cannot undo the effect you achieved with the iron. It is permanent. You may decide that instead of feeling soft, the fabric feels limp and you just don't like it.

Warning: washing it again will not undo it, hence the term “killing.” So my advice is to “kill” a sample first to see whether or not you like it.