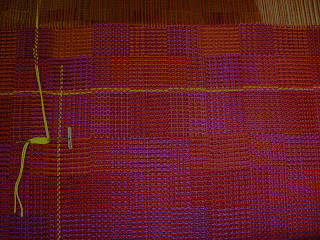
As I was weaving today, I noticed a threading error. I had not seen it on the photo I posted yesterday. But when I went back to it and clicked on the photo, the closeup version came up and the error was crystal clear. Here it is, with a black arrow pointing to it, an arrow that I doubt is necessary............
Sitting at the loom, I looked at the heddles that held those warp ends. I discovered that I had threaded 1,4,1,4,1,4. This is definitely not a crackle threading! Clearly I had inadvertantly omitted some heddles.
So I decided to go back to the post where I had given the original threading. In that process I discovered the post titled, "Who Spotted the Threading Error?" At first glance, the error there looks quite different from the current error. In the earlier post what is visible is the extra-long weft shots. But what called my attention to the error here was the repetition of those 3 red warp ends, each alternating with a beige weft. Those red warp ends were coming up too often. I did not notice the long overshots until I looked at the photographic blowup.
So the error was not caused by incorrectly threading a block, specifically by leaving out some heddles in that bit. That is what I thought while sitting at the loom. Rather, the error occurred, as I explained earlier, because I had failed to do a good job in writing out the transition from the last threading in the draft back to the first threading. The result was the appearance of an incorrectly threaded separate block.
It was a good thing I noticed those overshots and finally discovered the real problem. Just sitting at the loom, not aware of the overshot, I thought this threading might become an interesting design feature by using a different colored warp and repeating the threading a few times. Of course that would be possible anyway. But I would have to be willing to have some wefts shooting over more than three warp ends. But there are problems with longish wefts in fabrics meant to be used. They can easily catch on things, especially when the yarn is slippery like mercerized cotton or silk.
Monday, December 31, 2007
Friday, December 28, 2007
Getting Back to Weaving
When I woke up this morning I was surprised to find myself still feeling the emptiness of of the house after the children and grand-baby had left yesterday. I did not feel like weaving. I understood a bit how empty-nest moms can go into a lingering depression.
I did put off starting to weave until the middle of the morning. As I said, I did not much feel like weaving. So I told myself, well, I would just weave one block length with the new colors of yarns (browns and blues on the red warp). I had wound the pirns while I was still up on weaving before everyone arrived for Christmas. So all I had to do was to put the pirns in their shuttles. I had also made notes of the treadlings and colors I wanted to use next.
The only reason I stopped at weaving two block lengths was that it was a bit late in the morning and I had to get my walk in before lunch............... Guess I'm back!
And on that walk, I took my Christmas gift MP3 player and listened to an episode of Weavecast. I am hooked....................
Friday, December 21, 2007
Authoritative Statements
Yesterday I was looking at my written plans for the next silk crackle scarf. The plans go on for four pages. I haven't looked at them for quite awhile, so it was kind of interesting to read what I had written. The pages include some preliminary ideas and some roaming around about color. Go here to see the colors I plan on using. And also here. I can hardly believe that my thinking about this next project goes back at least as far as early July.
Near the end the written plans I was looking at, there is a section I have called Final Plans. This section includes such things as the length and the width, the yarns, the epi, warp and weft calculations. Also, I have stated most authoritatively that I will use the 4-shaft crackle threading I used for the cotton crackle jacket, and two of the treadlings.
Ahem. So much for so-called authoritative statements.
I will not be using that 4-shaft crackle threading. The new authoritative statement is that I will be using the 8 crackle blocks on 4 shafts threading that I am now using on the current sampling.
Now..........just how long will this particular statement remain "authoritative'?!?
Related Post: Designing the Christmas Towels Yet Again
Thursday, December 20, 2007
The Joy of Multiple Shuttles
Oh yes! With this crazy 8-blocks on 4-shafts crackle threading I can do amazing things with closely related colors.
Here is the last of this particular sampling, the sampling I hope to turn into a bag when I cut the warp off the loom. I have not exhausted the possibilities. For now, however, I have learned enough and I like what I have woven. Pay no attention to the two treadling errors.........
It is so much fun to weave this way because I never really know what the exact effect is going to be until I actually start treadling and throwing shuttles. This is the kind of weaving where I can wing it as I weave, at least if I am weaving something like a scarf where I do not have to worry about matching things. I can make decisions on the fly. And that is how I love to weave.
I am so glad that I decided to weave this part of the sampling as fabric. This decision has caused me to explore possibilities I would not really have thought possible. These explorations have so excited me! I can hardly wait to get working on the next warp. But first there are other things I must try on this warp. The holidays however, are also at hand.
I am so obliged to Zielinski's work on crackle weave for opening my eyes to these new possibilities. To see a list of all of the books in the Master Weaver series, go here and scroll down to the M's. I believe they are also available at Halcyon Yarns, and probably other places as well.
Wednesday, December 19, 2007
Digital Photography for Textiles
Recently I had the good luck to discover a site for helping art quilters take good digital pictures of their art quilts. The articles are written primarily by Holly Knott. Holly is an art quilter and photographer and has many other talents as well. Though art quilts are what are on her mind here, much of what she has to say is useful for any kind of textiles weavers might produce as well.
There are pieces on choosing digital cameras, how to set up lighting and how to photograph the quilts. Holly has also put on an interesting group of pictures she uses as examples of bad photography and how to prevent said bad photography. Go here ot start reading the essays.
Thanks for this tip to a participant on the dyers email list, Sarah Ann Smith. Sarah Ann has her own blog here.
Tuesday, December 18, 2007
The Perils of Multiple Shuttles
Multiple shuttles increase the possibility of errors. At least for me. It is that simple. So I borrow some tricks from others and invent some of my own to help.
Warning: threat of boredom and desire for a nap for anyone continuing to read.
If one of the shuttles is a tabby shuttle I use a different kind of a shuttle. If I am using end-feed shuttles, for example, the tabby weft gets put on a regular shuttle. Also, if it is possible (it isn't always), I place the tabby shuttle on the fabric at the front beam rather than at my side with the other shuttle(s).
In my current sampling, however, all shuttles are carrying pattern weft. To help alleviate confusion when putting down one shuttle and picking up another I use positioning order.
When I use three colors across the treadles, as I have been doing, the shuttles get laid out at my side in the order that I need them. I place the just used shuttle at the end farthest from my body, and pick up the shuttle closest to my body. After throwing the shuttle I have just picked up, I then place that shuttle at the far end. What had been the middle shuttle is now the shuttle closest to my body, so I pick that up next. This takes practice but it is not too hard to get used to. I still have to watch carefully so that I do things correctly.
If I add a fourth shuttle to the mix I try to use the top of fabric for a resting place, much like I do with tabby shuttles. For example, if I might be using a cherry red for treadle 2 and a violet for treadle 5. Normally (at least the way I have set things up), I would be using the same color for treadle 2 and treadle 5. But now, when I get to treadle 5 I will have to not pick up the cherry red shuttle but rather the violet shuttle.
To help with this new change of plans, I place the two shuttles in question on top of the woven web. And I place those in the order I need them. If I am going to weave the cherry red on treadle 2 and the violet on treadle 5, I will put the cherry red in the front, closest to me. That is the first shuttle I will pick up.
So I weave treadle 1 with the shuttle closest to my side and then place it on my other side but farthest from me. With treadle 2 I will need one of the shuttles sitting on top of the fabric. I take the one closest to me, throw it and then place it back on the fabric, but behind the other shuttle. For treadle 3 I will pick up the shuttle closest to my side, throw it, place it on the othr side of me, on my far side. With treadle 4 I will pick up the shuttle now closest to my side, With treadle 5 I will pick up the shuttle closest to me on the fabric (remember, when I was done with the first shuttle there, I rested it behind the other shuttle on the web), and with treadle 6 I will pick up the shuttle closest to me at my side. Everyt ime I pick a shuttle and throw it, I will place it either to my other side, away from my body, or on top of the fabric, away from my body.
That all takes a bit of getting used to, especially when I change the order. Then I have to remember that the shuttles on top go either first and fourth or third and sixth, depending on what I have decided to do,
And then I got a bit insane. Not that this hasn't all been a bit insane..........
I tried two sets of two different shuttles. Yup, 5 shuttles. I kept one set on the top the fabric. The other set I kept always as far away from me as possible, in the well of my bench. There is a well on each side. The solitary shuttle I kept on the bench next to me. This system does work. But I also concentrate very very hard. And if there is lots of opportunity for making errors with three, there is plenty more with five. I definitely would ot weave for more than 30-45 minutes at a time and I would not weave when I was the slightest bit tired. This is fun weaving but it is definitely not relaxing weaving.
Monday, December 17, 2007
Weaving and Art
In her latest comment, Meg has said that she likes to "hear what other weavers think." I can understand that desire, and know, as well, that she is someone who is working at selling her own work. So I will try to address the two further questions she has asked me.
The first question is "...would you wait to be approached [by a gallery]?"
If I wanted my work to be shown in a gallery, I would not wait to be approached. By "wanting" I mean much more than, gee, wouldn't it be nice................. The "wanting" has to be truly intentional. Any "wanting" I may currently have is not of this kind.
Her second question I have found more difficult to answer: "Will you, Peg, know when you've crossed that line [between craftsman and artist]?"
If I gave the impression of drawing a firm and clear line between craft and art, I did not mean to. If there was any line meant at all, it was a faint, shadowy, tentative line, perhaps a squiggle more than a line, which occurs when a weaver makes his first attempt at self-expression. The only thing he might be doing is changing the colors from the original that he is following. I don't care if he changes the color simply because he can't find the same color yarn as in the original design! When he does something like that, I might say that he is beginning to cross a line into a life of weaving adventures. I crossed that "line" a long time ago.
Now perhaps the line Meg refers to is a line I would have to draw in the sand, so to speak, should I choose to try to exhibit as an artist rather than as a weaver. This is not a decision, however, I could make. It is a decision made by the public. Painters exhibit as painters. Weavers exhibit as weavers. Art galleries display paintings. As a general rule they do not display weavings. So, to return to Meg's first question, if I wanted my weavings to be displayed along with paintings, really intentionally wanted that, it could not possibly happen if I waited to be approached. I would have to market my work very aggressively and be prepared for a great deal of rejection, perhaps (probably?) total rejection.
I would have to break down barriers: I would have to change how the world in general tends to think about art. I am not the kind of person to work at breaking down barriers.
Reading Meg's recent blog post, however, suggests to me that she has what it takes, including the very intentional wanting, to break down barriers. I will follow her pursuit with great interest (and envy!).
Now I am returning my energies back to weaving. That is where they belong. Of course, we are in the midst of Christmas preparations, and I already chafe at the resulting restrictions on my time. That chafing is far more real and important to me than thinking about displaying my work in any kind of a gallery.............. I do look forward to children and grandchildren arriving. But I also look forward to the time when Christmas celebrations are over......
Friday, December 14, 2007
8 Crackle Blocks on 4 Shafts, More Polychrome Treadling
This is continued weaving with various reds and violets:
I have tried something new here. I am now using 4 colors across the treadling of pedals 1-6. To be more precise, I am keeping the same basic ordering. This is color a for treadles 1 and 4, color b for treadles 2 and 5, and color c for treadles 3 and 6. But now for one of the colors I use two different colors. For example, on treadles 1 and 4, instead of using the same red, I might use two different reds. Or I might use a violet on the first and a red on the second. And then, when I have woven enough shots, I change the order.
The result, to my eye, is a greater depth and complexity. And to that end I don't like any more what I have been doing with the yellow. I think a different color would be better for the spark than the yellow.
Treadling this way requires more concentration and takes a bit longer, but it is worth it. And there is no reason for not adding two more colors across the treadles. Oh yes, preservation of sanity might be a reason...................
By the way, the color reproduction is now quite accurate. I have finally figured out what settings to play with in my PaintShopPro software to get this.
I thought it might be interesting to see what happens to the selvedges with this kind of treadling:
Thursday, December 13, 2007
Weaving and Art
Meg made a comment recently in which she asked two questions. Here is the first question:
"....in your opinion, Peg, what makes a piece of weaving deserving of being in a gallery?"
I am not, absolutely not(!) going to answer the question of defining gallery worthiness, not for weaving, not for any kind of fiber art, not for any kind of so-called traditional fine art! That is a question for gallery owners/operators, or, in the case of juried shows, for the jurors. It matters not a whit whether or not I think a piece is deserving; the only thing that matters is whether these others think a piece is deserving.
And here is her second question:
"...what are we, or you, a weaver, a craftsperson, an artisan, an artist?"
I will try, for myself and myself only, to answer the second question.
I remember when I became engaged. I practiced over and over again what my new name was going to be. It sounded so foreign and yet wonderful. So scary. I have no idea when I finally became comfortable with that new name. I know a marriage certificate didn't make me feel comfortable with it. I know that a wedding ceremony didn't make me feel comfortable with it. However, both did help. Sometime in the course of our marriage, as the two of us lived into the commitment we had made, my name was no longer new. Now it is difficult for me to imagine that I ever had another name.
I remember when I began the struggle to think of myself as a weaver. No certificate marked the change. No ceremony marked the change. Only, finally, the internal commitment to weaving marked the change. But because there were no public vows to make, no public document to sign, the movement towards naming myself as a weaver came much more slowly and with much greater difficulty.
I can say right now that I do not, however, consider myself an artist. On the other hand, I cannot say that I am not struggling to move in that direction.
A painter is a painter. But he is also an artist. A sculptor is a sculptor; he too is an artist. An oil painter is an oil painter, also an artist. I person who works in batik is a craftsman but also an artist. Many quilters are not only quilters but artists. I don't think most people have trouble with all this. I certainly do not.
And there are weavers, as well, who are artists.
Any painter, quilter, sculptor, weaver who is trying to express something of himself, whether beauty, meaning, opinion, has moved beyond being simply a craftsman. He is moving into the world of art. And the longer that person continues the struggle along that path, trying to follow his own voice and not the voices of others, the more what that person creates becomes more recognizable to others as that person's work.
On the other hand, a painter who simply copies the works of others, a quilter who only follows patterns designed by others, a weaver who always reproduces someone else's design, none of these is an artist, none of these is moving along a path which would lead him into the creation of art.
As for my own work, all I know is that this is the kind of path I have chosen to follow. I, once a bashful individual who always did what she was told, who always tried to live out the expectations of others, am now trying to listen to my own voice.
Wednesday, December 12, 2007
8 Crackle Blocks on 4 Shafts, More Polychrome Treadling
Here is more of the polychrome treadling I started yesterday:
The red at the bottom is the treadling from yesterday using three reds. I then continued the same treadling, but using blues and purples as well in various ways and proportions. On occasion I interpolated a short band incorporating yellow for a spark of interest.
Also I incorporated some yellow warp. This is visible on the left side of the photo. What I did here was to take two lengths of gold/yellow 10/2 pearl cotton and threaded each of them through neighboring heddles. These are heddles which already had warp ends threaded through them, so I was added ends to them. I then sleyed them, tied them to the cloth and weighted them at the back of the loom. The pin at the top with the gold/yellow thread coming from it is the beginning of another length of yellow warp ends.
I like what is going on here and think it has possibilities for my next silk warp. Also, I like this part well enough that I am going to weave it so that I have enough length to make some kind of small bag with it. Thanks to Leigh for this idea.
What I do not like about this is the blues and violets with the orangish red. Used with the reds, that is fine, but not with the blues. Either that or I would have to make a more subtle transition.
By the way, the colors in yesterday's post are much more accurate than the colors in today's post.
Tuesday, December 11, 2007
8 Crackle Blocks on 4 Shafts, Continued
Here is the next set of samples, all treadled with 10/2 pearl cotton as weft:
These are treadled, for want of a better word, polychrome style. That is, I used three colors of weft (or, in the case of the red, three shades of red), and treadled them sequentially. In the case of the sample at the bottom, I treadled the first group (at the very bottom) as follows:
treadle 1-blue;
treadle 2-gold;
treadle 3-purple;
treadle 4-blue;
treadle 5-gold;
treadle 6-purple.
I then repeated these six treadles with the same colors until that group of blocks was as tall as I wanted. Then I changed the order of the colors for the second group of blocks. And I changed the order once again for the third group of blocks.
One thing is very clear with this treadling and this use of color. The "blocks within blocks" phenomenon that I mentioned when talking about the first set of samples is much more obvious. I can count 25 blocks across the width of the weaving shown in the above photo.
The red sampling is treadled the same way, except with three shades of red: a dull red, an orange red and a cherry red. The photo does not reveal the "blocks within blocks" phenomenon so clearly here. Looking at the actual fabric, however, one can clearly see them.
Now I feel like I am getting somewhere with my sampling. I very much like what is happening in the red sample. And I also like the roughish texture, not visible in the photo, which has developed. I do not know if that texture effect will stay through the washing and pressing of the fabric.
I must confess that one of the things that I like is that no binders are needed and the treadling is very easy.
Monday, December 10, 2007
Randall Darwall
I mentioned Randall Darwall in an earlier post when I was discussing weaving as fine art. In my early days as a weaver (I was but a raw beginner) I took a one-day workshop with him. The workshop was offered by my weaving guild in Atlanta . We were supposed to bring some of our weavings for him to critique. Few of us dared. Certainly I did not. Nevertheless it was an unforgettable day in which he shared his life, his weavings, his techniques.
Darwall was the first weaver I'd ever heard to suggest that scarves could be art. He told us that he wove his, not necessarily just to be worn, but to be draped over a chair, on a wall, used on a table.
Since that day, whenever I am in a boutique that carries his scarves, I study them intently. Studying them is like studying a magnificent oil painting. I get glimmers and smatterings, but I never fully understand. All I really know is how beautiful his scarves are.
Yesterday I discovered a blogger who had taken notes at a week-long hands-on workshop offered by Darwall last year in New Zealand. Her notes can be found here on her blog.
Meg introduces her blog entries: " It was like Christmas. But better. We waited and waited for the whole year. And then it finally happened. For six exciting days, our two Santas greeted us at 8.30 AM every morning and we got stuck into the magical world of colors (and values and proportions, but more on these later)." Do go read the whole thing for yourself.
And for her responses to the Darwall scarf she purchased (and also a gorgeous photo of it), go to her post here.
And do look at some of her other posts. A good blog. I now have a link to it on my blog.
Related Posts: Art Piece 2: Weaving Continues
Crackle Yardage Two
Here is a photo of the second crackle yardage bit I wove. It has been mended. That is not quite true. Aside from an unfixable mis-treadle, there was no need for mending. All I had to do was cut off all the extra bits of weft thread. Then I washed and hard-pressed it. And here it is as it looked while still on the ironing board:
Yes, the ironing board looks a bit big. That is because I have laid something called a Big Board over the top of the ironing board. It is covered with padding and muslin, just like a regular ironing board is. Sometimes, though, when I want a really hard press, as for silk, I press directly on the board itself with no padding or muslin cover. This has been a wonderful tool for me. For more information, check out the website for Big Board.
And here is a picture of the fabric draped over a lamp:
The fabric is quite light weight and, considering the structure, drapes rather nicely. The lampshade underneath, of course, causes the fabric to look bulkier than it really is.
My original intention was to use this piece as trim. Of course, that was only an intention. I do not know what will finally become of it. I do like it, however, and almost wish this had been the main yardage.
Friday, December 7, 2007
8 Crackle Blocks on 4 Shafts: More Treadling on Opposites
Here is the first set of samples from the 8 blocks on 4 shafts crackle warp. These are treadled on opposites, using two colors. There are 3 repeats, each repeat using a different set of colors. Interesting, but I can live without them.
The samples do show something interesting, however. At first glance, this looks like a row of long blocks 11 blocks to be more precise. Closer investigation, however, shows that each long block actually comprises two blocks. Treadling on opposites does not play up this distinction, though it is clearly there. Perhaps another treadling will.
This is a bit more interesting. Well, at least it is suggestive of some promise. This continues the treadling on opposites but using two different reds. It's difficult to see in the picture; it does show up more in reality, though it is still subtle (which is good, by the way). Now I am starting to get a glimmer of some possibilities.
The black wefts you see are 10/2 pearl cotton. I wound a length on a knitting bobbin and just inserted in sheds, choosing when quite arbitrarily. The heavy dab of black in the center results from winding the black around two warp ends every other shed.
A little to the left is a black thread following the warp for a bit. What I did there was to hang the black yarn on its bottom off the back of the loom. I put it through the reed but not through a heddle. Then, as I wove, I lifted it up or let it lay at the bottom of the shed, depending on where I wanted it to appear. It tended to want to stay at the bottom, but it was not hard to raise it using a crochet hook, or even my fingers.
This hand manipulation was not difficult to do. I am thinking of using it in the final fabric, picking up the black lines from the oyster shells. To see the picture I am using for my inspiration source, go back to this post.
I have now started working on polychrome treadling. More on this later.
Thursday, December 6, 2007
Crackle Pleats?
Dorothy got me thinking. She has just published an interesting post on creating pleats while weaving. You can read it here.
I have read about this technique a number of times. It turns up in a lot of the weaving literature. But the idea has only brought a yawn from me. Something about Dorothy's piece, however, intrigued me.
I think what intrigued me was the description of her process, including good pics. I started to think: crackle pleats? I put this in a comment on her post, but meant it as little more than a small joke, since I am so enmeshed in crackle.
Maybe I shouldn't consider it as a joke? I have put it in my folder of ideas..............
Wednesday, December 5, 2007
Weaving and Blogging
Blogging does take time away from weaving. Blogging does not take time away from weaving. Huh????
It is obvious that sitting at the computer means that I am not sitting at my loom. But weaving is a craft that comprises a lot more than just sitting at the loom and throwing the shuttle. And one of the main things that is involved in weaving is thinking.
My last post, Who Spotted the Threading Errors, illustrates a bit of one of my recent thinking activities. What I want to point out here, however, is that I am not sure I would have done all this thinking had I not also been blogging. Blogging forces me to write stuff down. Writing stuff down means I have to think. Thinking, for me, is facilitated by writing things down.
There is an irony here. The whole threading error that I was talking about earlier occurred because I did not write the ending and beginning threading out so that I could see the threads in black and white on paper (well, really on the computer screen......).
So, I am grateful to Leigh, who encouraged me to blog. And I am grateful to Sara, who posted a long and cogent argument for weavers to blog.
Tuesday, December 4, 2007
Who Spotted the Threading Errors?
When I looked at the pictures I had taken of this first 8-blocks crackle sampling, one thing immediately jumped at me. Something I had not noticed in the weaving. Something I had not noticed in the computer drawdown. Here it is, with the black arrows pointing to the problems that caught my attention:
Those arrows point to places where the weft yarn skips over more warp ends than it ought to. I went back and looked at the computer drawdown. These skips are not there. Clearly I made a mistake in the actual threading. When I looked at my threading and my notes, however, I threaded exactly as I had printed the threading out. However......and this is a big however....
The error appears at the point where I end the last block of the repeated group of blocks and begin the first block of that group of blocks. And since I repeated the group of blocks three times, that error occurs two times.
Here is the threading for the end of the repeat:
4 1 4 2
Here is the threading for the beginning of the repeat:
3 1 4 1
It had looked to me like there would not be a problem here when I entered the threading blocks into my computer software. What I did not do, however, is write out the last block and the first block as they would appear together. And this is what I would have gotten, had bothered to do this instead of thinking I "knew it all:"
3 1 4 1 4 1 4 2
Now the error is obvious to me. There is a repetition of the 4 1 pair. That repetition destroys the crackle block structure at the point and results in an extra bit of weft going over the warp ends. To correct the matter, all I have to do is leave out two warp ends, one on 4 and one on 1. Doing that gives me:
3 1 4 1 4 2
The first four numbers (3 1 4 1) give me one unit of the first block. The second two numbers give me the last two threads of the last block. The entire unit of that block reads 1 4 2 4. So, the last unit of the last block and the first unit of the first block, when written out look like this:
3 1 4 1 / 4 2 4 1
The slash indicates the division between the two blocks. All is well.
Now I know I cannot trust my imagination to see what is going on in the threading. I must write it down.
No, I did not rethread. This is only a sample. And seeing these two errors over and over again as I weave will reinforce what I need to do from now on. Hopefully................!
Monday, December 3, 2007
8 Crackle Blocks on 4 Shafts: First Sample
Here is a photo of the first sample on the loom.
The weaving is very simple. I simple treadled on opposites. This means that when I treadled such that I raised shafts 1 and 2 (treadle 3), that treadle was followed by a treadle which raised shafts 3 and 4 (treadle 8). On the first treadle I threw brown weft; on the second I threw weft. I repeated this for a total of 6 times (2 shafts treadled constituting 1 time). Then I moved on to the next set of opposite treadles (4 amd 7) and repeated throwing the wefts for a total of 6 times. I continued with treadles 5 and 6, then 6 and 5, then 7 and 4, and finally 8 and 1.
One thing visible is a slight M's and O's effect. Zielinski warned about this in overshot style treadling. If you continually repeat the pattern treadle with the opposite shed for the binder, you will get this kind of effect. Apparently it happens even when the opposite shed is not used for a binder but for a second pattern shot. Perhaps the effect would be more apparent with a finer binder thread? One thing I will look for is whether or not this effect washes out in the washing and pressing.
Because I am using only 4 shafts, treadling on opposites can produce only three blocks. At first glance it might look like 6 blocks are being produced. The effect, however, is an illusion. The illusion is created by the handling of color.
The second set of three blocks is really nothing but a repetition of the first three blocks, only in reverse order. The order is reversed because beginning with the 4th treadling sequence and continuing with the 5th and 6th treadling sequence, the treadling is the same, only in reverse. Since I continued to throw the brown weft first and the red weft second, the colors are reversed.
Looking on the third group of shots and the fourth group of shots shows this clearly. The red weft floats in the third group (treadles 5 and 6) and replaced by brown weft floats in the fourth group (treadles 6 and 5).
The drawdown shows something interesting going on between the third and fourth set of blocks.
There is an awkward repetition of two treadles in a row. The red arrow points to the problem. This happens because treadles 5 and 6 are the last set of treadles of the first group, while 6 and 5 are the first set of treadles for the next group. I have moved from having the first treadle of each group being first 3, then 5, then 5. When I get to 6 (and 7 and 8), the opposite treadles turn out to be the first treadles of the first three groups.
When I saw this on the draft, I realized I needed to figure something out to get away from that awkwardness. But then I looked at the fabric.
The fabric is fine. The doubled treadle is virtually invisible. Drawdowns are not the last word.
Friday, November 30, 2007
Warping with Handspun
The other day I finished knitting a sock and needed to cut off the yarn. I was a passenger in the car and had forgotten to bring scissors. So I broke it. That is, I tried to break it. With my bare hands.
I've broken knitting yarn before, even yarn with acrylic in it. But this sock yarn would not budge. So I untwisted the yarn enough to get at the 3 single plies. Individually, each of the singles broke with practically a feather touch.
I have always known that singles yarns could be problematic on the warp because they are not as strong as plied yard. And even more problematic would be handspun singles, especially if the handspun is softly spun. I have known for a long time that a two-ply yarn is stronger than a singles. I have known for a long time that a three-ply is stronger yet. I had learned these things when I was weaving with linen and when I started spinning. But I didn't really "know" any of this until I tried to break the sock yarn with my bare hands.
Now I really know in my bones why my plied handspun does not break when I use it as warp.
Thursday, November 29, 2007
Ready to Weave
The warp is lashed onto the front rod. And the front rod is attached to the front apron rod with Texsolv loop cord. I decided to try the Texsolv for joining the 2 rods in an attempt to keep the rods an equal distance from each other. This was hard to do just with tying them with pieces of string. The Texsolv keeps the two rods perfectly spaced.
And here is a picture of the trick I borrowed from Leigh. To support the two front rods while lashing on, Leigh had put a ruler on either side of the warp. The ruler rested on the beater lip and the front beam. Onto this the rods were slipped. I couldn't quickly find any rulers, but I did have pick-up sticks, so I used one of these on each end. It worked like a charm. It was much easier for me to get even tension because I wasn't fighting the waving around of the front rods.
This picture also shows more clearly how I used the Texolv loop cord to join the two rods.
I then decided to try a tip I had learned from Sandra Rude. When I had the warp evenly tensioned, I left it overnight. The idea was to get any soft spots to declare themselves in the dark hours of the night. Perhaps also the idea was to come back to testing on a good night's sleep. I discovered that it had softened up a bit on the right hand side so I tightened up the lashing cord there.
Then I proceeded to throw shots with blue 20/2 weft. I discovered a crossed thread on the right-hand side. Strangely, it was the last warp end on the right. Instead of sleying it in the dent with its partner, I had sleyed it one dent to the left. So I cut the offending warp end and rethreaded and sleyed a temporary end in the correct spots. Hence the pin you see on the right hand side of the warp. The pin is holding that warp end in place. The pin is visible on the right side in the following photo.
Visible in the photo also is a correction I had to make to softening ends on the right side. This time I couldn't simply pull the lashing cord tighter. The knots were just too tight to loosen up easily. So I got out a bamboo double-pointed needle and stuck it through the two end loops of the lashing cord. Then, to keep it in place, I pushed the ends of the needle into the holes of the Texsolv.
The warp is looking good. I am ready to start weaving.
Wednesday, November 28, 2007
Inspiration
"Inspiration is found in the studio while you are working."
This is one reason I find it so important to weave every day. Weaving, by the way, does not mean just sitting at the loom. It also means things like warping, mending cloth, working on drafts. Most of my ideas come during these times. The remaining ideas generally come in the middle of the night. But without the actual weaving activities, they probably would not have come either.
Sometimes they come at fiber shows and art museums as well. A painting can just get me somehow and I dig out my notebook and pen from my purse and write frantically.
And this is why it is important always to have paper and pen/pencil at the ready. When my ideas come in the middle of the night, I can hold onto them till morning without writing them down. But if they come in the midst of weaving-related activities, or at galleries and art museums, the ideas are likely to be lost if not written down fairly quickly.
Source: Art News Blog
This is one reason I find it so important to weave every day. Weaving, by the way, does not mean just sitting at the loom. It also means things like warping, mending cloth, working on drafts. Most of my ideas come during these times. The remaining ideas generally come in the middle of the night. But without the actual weaving activities, they probably would not have come either.
Sometimes they come at fiber shows and art museums as well. A painting can just get me somehow and I dig out my notebook and pen from my purse and write frantically.
And this is why it is important always to have paper and pen/pencil at the ready. When my ideas come in the middle of the night, I can hold onto them till morning without writing them down. But if they come in the midst of weaving-related activities, or at galleries and art museums, the ideas are likely to be lost if not written down fairly quickly.
Tuesday, November 27, 2007
More on Sett
The figures I gave on sett from the Osterkamp book are rather typical figures for her. In her tables she frequently has very peculiar numbers such as 19, 27. The only way I could achieve these kinds of setts is through uneven sleyings. Uneven sleyings occur when you do not put the same number of ends in each dent. The sleying might be, for example, 2-3-3-3-2-2-3-3.
I do not like uneven sleyings. First, I am much more apt to make a sleying error when I have to change, even in a regular fashion, the number of warp ends in a dent. Worse still, I would find it much too easy to miss a sleying error until I was in the process of weaving.
Also it is my experience that fabric weaves better with equal numbers of threads in each dent. There is less possibility of ends slipping around in the final fabric or, perhaps even worse, of the whole fabric simply not evening out in the final finishing. In this case, the warp ends would not be evenly spaced.
Uneven spacing of warp ends can be a design feature, but if it is, it ought to be intentional. Uneven spacings, skipped dents, crowded dents, are all ways of achieving this kind of design feature. But right now my concern is obtaining a regular cloth.
The result of this rejection of uneven sleying is that I have a large number of reeds. I would like more, but I would have to have them made to order. I don't consider this particularly a problem, but whenever I think about it, I cannot make up my mind which of several possibilities I would get the most use from. Reeds do not come cheap!
Monday, November 26, 2007
Crackle Yardage Sample
Here is a photo of the sampler piece that I saved to do some washing experiments on. I washed and hard-pressed the sample two times.
What totally surprised me was how fine and drapeable this little piece is. There is no feeling of the warp having been sett too far apart. Looking at the figures explains this unexpected result.
At the reed, the width of the fabric on the loom was 36.5"
The width on the loom, measured at the front, was 34.0"
The width off the loom was 33.0"
The width after the first washing in hot water and drying on perm press setting was 32.5"
The width after the second washing in hot water and hot dry was 32.25"
The total shrinkage in the width was 4.25" The total shrinkage in the with was a bit more than 10%
The length on the loom was 7.25"; the length after the first and second washings was 7.0" That is less than 5%.
I also computed the epi in the plain weave section. The epi turned out to be 34, in contrast to the weaving sett of 30 epi.
I also measured the picks per inch in that section,. The ppi turned out to be 32.
I find it humbling to hold finished cloth up to the light to see how evenly I managed to treadle. Perhaps I would be better to say, how UNevenly I treadle. Really humbling. And the cloth always looks like window screening. Here is a photo of that fabric, before washing, taped to a window:
And here is another photo of the same fabric, but after the final washing and pressing:
The closing up of the "window screening" is quite obvious. Also, the imperfections in the treadling have disappeared.
I have hopes for the fabric once I have mended, washed, ironed................ But, I will have to rethink what I was planning to make. A somewhat fitted jacket will no longer do. The jacket must be much looser and more fluid.
Friday, November 23, 2007
More Weaving Misadventures
I sat down this morning to finish sleying the reed. I had finished two-thirds of it on Wednesday. This meant that I was now working left of center. I pulled out the first group of threads and separated them into groups of two. I inserted my sley hook in the appropriate space and grabbed the first thread. As I did this I saw, to my immediate right, on the first shaft, approximately 30 empty heddles.
An occasional empty heddle is nothing to cry about. It happens. It can just stay there. If it doesn't mean re-threading too many threads, I will correct it. Otherwise I just let it stay there. But 30 empty heddles? No way.
How on earth did this happen? How on earth could I have skipped 30 heddles in a row on the first shaft? I did have a cold. I was also sick from my flu shot. But surely.....................
Fortunately I had tied my threaded heddles in groups such that each group represented one block. So it was very easy to figure out where I was in the threading draft. And I saw that this error had happened in an interesting place: at the beginning of the third repeat.
Anyway, I pulled all the ends out of their heddles, rearranged the heddles, put books under the shafts again to facilitate access to the cross, and am back at it.
Have been surprised that it's not really terribly awkward to thread in this way, with the front beam on, the cloth beam on, the reed in and the beater upright. The most awkward thing is getting on and off the bench because it is right up there close to the cloth beam. Fortunately I'm pretty agile. I just need to make sure that my coffee mug is out of the way so my feet don't kick it over in the process of mounting or dismounting!
Wednesday, November 21, 2007
Getting Sidetracked
I belong to the Online Guild of Weavers, Spinners and Dyers, affectionately called OLGA. This wonderful group sponsors month-long workshops on various topics, led primarily by list members. The next workshop, beginning in January, is on knitting with wire.
For several years now I have been intrigued with possibilities of working with wire. For a while I investigated weaving with wire. There were two HGA Learning Exchanges on the subject (for more on HGA Learning Exchanges, go here ). I was definitely interested but at the time I was involved with something else. I no longer remember what that something else was. I think I was also playing the coward.
At some point I was interested enough in this to purchase a beautiful book by Arline M. Fisch called Textiles Techniques in Metal. I would have purchased it for the photos alone. They are wonderful. She writes chapters on knitting, crochet, braiding, sprang, basketry, and knotting. Oh yes, she does have a chapter on weaving. The pages on weaving are getting a bit dog-eared.
And one year there was a seminar/workshop at HGA's Convergence on the subject, but I was unable to attend Convergence. Did I really want to attend? Did I really want to take that workshop?
Then a few years ago I took a weekend workshop sponsored by a jewelry group on crocheting with wire. Aha. I took it and decided I really didn't want anything more to do with it. I was a total klutz. End of story. Sure.
So now OLGA is sponsoring an online knitting with wire workshop. Learning that destroyed by weaving plans for the day. I was on the internet researching materials. I was on the internet Googling knitting with wire. I managed to find a book I had purchased for some unknown reason on knitting with wire. It's by Nancie M. Wiseman and called, appropriately enough Knitting With Wire.
Then I started thinking about weaving with wire. Not with my big floor loom. I was thinking how I might use my small tapestry loom. Then I started thinking in terms of a copper pipe loom where the loom itself might serve as a frame for the piece. And then I found Fisch's book again and saw possible off-loom techniques. The mind boggles.
Now it is dinner time. My hubby wants to go out for dinner. Huh? He wants to watch a DVD tonight. Huh? Well, he does begin his Thanksgiving vacation this evening so he's entitled. Maybe. Grudgingly (though not so as he would know that), I will give up my current temporary diversion and go out to eat, watch a DVD and have a very pleasant evening.
Tomorrow. No, tomorrow is Thanksgiving and I have other plans...........
Friday. Friday I will be back at the loom..................for at least some of the day.
8 Crackle Blocks on 4 Shafts: Sett
I am now in the process of sleying the reed. I am using a 12-dent reed sleyed 2 ends per dent. This gives me an epi of 24.
24 was the epi I had originally intended to use. But when I discovered that my warp consisted not of 10/2 pearl cotton but a combination of 10/2 and 20/2, I began to have concerns.
My previous warp (the fabric I am now finishing) was sett at 30 epi. It consisted solely of 20/2 pearl cotton. The result seemed to me a too loose sleying. The jury is still out on that decision by the way. However, the way I had woven that crackle was essentially a twill treadling, not a plain weave setting. Had a done a plain weave kind of treadling, the sett would have been fine.
The warp I am currently sleying is half 20/2 pearl cotton and half 10/2. Osterkamp recommends a sett of 19 for 10/2 and a sett of 27 for 20/2 if you are weaving clothing for garments. 24 seems comfortably in the middle. So, even though I will probably experiment with a bit of polychrome, I have decided to stick with a sett of 24.
Of course, having looked at Osterkamp, I now realize that if the warp had consisted solely of 10/2 pearl cotton, I should have tried a 20 epi sett instead of a 24 epi sett. The only reason, by the way, that I did not use 27 epi for the 20/2 warp is that I wanted the same number of ends in each dent and with the reeds in my collection, that would have meant choosing between 24 epi and 30 epi. I knew that 24 epi would be way too loose, so I settled for 30 epi.
Perhaps I should have named this blog, My Weaving Misadventures!
I like Peggy Osterkamp's books very much, including her sett charts These very detailed charts can be found in her Volume I, Winding a Warp and Using a Paddle. She also devotes a chapter to how to work out your own sett with a yarn which is not covered in her chart. I have found that chapter invaluable. Well, actually, I have found the whole volume invaluable.
For more on Peggy Osterkamp, go here. Or just Google her name!
Tuesday, November 20, 2007
Photographing Textiles
I don't really know anything about photographing textiles. So I was delighted when I saw that Curious Weaver has a very good piece on photographing textiles. She shares her setup for taking pictures of her own weaving. I really liked seeing her setup. This is a case where a picture (or two) is really worth a thousand words. Go here to read the piece.
Monday, November 19, 2007
Crackle Yardage Progress
The crackle yardage has been sitting lumped in my sewing room over a chair. Out of sight, out of mind. I try to devote at least a part of my weekend to sewing and/or spinning. Of course, when I went to my sewing room to continue work on a pair of slacks I am making, there it sat. An ugly lump on the back of my chair. OK, I promised myself that once I had zigzagged all the edges and cut the pieces apart, I could then move on to my slacks. I did just that.
In the course of the zigzagging I discovered just how vulnerable the yardage was. As I was adjusting and sewing, it would catch on edges of my sewing table (rounded edges, mind you), and groups of yarn would pull out of place. Here was but more evidence that the sett for the polychrome was too wide. Sigh..........
When I cut up the pieces I had, in addition to the three deliberately woven pieces, a series of sample treadlings preceding the third piece. I saw something there I rather liked so decided to save that.
I am going to use that sample piece to experiment with the washing process. I will measure it, wash it in hot water and dry it in the dryer. Measure. Wash and dry again. Measure. I will probably also hard press it after the first washing and again after the second washing. What I am trying to do is to shrink the fabric to see if that helps the fragility of the weaving caused by the too-wide sett. I will report back.
Meanwhile, I now have no excuse not to start examining the three fabrics for errors to correct and loose ends to cut off.
At the very bottom of the stack, barely visible, is the original yardage. On top of that (blue dominant) is the yardage I wove for trim. On top of that (yellow dominant) is the bit I wove with the same treadling as the trim fabric, but using 10/2 pearl cotton instead of 20/2. The top piece is the little sample I will be doing my washing/drying experiment on.
I do have, by the way, a couple of wool jackets I have made with some long floats. These floats do tend to catch and occasionally break. When they do, I cut them off. With wool this is not such a horrible problem because the wool will kind of stick to itself. Mercerized cotton, on the other hand, is much too slippery to do that. Another sigh.
Crackle with Handspun
Sunday I was still feeling a bit of head cold misery so I spent some lazy time plying some of my singles. I have been getting tired of knitting socks in my odd waiting hours when I am away from the loom (and computer), so had begun thinking of knitting a lace silk scarf or two with some of my handspun. . I thought, if I designed a simple lace pattern, this would be a pleasant change. And so I was motivated to get to work on plying. And I needed something easy and repetitive to do to put me out of my misery.
Normally I truly hate plying. It is boring, boring, boring, and I try desperately to play games to make it more quickly. Yesterday morning, however, it was a pleasant occupation. And I just kind of let my head run wherever it wanted to go.
I was very surprised. My mind started coming up with ideas for weaving with handspun. Weaving crackle with handspun. Clearly I must have been feeling a bit better than I realized. I began to think of the possibility of using two different colors of handspun as pattern wefts. I would then use the same two colors for warp and tabby binders. But these yarns would be silk.
As my mind continued playing with this particular possibility, I realized I already had spun one color of merino I really like, a very deep but heathered blue teal. I have not plied it yet, but when I do, I suspect/hope it will be about fingering weight. So, I thought about getting another merino from same source (link to source) and spinning and plying that.
Later that day I went to my source, Lisa Souza, and found the perfect red. It is called Garnet. You can find the color here. Look under "heathered solids." I ordered it. How soon it will come will depend whether she has it on hand or has to dye it. She is usually quite prompt in filling orders.
Lisa also has a lovely color called Warm Gold. Later I might order a bit of that to use as an occasional spark.
Here is a skein of the yarn I plied yesterday, washed and dried. 330 yards. I have two more bobbins to skein. One should be about 330 yards and the other significantly less.
A while ago, I figured out how much yarn I would need for warp and weft for a scarf roughly 12" wide x 72" long, including fringe. I figured the sett at 10-12 epi. 620 yards to 642 yards were the absolute minimum figures I came up with.
When I spun the singles for this, I came up with one full bobbin and one bobbin a little more than 3/4 full. All of this is helpful information for me in figuring out how much I will need for weaving. The one thing I did not document is how many ounces of fiber this was originally! Next time.....................
The source of the fiber for this yarn was Three Bags Full, sold by The Bellweather. I have their subscription which comes out 4 times a year with the latest samples. It is wonderful stuff and great fun to spin.
Friday, November 16, 2007
8 Crackle Blocks on 4 Shafts Sampling
Having just begun to emerge from the depths of a cold from Hades (my doctor did confirm that it was not the flu), I finally have energy enough to get back to work. I knew I was feeling better when I woke up this morning and found myself beginning to plan my day.
Anyway, I have managed to get the warp on the loom and ready to thread, as you can see in the photo above. The books are there to raise the shafts up to a level where it is comfortable for me thread the heddles. The bottom book is Black's Key to Weaving. The top book is a Spanish cookbook. Well, weavers have to eat as well.
Threading should be a quiet activity, perfect for someone in recovery. I must, however, be extraordinarily vigilant in the threading for I know that right now I am more vulnerable than ever to making mistakes.
Here is the threading:
It is simply the same ascending twill-type threading that I have been talking about recently, but with each threading unit repeated three times. The threading runs for 104 ends.The entire threading is repeated three times. So I have a total of 312 ends.
Well, that's not quite right. Yes, it is repeated three times. But somehow in the stupor of my cold (and yes, I did have a fever), I decided I needed an extra 22 threads, so I wound an extra bout with those number of threads. So now I had a choice. I could either drop those extra ends off at each side and thread the correct number of ends. Or I could add a block of units on each end and use up the extra ends that way. Since I had already wound everything on, I decided to go with the latter.
One thing really gripes me. As I was raddling the ends, many of the deep red ends really seemed much finer than the rest of the ends. Actually, when I started to wind the extra 22 ends I immediately noticed this and I switched to a different red cone. Today I checked. The red cone with the finer ends actually was a cone of 20/2 pearl cotton, not 10/2 pearl cotton. That must have been the cone I used for winding the greater portion of the warp. I would love to know why I didn't notice it when I began making the warp. It was so obvious when I went to make the extra 22 ends and again when I went to put the warp in the raddle.
In any case, another choice was tnow before me: 1) throw away the entire warp and start again; or 2) go on as planned. Since all I was doing was sampling, the first option seemed a bit excessive. I only want to see how this multiple-block crackle on 4 shafts actually works and also if I want to try it on my next silk warp. Also, the idea of alternating thick and thin ends sounds just a bit intriguing. I know it would provide an interesting texture in plain weave, and perhaps in some twill weaves as well. But how would it work in crackle? Do I sound like I am getting intrigued? Do I sound like I might be rationalizing? Do I sound like I still have a bad cold?
Perhaps the name of this blog should be Peg's Weaving Misadventures!
Thursday, November 15, 2007
Weaving as Fine Art
I ran across a web site with woven pieces by Adela Akers What she weaves falls under the class of gallery art. Indeed, this excellent website showing some of her things is a gallery in Santa Fe. It is a gallery of crafts, but crafts which have been raised to a level competitive with fine art. And her work hangs in the prestigious Metropolitan Museum of Art in NYC and in the Renwick Gallery in New York City. She is also Professor Emeritus of Tyler School of Art, Temple University, Philadelphia
No, she is not a tapestry weaver. She is a weaver. She does use some unusual materials: horsehair and metallic foil. To learn more about her, go here. And here
Yes, inside of me is the desire to move my weaving into gallery art. Randall Darwall, whose work I greatly admire, elevated the woven scarf into art. Don't miss his beautiful web site. I would like to transform my crackle weaving into something more..........
Wednesday, November 14, 2007
8 Crackle Blocks on 4 Shafts, Continued
Here is another drawdown view of the ascending crackle treadled with no binders. This time, however, I have reduced the size of the drawdown so that it resembles a bit more what the fabric might look like. What has happened, inadvertently, is the beginning of the crackle threading treadled as traditional crackle and not as Summer and Winter at all. But not totally. If you look back at the treadling in the earlier post, there are places where the treadling does alternate rather than repeat. So this is really a mixed-up treadling.
On this next drawdown, I have changed the treadling so that all treadles alternate. First, here is the reduced-size drawdown to give an idea of the fabric:
This is clearly a different beast! This is clearly the beginning of a summer and winter treadling.
And here is a blowup of the draft which shows just that:
I have rearranged the treadles within each treadling block, so that they always alternate.
For a true summer and winter treadling, however, each set of treadles would be alternated repeatedly until that particular block is squared (traditional) or for the desired length of the block (contemporary).
So, I have learned that I need to be careful in picking out the order of the treadles for treadling a threading as drawn in. I need to have decided whether I want a Summer and Winter treadling or a traditional crackle threading. Or perhaps I might just want to be inconsistent……….?
But treadled as traditional crackle or as summer and winter, that binder thread on the opposite shed is always needed.
Monday, November 12, 2007
Making Choices
I love to sing. I have sung alto in church choirs since I was in high school. I also sang alto in a small group (three voices on a part) for over ten years. But in the past two years something remarkable has happened. I have gained confidence in my voice. Thanks to the church choir I now sing in and its director, my voice has improved in quality and power. I love singing more than ever. Over the years I have occasionally thought about voice lessons, but the thought has always quickly fled. Weaving is my passion and I have not been willing to give up any weaving time to something else, no matter how much I might lovethat something else. But not this time. Now the choice seems to be much more difficult.
A year ago our choir worked on a piece with an alto solo. We knew that this one particular week, the director was going to select the soloist. Oh, I wanted that so badly and I sang my heart out. And I was chosen. I was stunned. And I said no. I had to. I knew that in public my voice would not hold up. It would betray me. Saying no broke my heart. But I had to. And the alto I thought should have the part in the first place got it.
This alto and I are friends. She claims my singing inspires her to sing better. I claim just the reverse. She didn't do well on that solo by the way, but I would have done much worse. Now she has been chosen to sing a solo from a Handel piece for Christmas. Oh. And she is taking voice lessons. Oh. She explained to me that she does not want to make a fool of herself. She is very smart. And suddenly I now want, really really want, to take voice lessons.
The choice has suddenly become an urgent reality, not just a passing flight of fancy. I know I would put my heart into those lessons and into the practicing those lessons would require. I know that lessons would improve the quality of my singing and might even allow enough courage to grow in me to sing solo. But I wouldn't have to sing solo. The choir is where I belong.
It is hard to make choices when the heart is so much involved. It is hard to say no to something the heart so intensely desires. Deep down I have already made the choice. Deep down, it is the weaving that pulls me. I need to learn to accept the choice my heart has really made. I need to accept that I will always have to live with singing pulling at me. Deep down I have to learn to accept the great satisfaction choir singing gives me and not ask for more.
Friday, November 9, 2007
8 Crackle Blocks on 4 Shafts
Yesterday I started talking about some of the specifics of my next crackle project, specifically the treadling. I gave the (corrected) threading I planned to use but I also explained some things about the kind of threading I am using. This is a threading that allows you to have 8 crackle blocks on 4 shafts.
Now I have been starting to work out some treadlings. Here is the first treadling, and it is the first treadling that Zielinski discusses as well. The threading I have used here, by the way, is not the threading for my next project, but the simplified threading where each block as only one unit. Zielinski calls it a simple ascending diagonal. The only difference between this threading, however, and the threading that I am using in my project is that in my threading, each unit is repeated three times. So mine, too, will be a simple ascending diagonal, just a bit longer.
Here are the threading, the tie-up, the treadling, and the draw down:
Look at the treadling. If you look at the first treadle, then the 3rd, 5th and ensuing odd treadles, you will see what are called the pattern treadles. These are the treadling as drawn-in treadles.
The first treadle raises shafts 1 and 4 and the third treadle raises shafts 2 and 4. If you then look at the threading, the threading for the first unit is 1,4,2,4. These are the shafts that the first two pattern treadles are raising.
Looking at the next set of pattern treadles (5 and 7), treadle 5 raises shafts 2 and 4 and treadle 7 raises shafts 1 and 2. The threading for the second crackle unit is 4,2,1,2. These are the shafts that the second set of pattern treadles are raising. Note, by the way, that the incidental thread between these two units (the 5th thread, on shaft 1) is not counted in figuring the the pattern treadles.
The remaining six threading units and their treadling follows the same procedure.
But there is a problem. Treadling these pattern treadles creates floats more than 3 threads long. The answer to that, of course, is to treadle the tabbies in between the pattern wefts. This is always the solution in crackle structure. If you look at the tie-up, there they are, treadles 1 and 3 and treadles 2 and 4.
But, there is a catch. These treadles do not raise tabby sheds. Raising treadles 1 and 3 does not raise each and every alternate warp end. Nor does raising treadles 2 and 4. How, then, do we create a binder weft?
The binder weft is created like this. Each time a pattern weft is treadled, the treadle that raises the shafts opposite to the pattern weft shafts is raised. Thus, when shafts 1 and 4 are raised for the first pattern treadle, then the next shafts which are raised are shafts 2 and 3.
Looking at the next pattern treadle: here the pattern treadle is the treadle which raises shafts 2 and 4. This is then followed by the binder treadle which raises shafts 1 and 3.
And this pattern follows through the remaining treadling. Pattern treadle, then binder treadle which raises the opposite shafts.
Here is a simulation of what the fabric would look like. I call it a simulation because I have reduced the size of the drawdown to the point where it looks more like what the fabric would really look like when woven.
Here the areas of floats are more clearly set off from the areas without the floats. The blocks are a bit easier to see here. It is also easier to see that the blocks here are a bit more muddied than they are in ordinary 4-shaft crackle. That, however, is not necessarily an issue for me. In fact, it might possibly enhance my attempts to manipulate color. But only actual weaving will show me how true, if true at all, that is.
Here, to the right, is the same threading, also treadled as drawn in, but without the binding treadles. I did this because I wanted to get an idea of what the fabric would look like if I used a fine thread for the binder threads and a thick thread for the pattern threads. Weaving in this way makes the binder threads practically invisible, so presenting the draw down in this fashion is actually more realistic than just making the pattern threads twice as as long in the draw down.
Eliminating these binder threads, however, has also highlighted something interesting. There are times that the first pattern treadle from one unit is the same pattern treadle from the preceding unit. That this is going to happen actually follows from the threading.
My next step will be to try reversing these orders so that I no longer get two of the same pattern treadles in a row. As long as I keep the two pattern treadles for each unit together, it would not seem to make a difference which order I place them. Then I will see what happens when I put the binding treadles back in.
One thing that is illuminating here is the value of weaving software. It has the ability to bring into focus things that need to be attended to before I actually start the weaving itself.
Thursday, November 8, 2007
I Need a Proofreader
I was a newsletter editor for three years. After the second issue came out, a friend approached me to volunteer herself as a proofreader. I accepted. We are now good friends.
Now I need a threading proofreader! The correction in the last post is of the last threading. This is the threading I plan to use for my next warp. After I posted it, I was looking at the drawdown. Something didn't seem right. I looked at it some more. Was something wrong with the threading? So I went over the threading carefully. Then I studied the drawdown again carefully. The threading now seems to be correct.
I guess it is as easy to make threading errors on paper (or using weaving software) as it to make them when actually threading the heddles!
Wednesday, November 7, 2007
Next Crackle Project (Corrected)
Why did I change my mind? Why am I putting off the silk warp that I have done so much dye sampling for?
Part of this is, I believe, an unwillingness to get back to 60/2 silk. Much as I love it, it is fine thread and, while rewarding to work with, great patience is required in the dyeing and the warping. What follows may be really an excuse.
Anyway, I was checking out what Zielinski has to say about crackle. I knew he had some thoughts about getting more than four blocks out of only four shafts. So I dug out my Volume 8 of his Master Weaver series. There he explains how he has developed an 8-block crackle threading from something called a double diagonal twill. He discusses this particular twill in a volume of the Master Weaver series that I do not have. But he does here give us the threading for that structure:
Here it helps to remember that crackle threading is based on a point twill. Here are the usual four units but without the accidentals. The point twill basis is obvious here.
The point twill basis is not obvious in the double diagonal twill, but when he combines these units to create crackle blocks, the relationship to point twill becomes much clearer. And here are the individual 8 crackle blocks, again without the accidentals. Somehow it did not come through very clear but it is readable.
I have clearly left out much of Zielinski's thinking process here. What he is doing is joining the threads of the double diagonal twill threading in such a way that crackle blocks are created. Looking at the first threading unit on the left, he has joined together the first three threads of the double diagonal twill threading so that it forms one block. In other words he has put together first 1 and 4 and then he has put together 4 and 2. But that would create an impossible threading: 1,4,4,2. To correct this he has reversed the 4 and the 2. The resulting threading block is then 1,4,2,4. To read more of his explanations, check out pages 47ff in volume 8 of the Master Weaver series. One of the places this series is available, by the way, is Camilla Valley Farms.
And here is the threading I am going to use. It is nothing fancy. It is just each of the threading blocks repeated three times.
I will repeat this group of threads three times.
I am really excited to see the weaving possibilities for this threading. There will be issues, because no plain weave is possible. But I think exploring this will be fun.
Subscribe to:
Posts (Atom)