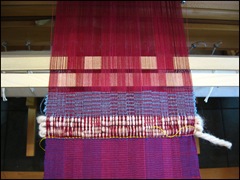
I left off explaining the first steps with throwing the blue wool weft shots for approximately one inch.
INSERTING THE STICKS
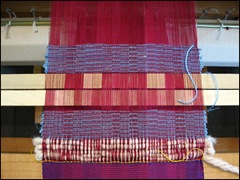
The next step is to open one shed, insert a stick, then open the opposite shed and insert a second stick. The sheds are supposed to be the two plain weave sheds. Having no ability to make plain weave sheds on this warp, I chose sheds as near as opposite to each other as I could. The sticks I used are the sticks for separating warp ends on the back beam.
MORE WEAVING
After inserting the two sticks, I then wove roughly another inch with the blue weft.
Now, between the two sticks and the two sets of woven bits, the warp, along with its tension, is secured.
CUTTING OFF
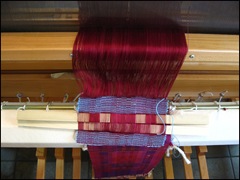
The next step is to cut off the warp in front of the first inch of blue wefts. I always worry at this point that I am going to cut in the wrong place. The result of that would be having to tie the warp ends into half-inch groups, lash them onto the front beam, and adjust the tension. This is a chore I did at the beginning and do not want to do again.
Here I have made that cut (in the right place!) and the warp with its sticks and blue bits of weaving is hanging from the front of the reed.
REMOVING THE WOVEN CLOTH
Now I need to unroll the woven cloth from the front beam and remove it.
Related Post:
Preparing for Lashing On
Lashing on to the Front Rod
© 2008


5 comments:
I can't see from the pictures where you cut off and how do you retie on? I will have to research more about this subject. I love reading your blog...it is the high light of my day when I see your "talking about weaving" in my "in box". THANK YOU!
Oh I do see where you cut! Do the sticks then act like lease sticks? because they help separate the ends from each other. This is something I can definitely adopt or adapt!
Aren't Ms. Osterkamp's books some of the best references ever?
This is one of her best tips, and really cuts (no pun intended) down on time and effort. It was one of the things that got me over my reluctance to weave full sized samples -- knowing that I didn't have to futz so much with retying on.
Great photo illustrations, as usual, Peg.
Am so tickled that you got a chuckle out of "inner weaver." :) Was hoping you would.
I agree with Jackie -- yours is the first blog I tune into each morning. Your willingness to take the time and effort to share your knowledge and to offer such clear illustrations of techique and tips is really an asset to the weavers' blogisphere.
Weave (and blog) on!
Jane
Jackie, retying is coming up. And thank you for the great compliment!
Susan B, not they don't really act as lease sticks. You will see in the next post that they are going to get wound onto the front beam with the rest of the woven cloth (that I am going to weave)
Jane, despite having started out with a whirlwind weekend class in learning how to weave, I don't think I would have survived without having Osterkamp to refer to (constantly!!). And thank you for the compliment as well!
OK, this does look like Peggy's method! It's really useful. I should do it more often.
Post a Comment