Friday, October 30, 2009

I WANT TO DYE THE WARP, GOSH DARN!

Posted by Peg in South Carolina
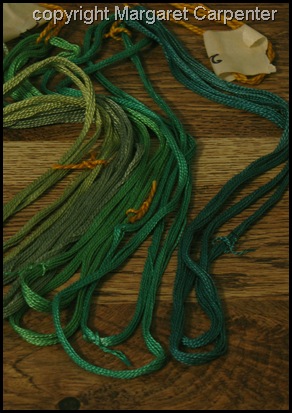
But I need roughly three hours of relatively uninterrupted time at home to do a batch of immersion dyeing.  That’s not going to happen till Tuesday.   Sigh……..

Not that there aren’t things to do.  I am in the process of examining the threading and threading blocks for where and how I want the warp colors to change.  I need to do that before I start winding the warp.

And I can always start winding the skeins for the dyeing of the weft yarns. 

But, gosh darn, I want to dye the warp yarn!


"I Want to Dye the Warp, Gosh Darn” was written by Margaret Carpenter for Talking about Weaving and was originally posted on October 29, 2009. ©2009 Margaret Carpenter aka Peg in South Carolina.

Thursday, October 29, 2009

MORE DYE STOCK SOLUTIONS

Posted by Peg in South Carolina

After working out the calculations for dyeing the warp skeins, I checked my stock solutions and discovered I needed to make more Sabraset Sun Yellow and Sabraset Violet. That meant moving out to my dyeing station in the garage.

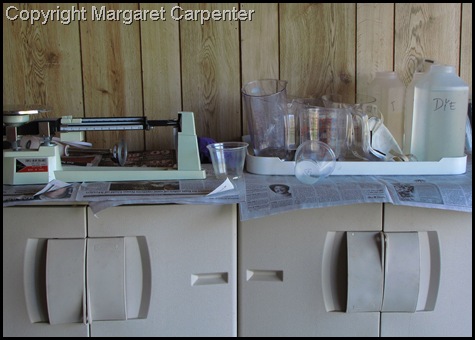
Dye station in garage

It’s just a small place, the tops of two cabinets, covered with newspaper. Easily set  up and taken down.

The scale dominates the scene—my triple beam balance scale.  Usually for dye powders I have used my little 10-gram balance scale.  My chemist friend assures me this is the same scale that drug dealers use……….   Well, it must surely be accurate, then!

But I decided to drag out the big scale, and honestly, it did seem a bit easier to use.  That is, it seemed easier to get the right amount of powder in, largely because I’m putting it in a larger container.  Ten grams of dye powder usually fills the little scale’s pan to almost overflowing. So I shall probably continue to use the big triple balance.

Directly behind the scale is a very inexpensive (i.e., cheap) electric blender.  It does a much better just of mixing the dye powder into solution, especially for those colors that just don’t want to get mixed and insist on clumping.  Like Sun Yellow. 

The small clear plastic containers on the right in the front are what I use to put the dye powder into for weighing.  The white powder mask is also visible on the tray.  Invisible are the green disposable plastic gloves.

Just outside the garage to the right is a hose which I can use for anything that needs to be rinsed out in between measuring different colors.  In our Georgia house,  we added the garage and I had a sink put in at the time.  That sink out to be a wonderful investment, both for dyeing and for cleaning up after gardening.

Related Post:  Making Stock Solutions


"More Dye Stock Solutions” was written by Margaret Carpenter for Talking about Weaving and was originally posted on October 29, 2009. ©2009 Margaret Carpenter aka Peg in South Carolina.


Wednesday, October 28, 2009

MORE ON WINDING FINE SILK ONTO CONES

Posted by Peg in South Carolina

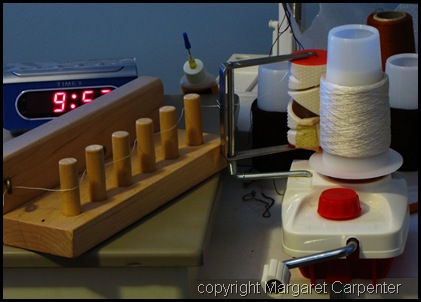
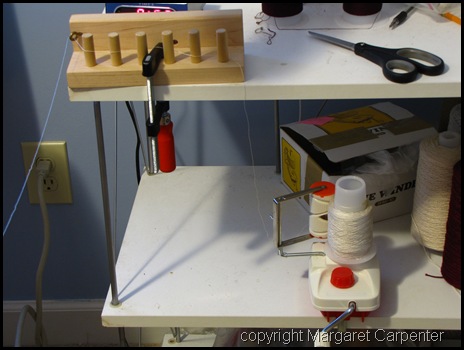
Cone winder below tension box

For the first cone I wound, I had the tension box level with the cone. I did the same thing when I started to wind the second cone. But then I decided to try winding with the cone below the tension box.  I did this primarily because I was having a bit of trouble with the yarn slipping off the pegs.

Moving the cone winder down worked well except for one problem.  When the cone is down on the middle shelf, I am looking at it from above.   As a result, I have trouble watching how the yarn is winding on.  I especially have trouble seeing what is happening at the bottom.  Here is a close-up that showed what actually happened.

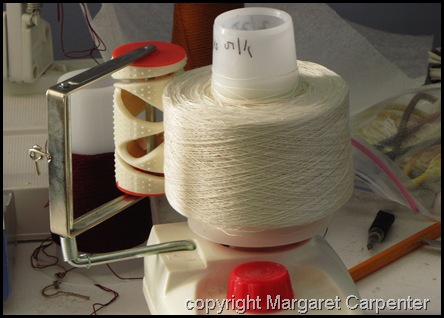
Problem Cone

The yarn slipped from time to time to the bottom of the cone.  I don’t think this will seriously affect my winding off from this cone to make skeins.  The real problem is that when this happens, the yarn can actually slip off the cone itself and get caught in the workings of the cone winder.  Looking carefully at the bottom right of the cone shows one thread close to doing that.

Next time I might try reversing the positions of the two.  But then I would have to change the way the tension box stands so that the yarn does not come off the guide rods.

Related Post:     I Might Try the Goko Again


"More on Winding Fine Silk onto Cones” was written by Margaret Carpenter for Talking about Weaving and was originally posted on October 28, 2009. ©2009 Margaret Carpenter aka Peg in South Carolina.

Tuesday, October 27, 2009

DECISION TIME

Posted by Peg in South Carolina

The time has come for me to knuckle down and make color decisions.  This is always an exciting and yet very frightening time for me.  Suddenly I feel so helpless.  I feel like I am acting on whims and can no longer see what the piece is going to look like.  Its idea is gone.  Everything feels like guessing.

But I have made my decisions and I have worked out the dyeing details insofar as I could.

Basically I am using only colors that come from my yellow-green/red-violet dyeing samples.  This is a safe decision because each color will relate in some way to all the other colors.  And it is a complementary color-scheme. There are some exceptions, but those exceptions will happen in the less obvious binder wefts.

For the warp I decided to use three very dull colors, one which veers towards the red-violet, the other two which veer a bit to the yellow-green. The colors will move from left to center and from right to center.  Calculations for these yarns are easy.  I will simply dye three Treenway 60/2 silk skeins.  They weigh 100 grams each.  The calculations are already done.

The warp yarn colors will be the background support for the weft yarns. It is in the weft yarns that the major color play will happen. The pattern wefts will use these same dulled warp colors, plus various gradations of the brighter yellow-green as well as the pure red-violet. The binder wefts, in 120/2 silk,  will be the same colors plus there will be some red, blue, and yellow wefts.  Not very much of this latter group.

I  have worked out how many yards I want for each of the colors I am going to use, for both the 120/2 silk and the 60/2 silk.Now I have to wind these off into skeins and weigh them before I can complete the calculations.

Related Posts: 
Yellow-Greens and Some Red-Violet
More on Color


"Decision Time” was written by Margaret Carpenter for Talking about Weaving and was originally posted on October 27, 2009. ©2009 Margaret Carpenter aka Peg in South Carolina.

Monday, October 26, 2009

I MIGHT TRY THE GOKO AGAIN

Posted by Peg in South Carolina 

Why?   Because this second skein is winding off so easily. 

Cone winder with tensioner

So easily that it tends to loop around.  I solved that by putting a tension box* between the skein and the cone and then running the yarn through it.  Any whipping and looping that happens will happen before the yarn enters and tension box, not after.

The only thing I have to continue to watch with an eagle eye is the yarn as it winds onto the cone.  The yarn can get caught and start winding either underneath or above the wound part of the cone. With the tension controlled, this rarely happens.  And catching it immediately when it does happens makes it quick and easy to fix.

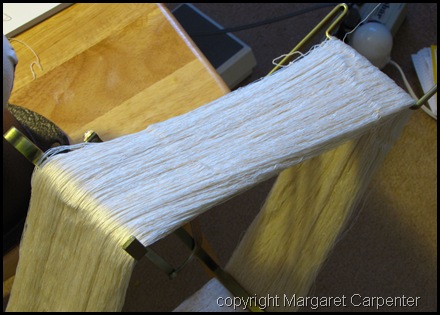
Here is a close up of the skein itself as it looks on the skeinwinder (viewed from the top). 

60.2 silk on skein winder

It looks exactly like a skein should look.   Smooth.  Spread across the whole width of the skein winder.  Flat.  And the yarn feeds back and forth from across the top of the skein.

Now I finally know exactly what the skein should look like when it is stretched out.  I also know I can try each end to see which end feeds from the top.  Knowing these two things gives me the courage to try the Goko again.  For if that skein unwinds in the same manner as the current skein unwinding, the Goko will work exactly as it ought to, turning free an easy as it lets the yarn unwind. 

With the LeClerc, because it is so heavy, I have to turn the winder as well as the cone winder in order for the yarn to feed off.  With the super-light Goko, the pull from the cone winder is all that is needed to cause the yarn to feed off of it.

*This particular tension box is sold at Purrington Looms.


"I Might Try the Goko Again” was written by Margaret Carpenter for Talking about Weaving and was originally posted on October 26, 2009. ©2009 Margaret Carpenter aka Peg in South Carolina.


Friday, October 23, 2009

FIRST 60/2 SILK SKEIN CONED

Posted by Peg in South Carolina 

First 60.2 silk skesin coned

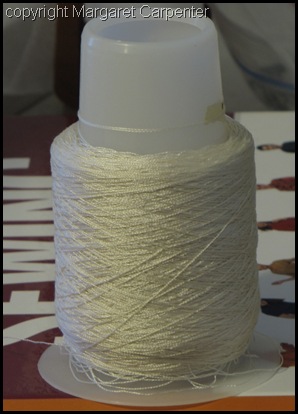
I wasn’t sure I could get one whole skein onto a cone;  I’d never tried that before.  But it worked.  Just took a while……….

Only 3 knots in the entire cone.  Not bad.

From these cones I will make skeins for dyeing.

Why not make the skeins directly from the Treenway skeins? I could put the Treenway skein on my Goko* and wind from it onto my LeClerc skein winder.

I had tried that on an earlier project.  But it was not totally successfully, as you can see if you read this post.  Indeed, I got frustrated enough that I gave up and made cones instead which I then wound into skeins.

*Go here and scroll down the page to see Schacht’s Goko skein winder. To be clear, I want to say that the problem is NOT with the Goko.  The Goko is a good piece of equipment.  I just have to learn more about handling 60/2 silk!

Related Post:  Winding Weft Yarn for Dyeing Continues


"First 60/2 Silk Skein Coned” was written by Margaret Carpenter for Talking about Weaving and was originally posted on October 23, 2009. ©2009 Margaret Carpenter aka Peg in South Carolina.


Thursday, October 22, 2009

MORE CALCULATING

Posted by Peg in South Carolina

The next thing I needed to calculate was how much yarn I needed.  My arithmetic (never trustworthy, even with a calculator) revealed I would need 8,305 yards of 60/2 silk for warp and another 8,305 yards of the same silk for the pattern wefts. 

The amount figured for weft is not an honest calculation.  An honest calculation would have required me to figure out the picks per inch and multiply this by the amount of yarn one weft shot would require, then figure out how many picks all the weaving (and only the weaving) would require.  I simply took the lazy way out and figured I would need approximately as much warp as weft, assuming, of course, a balanced weave, which this will probably not quite be.

One skein of 60/2 silk from Treenway Silks has approximately 3,500 yards on it.  So I will need a minimum of 4.7 skeins.  I have 6 skeins, but think that for the time being I will wind off only 5 skeins as all my calculations are on the very generous side. 

Then I will need 8,305 yards of 120/2 silk for the binder weft.  Since I will be throwing a binder weft with each pattern shot (surely, this is bordering on insanity……..), I figure I need the same amount of binder weft as pattern weft.

One cone of 120/2 silk from Treenway has a little more than 15,000 yards.  I need only one cone.

Now I need to calculate how much I will need of each color, once I have chosen  the colors I plan to use.

Related Post:  Initial Calculations 

"More Calculating” was written by Margaret Carpenter for Talking about Weaving and was originally posted on October 22, 2009. ©2009 Margaret Carpenter aka Peg in South Carolina.


Wednesday, October 21, 2009

GREEN AND RED DYE SAMPLING

Posted by Peg in South Carolina

Greens and Reds

The movement is from 75% red + 25% green on the far left to 1.5% red + 98.5% green on the far right.  The depth of shade is 4%.

I’m glad I did this.

The dye sampling is now done.

Related Post:   Done with Dye Sampling?

"Green and Red Dye Sampling” was written by Margaret Carpenter for Talking about Weaving and was originally posted on October 21, 2009. ©2009 Margaret Carpenter aka Peg in South Carolina.

Tuesday, October 20, 2009

INITIAL CALCULATIONS

Posted by Peg in South Carolina

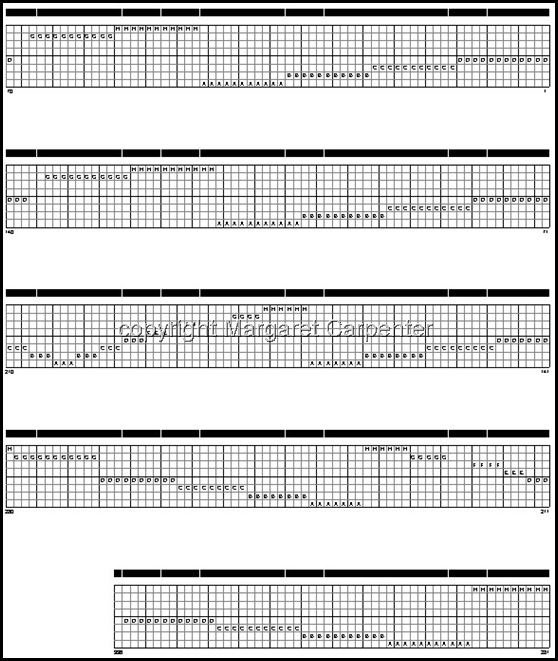
I have done things a little backwards. Normally I would figure out the width I wanted a piece to be and start with that.  But because I am not interested in the precise width of this project but am more concerned with precise thread patterning, I started with the number of ends. Here is a copy of these initial calculations:

image

5.5 yards seems like a doable length for me to get a well- and evenly-tensioned warp. But for weighting the warp ends, I shall have to check to see if I have enough weights to add them to one-inch segments.

This does not yet tell me how I am going to use different colors in the warp.  I am not quite ready to deal with the issue just yet.

RED

By the way, I changed my mind about the red as I started dyeing today.  I decided that Sabraset Scarlet leaned a bit too much towards yellow, so I decided to use a mix of 50% SAB Scarlet and 50% WFA Magenta, which leans to blue.  Mixing a yellow-leaning red with a blue-leaning red will never result in the brilliant kind of red that a pure red would be.  But there are no pure reds in the Sabraset dyes.  So this is my best compromise.

Related Post:  Recent Comments and Questions


"Initial Calculations” was written by Margaret Carpenter for Talking about Weaving and was originally posted on October 20, 2009. ©2009 Margaret Carpenter aka Peg in South Carolina.

Monday, October 19, 2009

SLOW (VERY SLOW) MOVEMENT FORWARD

Posted by Peg in South Carolina

DYEING

As I should have been able to predict last Friday, I have decided to do one more set of dye sampling. I will use the green of the last sampling but for the red I will use Sabraset Scarlet.  As this is a very busy day for me, however, the dyeing will happen tomorrow.

THREADING DRAFT

Also, I have saved another copy of the threading draft.  But in this copy I have eliminated the gaps between groups of blocks.  To do the actual threading, I will print out the original version with the gaps.  But for the calculations, I needed to eliminate those gaps.

Eliminating the gaps gives me 1506 warp ends plus four more for doubled floating selvedges.  That gives me a final total of 1510 warp ends.

ANTICIPATED PROBLEMS

1510 warp ends of 60/2 silk makes me catch my breath.  That many ends in a complex threading leaves plenty of room for making errors.  Also, that many ends provides for plenty of opportunity for stuck warp ends and so problematic sheds in the actual weaving.

I am hoping that leaving the gaps in the printed threading that I take with me to the loom for threading will help with the threading errors.  And I am going to change the sett from my usual of 60 ends per inch to 54 ends per inch in the hopes that doing this will make for easier sheds.  To help with the latter I also plan to use a temple.

Onward and upward!

Related Post:  Done with Dye Sampling?


"Slow (Very Slow) Movement Forward” was written by Margaret Carpenter for Talking about Weaving and was originally posted on October 16, 2009. ©2009 Margaret Carpenter aka Peg in South Carolina.

Friday, October 16, 2009

DONE WITH DYE SAMPLING?

Posted by Peg in South Carolina

There are a couple of shades I would still like to try……..

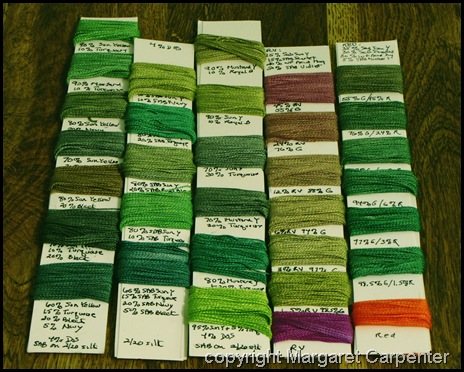
The Color Samples

But I’m not going to.

The whitish areas on some of the samples are areas that the dye didn’t reach.  These were places I had a tie and had tied it a bit too tight.  This is the kind of thing I watch carefully to avoid when I do the final dyeing;  but for the samples, it doesn’t really matter.

There is one real mistake, a mistake which shows me that I missed an initial sampling that should have been done.  The orange on the right card is supposed to be red………..  I didn’t sample it because the recipe I used was from another sample which had turned out a beautifully brilliant scarlet…..  Sigh……..

What I ought to do is to do the samples on that card all over again.  Maybe I’ll just use plain old SAB Scarlet instead of a recipe concoction.

I’ll sleep on it.  For the whole weekend.  I mean three nights!  Just in case anyone thinks I might be going into hibernation…..

Done with Dye Sampling?“ was written by Margaret Carpenter for Talking about Weaving and was originally posted on October 16, 2009. ©2009 Margaret Carpenter aka Peg in South Carolina.

Thursday, October 15, 2009

MORE ON COLOR

Posted by Peg in South Carolina 

RICHARD BOX ON PROPORTION

Richard Box has some some ideas about proportions of color to be used in embroidery.  On the whole, the proportions he favors are one third of one color and two-thirds of the second.

But this doesn’t mean that he favors using only two colors.  If either of the two colors is a mixed color, that is, a color made up of two or more colors (red-violet, for example), he likes to see a bit of the original colors that make them up (in this case, red and blue) somewhere in the embroidery.

Also, if there is a lot of one color (the color, I would guess, that is used for two-thirds of the piece), he likes to include bits of the color’s complement, yellow-green in the case of red-violet.

PROPORTION APPLIED TO MY GREEN CRACKLE PIECE 

Let me apply these ideas, tentatively, to the crackle piece I am preparing for.

The major colors will be green and yellow-green.  My instinct would be to select the green as the dominant of the two colors.  But this is a spring piece, and yellow-greens dominate in that season.  So I am going to go against my instincts and assign the dominant status to yellow-green.

Now I am going to be using a lot of different greens and a lot of different yellow-greens, all the way from quite pure to very dulled, so dulled that they may be read as brown.  I think I will subdivide each of these greens, the pure and the yellowed green, in the same way I divided the over-all greens.  That is, two-thirds of the yellowed greens will be dulled, one third will be bright and pure.  For the greens I am going to have two-thirds of the greens bright and pure, and one-third dulled.   Don’t ask me why.  This is just what I am seeing right now.

Now for some real fun.

Yellow-green contains yellow as well as green.  I have been wanting the whole time to include some highlights of yellow.  Now I have a reason for doing so.

Then the complement to yellow-green is  red-violet.  I already knew I wanted to incorporate some red-violet!  “Heaven, I’m in heaven” as the song goes…..

Related Posts:   Mud
Yellow-Greens and Some Red-Violet


More on Color“ was written by Margaret Carpenter for Talking about Weaving and was originally posted on October 15, 2009. ©2009 Margaret Carpenter aka Peg in South Carolina.


Wednesday, October 14, 2009

DIAGONALS IN THE DRAWDOWN: AN EXERCISE IN THINKING TOO MUCH

OR MAYBE I’M JUST PROCRASTINATING 


Posted by Peg in South Carolina

A while back, I figured out the basic treadling scheme I want to follow.  And I plan on working more with that scheme before I actually start weaving.  Moreover, I know that I may well make changes on the fly as I weave.

In the process, I tried to find treadlings that yielded clearer weft-wise diagonals. And I did find some.
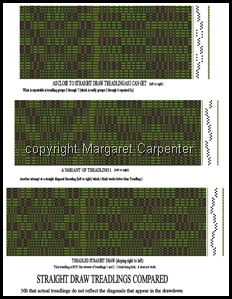
Straight Draw Treadlings compared
Note that I am working, not with the full 1300+ ends of the whole drawdown, but with the small versions.  Also, I am including only the middle and the right side.  The left side simply mirrors the right side.

Of these three treadlings, I liked the second and the third (which is the reverse of the second) the best. But I needed to compare them with the original treadlings.

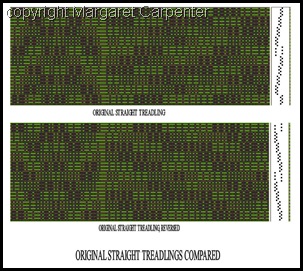
I pulled out the treadlings from my original treadling Original straight treadlings comparedscheme and wrote them up in a way comparable to these new treadlings.  That is,  I repeated the units of each treadling block three times. These treadlings appear to the right.

When I compared the treadlings on the right (the original treadlings) with thos I had just worked up,  the three I had just worked up seemed definitely superior.  They were superior because they showed the weft diagonals more clearly.  Not perfectly, but more clearly.

In judging these drawdowns I had been focusing primarily on the right panels.  But then I started paying more attention to the center panels.  That is when I began to lose faith in those first treadlings above.  I stared.  I stared some more.  I squinted.  I stared. 

 Finally I took a look at the whole drawdown page in miniature.image  
That drawdown appears just below to the left.

The top two groups are the original treadlings.  The next three little groups are the new treadlings.  And the last group, the big group, is the original overall treadling plan.

I’m sticking with the original overall treadling plan. Even though the diagonals formed by the weft-faced blocks are not as clear as I would like, the combination of weft- and warp-faced blocks together create a very clear diagonal that I like.

Any treadling changes I make on the fly will contribute to this overall scheme.


Diagonals in the Drawdown: An Exercise in Thinking Too Much“ was written by Margaret Carpenter for Talking about Weaving and was originally posted on October 14, 2009. ©2009 Margaret Carpenter aka Peg in South Carolina.

Tuesday, October 13, 2009

MUD, WORK, INSPIRATION

Posted by Peg in South Carolina

Yesterday I wrote about mud.  The color, mud.  What I did not write about was that I myself was dragging in the mud.  No inspiration, no enthusiasm, no energy.  True, it was a dreadfully rainy and bleak day, but never has that kind of weather elicited such a reaction from me.*  I was even beginning to think that I might be coming down with swine flu.

This morning I woke up.  No swine flu.  Energy pretty much back.  And an absolutely fantastic and to-the-point piece popped up in my blog reader, a piece, of course, which I must share.

MARKING MILESTONES

It is called “How to Defeat Burnout and Stay Motivated” and can be found here.  It is perhaps the best essay I can remember having read on the subject.  One of the things that got my attention was the author’s discussion of marking milestones along the journey.  Marking them, not just in your head, but in a journal.  Create them, if you have to. 

I had a voice lesson yesterday.  The 30 minutes usually feels more like 5 minutes, but it felt more like an hour yesterday.  Nevertheless I noted that one of the things my teacher does is to mark milestones for me.  The milestones she marks are quite small, but they are clear and well-defined, they are important, and when she marks one I smile.  I smiled yesterday. 

I don’t have a weaving teacher.  So I have to take over that function for myself.  Right now I don’t know exactly how I will do it, but I will figure it out. 

TRAINING INSPIRATION

Also interesting is his discussion of inspiration.  Inspiration seems to be a wispy kind of thing, a now-I’m-here, now-I’m-not kind of thing. But it doesn’t have to be.  It can be trained.  Go read the piece to learn how…….

A QUESTION REMAINS

One thing he does not talk about, however, is how to deal with the inevitable down days, how to survive them, how to believe that this day will pass, what to do when you are in mere survival mode. 

*This is probably not a true statement….(grin!)

Related Posts:  
Distracted and Out of Sorts
Get Back to Work


Mud, Work, Inspiration“ was written by Margaret Carpenter for Talking about Weaving and was originally posted on October 13, 2009. ©2009 Margaret Carpenter aka Peg in South Carolina.


Monday, October 12, 2009

MUD

Posted by Peg in South Carolina 

One of my favorite books on color is an embroidery book by Richard Box.  It is called Color and Design for Embroidery.

I particularly  like his observation on brown.  Browns, he says,

…are the foils to all the brighter purer colours….  Bright colours may sit on ‘thrones but browns are the ‘powers’ behind them.   (page 40)

Many people tell you that when dyeing you are to avoid “mud.”  Mud?  Why can’t they just say “brown”?  And why avoid brown?  Indeed, why avoid mud?!  My current dyeing has shown some marvelous possibilities for browns, and browns that will relate to the “brighter purer colours” that I will be using.

I plan on using browns in both warp and weft.  My hope is that they do truly serve as foils for the greens (and red-violets) that I will be using.

Related Post:    Where Do Ideas Come From?


Mud“ was written by Margaret Carpenter for Talking about Weaving and was originally posted on October 12, 2009. ©2009 Margaret Carpenter aka Peg in South Carolina.

Friday, October 9, 2009

BLOCKS TRANSFORMED TO THREADING

(TEACHING AN OLD DOG NEW TRICKS)

Posted by Peg in South Carolina 

Here is the first (of two) page of the printed-out full threading.

image

COPY AND STAMP

I discovered the very time-saving method of copying and stamping that PixeLoom (and probably other weaving programs as well) offers.  This, after several years of using PixeLoom.  I am either a slow learner or slow to investigate the software.

In any case, for the first group of blocks, for each block I wrote out one thread repeat, copied it, and then stamped it for a total of 11 threading units. I did that with each block in the group.

The second group of blocks was simply a repeat of the first.  So I copied each full block (consisting of 11 threading units) and stamped it. 

In the third group of blocks, the same order was followed but each block got progressively smaller.  So I copied only the number of threading units I needed for each block and then stamped it.

In the center group of blocks, a different order was followed and each block had only 3 threading units apiece.  I simply wrote these out by hand.  But instead of writing out the whole thing, I wrote out only half.

At this point, what I needed for the rest of the threading draft was the mirror image of what I had done.  So I clicked on “threading” and then on “reflect” and it happened!  Just a minor cleaning up at the center.

Now, of course, I realize that at the very beginning, once I had finished with the first block group, I could have clicked on “threading”, then on “repeat”.  And with the third I could have done the same, but then edited it by removing unnecessary block units.

This dog may be capable of learning new tricks;  it just takes awhile.

A LOT OF WARP ENDS

The total number of warp ends is 1664.  This is not quite accurate as this includes the blank spaces I incorporated.  When I proof-read the threading (MUST I proofread it?!?---YES I must…….sigh), I will make notes of the number of blanks so that I can subtract them from 1664 and get the real number.

Now I need to proof-read the threading.  I am a lousy proof-reader…………..

Related Post:    Designing the Whole Threading


Blocks Transformed to Threading“ was written by Margaret Carpenter for Talking about Weaving and was originally posted on October 9, 2009. ©2009 Margaret Carpenter aka Peg in South Carolina.

Thursday, October 8, 2009

YELLOW-GREENS AND SOME RED-VIOLET

Posted by Peg in South Carolina

Dulled Yellow Greens
RED-VIOLET

When I saw that red-violet at the far right, I knew a major change of plans was about to happen.  I absolutely have to use that color in this piece.  I have used it to tone the rest of the yellow-greens you see to the left.  As you move from right to left on the card each yellow-green has proportionally more red-violet till it gets to brown (the second sample from the left) and then tips over into red-violet toned by the yellow green (the sample on the left). Yes, that last sample on the left does look brown in the photo, but believe me, in real life it is definitely a variant on red-violet.

I love those toning effects on the yellow-green.  But the pure red-violet.  That’s got to happen.

No, it will not be the major color.  The major colors will still be the greens and yellow-greens.  But that red-violet is going to be important nonetheless.

WARP COLORS

My current thinking (subject to change, of course……..) for the warp colors is to do a warp which moves from browns created by mixing the yellow-green and the red-violet, through the toned greens and back again.   Except for the center portion. 

For the center portion, which will be quite narrow, I am thinking of winding that warp in the white silk. Then I will dye it using ikat tying techniques  so that the top and bottom are one 
or more of the toned greens but the center is the pure, or almost pure, red violet.

A VERY BRIGHT YELLOW-GREEN

In the same dye batch I decided I needed to try for a much brighter yellow-green than I had yet found.  So I included a sample with 5% SAB Turquoise and 95% SAB Sun Yellow on a card with other yellow-greens.
Some yellow greens 
This is the yellow-green on the right on this card.  Pretty bright, huh! I might try toning that with violet, a near-complement.  I’m curious.

NEXT

But the next dyeing will be toning a green with its complement, red.

Yellow-Greens and Some Red-Violet“ was written by Margaret Carpenter for Talking about Weaving and was originally posted on October 8, 2009. ©2009 Margaret Carpenter aka Peg in South Carolina.

Wednesday, October 7, 2009

FOLLOW-UP TO A BAD SILK SKEIN

Posted by Peg in South Carolina

I decided to start with one of the loose-hanging ends.  It wound onto the cone quite smoothly, that is until it stopped because it came to another cut in the yarn.  What I did see, however, is that those loose ends hanging down to the floor in the picture were only a few of the cut ends in the skein.  Unwinding revealed more and more that had been buried in the skein.

I tried another loose end.  This one did not go so well.  So I cut it and decided to go for the other end, the end with the gold 5/2 pearl cotton attached to it.

That wound off just as smoothly as its mate, which I had wound first, did.  And it used up quite a bit of the skein.

Heartened by my success, I took another loose end.  It wound on fine until it came to the end.  There were three more loose ends that I successfully wound on.

And so the skein was unwound. With unexpected ease. All of it on the cone.  With only 10 knots at the most.
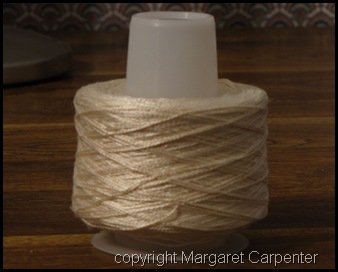
Coned 20.2 silk
Now to make sample skeins for dyeing.

Related Post:  A Bad Silk Skein


Follow-up to a Bad Silk Skein“ was written by Margaret Carpenter for Talking about Weaving and was originally posted on October 7, 2009. ©2009 Margaret Carpenter aka Peg in South Carolina.


Tuesday, October 6, 2009

A BAD SILK SKEIN

Posted by Peg in South Carolina

I was running out of the 2/20 silk on a cone.  Since I have more dye sampling to do, I got out one of my skeins to wind another cone.  I discovered, much to my horror, that the skein contained many cut threads.

Here is what happened when I put the yarn on the skein winder and started winding a cone. 

Skein with many cut ends

No, this is not a bad skein from Treenway Silks.  It is a skein from Treenway but the fault is entirely mine.

A year or two ago, I had received a package of silk from Treenway.  They are very frugal with their packaging and so package the skeins very tightly.  I was careless.  As I cut the package open, I cut into the skein.

I did not throw the skein out.  I figured it was still usable.  On the other hand, I was very slow to wind a cone of it.  So slow that I had forgotten all about it.

Before I started winding, I undid the ties and found the beginning and end of the skein.  I started winding from one of those.  The winding went well until the yarn stopped coming.  I had reached a broken end. 

If you look carefully at the top of the skein in the photo, you can see a heavier golden yellow piece of yarn hanging down from the skein.  This is 5/2 pearl cotton which I tied to the opposite end.  Doing this would keep me from losing it as I wound from the first end.  That 5/2 pearl cotton attached to the end would be my safety net—a place to start again.  I always do this, because I never know what problems are going to happen.

Now I do not know whether to proceed with that end or to take one of those many loose broken ends you see hanging down to the floor.  I know those loose ends will not unwind smoothly.  I will probably have to make a fair number  of knots.  But the good news is that I am not dyeing this yarn for weaving, only for sampling, so knots don’t matter.

Related Post:   
Loose End
Disappointment
That Badly Snarled Skein of Yarn


A Bad Silk Skein“ was written by Margaret Carpenter for Talking about Weaving and was originally posted on October 6, 2009. ©2009 Margaret Carpenter aka Peg in South Carolina.


Monday, October 5, 2009

DESIGNING THE WHOLE THREADING

Posted by Peg in South Carolina 

The block threading design as it now stands (after considerable revisions) is a good outline of the overall design. 

image

To see the block threading design in its previous incarnation, check out this post.  For an even earlier version, go here.

Each individual block is really one threading unit of four ends.  In this design, the most a block gets repeated is two times. At 60 epi,  four, and even eight, warp ends represent only a fraction of an inch.  The base size of a block has to be larger.  And groups of  blocks are going to have to be repeated.

My spacing indicates that there are three groups of blocks.  There is the left side, which slopes down from left to right.  There is the right side, which slopes down in mirror image.  And there is the center group which forms a point twill. The only group that will not be repeated is the center group.  But it will have more than one threading unit in each block.

So here is my (hopefully) final design. Note that I continue to leave blank spaces between the larger block groups so that I can easily differentiate one group from another.

profile threadingThe first block group begins at the top right and ends close to the top left. It consists of blocks 11 units wide.  The exception is the first block, which consists of 12 units.  This is to compensate for the shrinkage at the selvedge so that, hopefully, the extra 4 warp ends will give that block the same width as the others.  I may decide on 13 units.

This first block group is repeated again.  Then a third time, but with  difference.  Here the number of blocks gradually diminishes, until they are down to 3 in number. 

The central unit begins on the third system, near the middle.  In this central unit, each block is repeated only three times. 

Then the left unit begins, a mirror image of the right side.

Next step:  work out the actual threading. 

Related post:   Correcting the Crackle Draft Continued

Designing the Whole Threading“ was written by Margaret Carpenter for Talking about Weaving and was originally posted on October 2, 2009. ©2009 Margaret Carpenter aka Peg in South Carolina.


Friday, October 2, 2009

LAST GREEN SAMPLES

Posted by Peg in South Carolina

Last greens

When I looked at the first two sets of green samples, I saw some gaps I was interested in filling in.  These are the results.

The orange doubled loop visible at the top of the photo is what I used to loop through a skein (one through each skein) to make it easy to dip the individual skeins in and out of each of its Mason jar dye baths. 

NUMBERING THE SKEINS

The piece of paper with the number 2 written on it is a piece of masking tape. After I removed a skein from the dye and rinsed it I put a piece of masking tape on the doubled loop with an identifying number from 1-7.  These numbers referred to the formulas I used for the dyeing.

Numbering them makes it much easier for me to know which finished skein goes with which formula.  I don’t always have to do this because sometimes it is very clear.  In dye pots of yellow and blue, where I simply varied the amount of blue in the five or seven dye pots, it is very easy to distinguish one from another.  But these recipes were more diverse and complex.  I did not trust my eyes.

STARTING THE NEUTRAL SAMPLINGS

Since there were only five greens I wanted to try, I had room for two more colors, so I started on the set of neutrals.
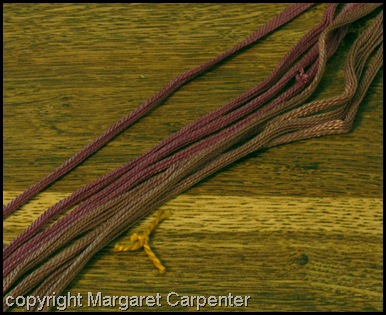
First Neutrals

The two colors I am using in this set to achieve neutrals are yellow-green and red-violet.  The reddish one on the left has 45% red-violet.  The browner one next to it has only 24% red violet.  I had anticipated that it would take less than half of the red-violet to brown the green because red is a very strong color.  I didn’t realize that I would have to drop it down to 1/4 of the total mount.  Red is really a dominating color.

PHOTOGRAPHY NOTE

For those who notice (and care about) such things, I took the two photos on the same table in the same light.  In the top photo, the color of the table is pretty close to what it is in reality.  In the bottom photo, the color is much more yellow. 

This color cast happened because to correct the color balance for the skeins in my software, I had to move the color cast to cyan and to green.  This removed the excess reddish cast but it also removed the reddish cast from the table and so turned it into a yellow-brown.

Playing with lightness and saturation in the two photos also affected the tables differently.

There are ways of dealing with this problem, but they are time-consuming and, quite frankly, I don’t care what the table looks like in the photo!

Some time I might try white paper, but I’m not sure I would like the strong contrast between background and skeins that would happen.  Of course, trying it is the only way to find out!

Related Post:   Two Sets of Greens Done


Last Green Samples“ was written by Margaret Carpenter for Talking about Weaving and was originally posted on October 2, 2009. ©2009 Margaret Carpenter aka Peg in South Carolina.
 

Thursday, October 1, 2009

CORRECTING THE CRACKLE DRAFT CONTINUED

Posted by Peg in South Carolina 

(Note that I had intended today’s post to precede yesterday’s.  That is why the browns are not the same.)

Something was still noticeable in the draft.  The right side diagonals are not as clear as the left side.  It is easier for me to work this out by looking at the top drawdown, not the one I will be using because the treadling is shorter and simpler. 

image

image


Here are the two sides of the drawdown, the left and the right, without the center group of blocks to distract.  Checking carefully row by row reveals some minor differences.  I remembered, too, that when I was checking the threading blocks, there seemed to be some questionable threadings on the left side.

I checked those threadings carefully, found errors and made changes.  And here are the final results,  a symmetrical draft.   At last.

image


Related Post:  A Problem with Crackle Draft

Correcting the Crackle Draft Continued“ was written by Margaret Carpenter for Talking about Weaving and was originally posted on October 1, 2009. ©2009 Margaret Carpenter aka Peg in South Carolina.